
Are you itching to unleash your creativity with Blender, the powerful open-source 3D modeling software? Well, we’ve got you covered! In this article, we’ll guide you step-by-step through the installation process of Blender on three popular Linux distributions: Ubuntu, Debian, and Fedora.
Blender is a versatile tool used by professionals and enthusiasts alike for creating stunning visual effects, animations, and virtual reality experiences. Whether you’re a seasoned artist or just getting started, having Blender installed on your Linux machine is essential.
Understanding the System Requirements
Before diving into the installation process, let’s first make sure your system meets the requirements to run Blender smoothly. Blender is a resource-intensive software, so having a capable computer is crucial for optimal performance.
Blender requires a 64-bit operating system and a graphics card that supports OpenGL 3.3 or higher. Additionally, it’s recommended to have at least 4GB of RAM, although 8GB or more is ideal for complex projects. Make sure your system meets these requirements before proceeding with the installation.
Installing Blender on Ubuntu
Installing Blender on Ubuntu is a straightforward process, thanks to the availability of the software in the official Ubuntu repositories. By using the package manager, you can easily install and update Blender with just a few commands.
- Open the terminal by pressing Ctrl + Alt + T.
- Update the package lists by running the command:
sudo apt update
- Install Blender by typing below command and pressing enter:
sudo apt install blender
- Enter your password when prompted and wait for the installation to complete.
Once the installation is finished, you can launch Blender from the applications menu or by running the command blender in the terminal. Congratulations, you now have Blender installed on your Ubuntu system!
Installing Blender on Debian
For Debian users, there are two methods to install Blender: using the official Debian repositories or downloading the Blender package from the official website. Let’s explore both options.
Method 1: Using the Official Debian Repositories
- Open the terminal by pressing Ctrl + Alt + T.
- Update the package lists by running the command:
sudo apt update
- Install Blender by typing and pressing enter:
sudo apt install blender
- Enter your password when prompted and wait for the installation to complete.
Blender should now be installed on your Debian system. You can launch it from the applications menu or by running the command blender in the terminal.
Method 2: Downloading from the Official Blender Website
If you prefer to download the Blender package directly from the official website, follow these steps:
- Visit the Blender download page at https://www.blender.org/download/.
- Select the version of Blender you want to download.
- Choose the appropriate package for Debian.
- Save the downloaded package to your preferred location.
- Open the terminal and navigate to the directory where the package is saved.
- Extract the package using the command:
tar -xvf blender-*
- Move into the extracted directory using:
cd blender-*
- Run Blender by executing the command:
./blender
Congratulations! You now have Blender installed on your Debian system using either the official repositories or the downloaded package.
Installing Blender on Fedora
Fedora users can easily install Blender using the DNF package manager. Follow these steps to get Blender up and running on your Fedora system:
- Open the terminal by pressing Ctrl + Alt + T.
- Update the package lists by running the command:
sudo dnf update
- Install Blender by typing and pressing enter:
sudo dnf install blender
- Enter your password when prompted and wait for the installation to complete.
Once the installation is finished, you can launch Blender from the applications menu or by running the command blender in the terminal. You’re now ready to dive into the world of 3D modeling and animation with Blender on Fedora!
Troubleshooting Common Installation Issues
While the installation process for Blender is usually smooth, you might encounter some common issues along the way. Here are a few troubleshooting tips to help you overcome these hurdles:
- Dependency Errors: If you encounter dependency errors during installation, try running sudo apt –fix-broken install on Ubuntu or sudo dnf distro-sync on Fedora to resolve them.
- Graphics Driver Issues: If you experience graphical glitches or performance problems, make sure your graphics drivers are up to date. Visit the official website of your graphics card manufacturer to download and install the latest drivers.
- Installation Hangs: If the installation process hangs or takes an unusually long time, try restarting your system and reinstalling Blender.
By following these troubleshooting tips, you should be able to resolve most installation issues and get Blender running smoothly on your Linux distribution.
Configuring Blender for Optimal Performance
Once you have Blender installed, it’s important to configure it for optimal performance on your system. Here are a few tips to help you get the most out of Blender:
- Enable GPU Rendering: If your graphics card supports it, enable GPU rendering in Blender’s preferences to accelerate rendering times.
- Adjust Memory Settings: In Blender’s preferences, you can adjust the memory settings to allocate more RAM for your projects. Increase the tile size and enable persistent images to optimize performance.
- Utilize Cycles Rendering: Blender’s Cycles rendering engine offers realistic lighting and materials. Experiment with different settings to achieve the desired results.
Taking the time to configure Blender according to your system’s capabilities will greatly enhance your workflow and productivity.
Exploring the Blender Interface
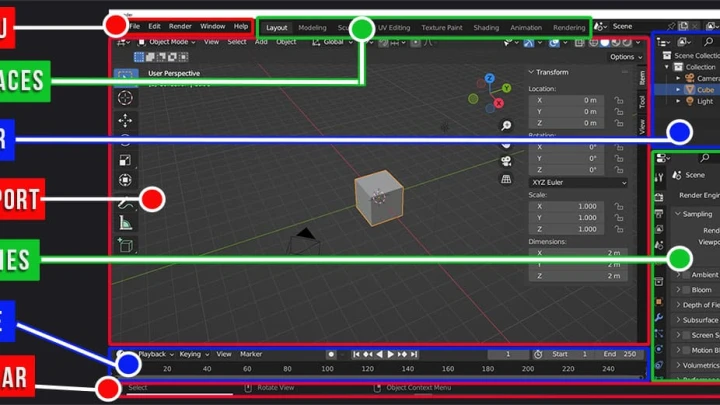
Now that you have Blender installed and configured, let’s take a quick tour of the Blender interface. Familiarizing yourself with the various panels, tools, and menus will help you navigate the software with ease.
Blender’s interface is divided into several key areas, including the viewport, properties panel, outliner, and timeline. Spend some time exploring each of these areas to understand their functions and how they contribute to the modeling and animation process.
Getting Started with Basic Modeling in Blender
With Blender installed, configured, and the interface understood, it’s time to dive into the exciting world of 3D modeling! Here are a few basic steps to get you started:
- Add Objects: Blender offers a wide range of primitive objects, such as cubes, spheres, and cylinders. Learn how to add and manipulate these objects in your scene.
- Edit Mode: Switch to edit mode to modify the vertices, edges, and faces of your objects. This is where you can truly shape and mold your creations.
- Modifiers: Explore Blender’s modifier stack to apply various effects and transformations to your objects. Experiment with modifiers like Subdivision Surface and Bevel to add detail and smoothness to your models.
- Materials and Textures: Learn how to apply materials and textures to your objects to give them color, shine, and texture. Blender offers a wide range of material options to unleash your creativity.
By following these basic modeling steps, you’ll be well on your way to creating your own 3D masterpieces in Blender.
Conclusion and Additional Resources
Congratulations! You’ve successfully installed Blender on your Linux distribution of choice and gained a basic understanding of its interface and modeling capabilities. With Blender, the possibilities for creativity are endless.
To further enhance your Blender skills, consider exploring additional resources such as online tutorials, forums, and video courses. The Blender community is vast and supportive, offering a wealth of knowledge and inspiration.
Now it’s time to let your imagination run wild and bring your ideas to life with Blender. Happy modeling and animating!

Nishant Verma is a senior web developer who love to share his knowledge about Linux, SysAdmin, and more other web handlers. Currently, he loves to write as content contributor for ServoNode.


