
Introduction To Virtual Machine Monitor Memory
Virtual machines have revolutionized computing, allowing users to run multiple operating systems and applications on a single physical computer. This technology, highly valuable for developers, testers, and those who need diverse environments, is integral to modern computing. However, a common issue that many Windows 10/11 users encounter is the excessive memory and CPU usage by a process called Vmmem.
Vmmem is a critical component in Windows, as it manages the virtual machine processes. It plays a pivotal role in providing the resources needed for virtual machines to run smoothly. Nevertheless, when this process starts hogging excessive memory and CPU, it can lead to sluggish system performance and hinder your multitasking capabilities.
In this article, you’ll get to know about the specifics of Vmmem, explore its common causes, and get a step-by-step guide to troubleshoot and resolve the high memory and CPU usage issue it often creates on Windows systems. By the end, you’ll have a clearer understanding of how to optimize your system’s virtualization performance.
What is Vmmem High Memory and CPU Usage Issue?
In the world of virtualization, Vmmem, short for Virtual Machine Monitor Memory, is a crucial component in Windows operating system. It plays the role of a bridge between your physical hardware and the virtual machines you run on your system. Vmmem ensures that these virtual environments have the necessary resources, like memory and CPU, to operate smoothly.
However, when Vmmem starts consuming an inordinate amount of system resources, it leads to the high memory and CPU usage issue. This essentially means that Vmmem is monopolizing your computer’s vital components, causing other applications and processes to slow down or even freeze. The impact of this problem can be profound, leading to a decrease in overall system performance, laggy user experiences, and the frustration of seeing your computer’s resources go to waste on a process that’s not well-optimized.
Causes of Vmmem High Memory and CPU Usage
Several factors can lead to the notorious Vmmem-related performance problems that plague Windows 11/10 users. These factors, when left unaddressed, can result in your system’s memory and CPU resources being gobbled up by Vmmem, ultimately causing system slowdowns and frustrations.
- Running Virtual Machines: If you’re running virtual machines on your Windows 10 PC, Vmmem is naturally active to facilitate their operations. However, if the virtual machines are assigned too many resources or if there are too many of them running simultaneously, it can lead to excessive memory and CPU usage.
- Resource Allocation: Vmmem is responsible for resource allocation between your physical hardware and virtual environments. If the allocation isn’t managed properly, it can lead to Vmmem consuming an undue amount of resources, causing other applications to suffer.
- System Resource Conflicts: Sometimes, Vmmem conflicts with other system processes or applications, leading to heightened resource consumption. This could be due to outdated drivers, software conflicts, or resource contention between Vmmem and other running processes.
Understanding these common causes is essential to troubleshooting the Vmmem high memory and CPU usage issue effectively. By addressing these root problems, you can ensure that your Windows system operates smoothly and efficiently. In the following sections of this article, we’ll delve into detailed steps to resolve this issue and prevent it from recurring.
Troubleshooting Vmmem High Memory Usage
Resolving the Vmmem high memory and CPU usage issue requires a systematic approach. This step-by-step guide will help you identify and address the problem effectively:
1. Adjust Virtual Machine Settings
- If you’re running virtual machines, start by reviewing their settings. Ensure that you allocate resources, such as RAM and CPU cores, judiciously.
- Adjust the resource allocation based on your system’s capacity and the needs of your virtual machines. Over-allocating can cause Vmmem to consume excessive resources.
2. Monitor Resource Allocation
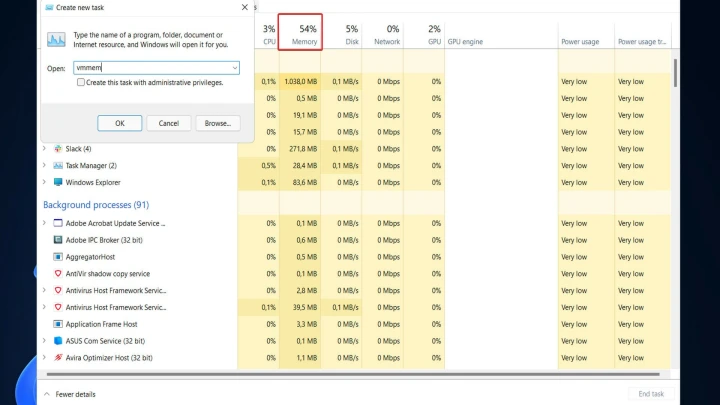
- Keep a close eye on how your resources are being allocated. Windows OS provides tools like Task Manager and Resource Monitor to track memory and CPU usage.
- Identify which processes or virtual machines are responsible for the resource consumption. This information will help you pinpoint the issue.
3. Optimize Windows 10/11 for Virtualization
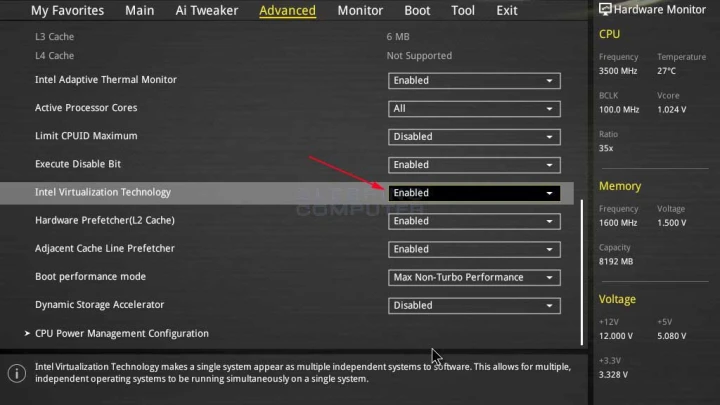
- Ensure that your system is optimized for virtualization. To do this, access your system’s BIOS or UEFI settings and enable virtualization support (VT-x/AMD-V).
- Update your motherboard firmware to the latest version to enhance virtualization support.
4. Disable Unnecessary Features
- In Windows, some features like Hyper-V can interfere with other virtualization tools, leading to high Vmmem resource usage. Disable Hyper-V if you’re not using it.
- To disable Hyper-V, open Control Panel, go to “Programs,” then “Turn Windows features on or off,” and uncheck “Hyper-V.”

5. Manage Background Applications
Reduce the number of background applications running on your system. Close unnecessary applications and processes to free up system resources.
6. Update Drivers
Ensure all your hardware drivers are up-to-date. Outdated drivers can lead to resource conflicts and performance issues. Visit the official websites of your hardware components, such as your graphics card and motherboard, to download the latest drivers. To avoid hassles of identifying, searching, downloading and installing outdated drivers, you can choose automated solution as well, which works efficiently to save your time and effort.
2. Install the updater and click on Scan Now button to start the scan for problematic/outdated drivers.
3. Select the drivers you want to install or click Update All button to update all drivers.
7. Check for Malware
Perform a comprehensive malware scan using reliable antivirus software. Malware can hijack system resources and cause unexpected performance issues.
8. Defragment Drives
Regularly defragment your hard drives to optimize their performance. Fragmented drives can slow down your system and lead to higher resource usage.

By following this step-by-step guide, you can effectively troubleshoot and resolve the Vmmem high memory and CPU usage issue in Windows 11/10. Once resolved, your system should operate smoothly, even when running virtual machines or resource-intensive applications.
How to Prevent it in future?
Preventing future Vmmem-related performance issues hinges on efficient virtual machine management and regular Windows 10 updates. Ensure your virtual machine settings align with your system’s capabilities, optimizing resource allocation. Keep a vigilant eye on resource usage and regularly update drivers. Be proactive against malware with reliable security software. Disabling unnecessary background applications, defragmenting drives, and minimizing system feature conflicts will help maintain a well-balanced system performance.
Conclusion
Tackling Vmmem-induced high memory and CPU usage in Windows 11/10 is crucial for maintaining a smoothly functioning system. The significance of this issue lies in its ability to disrupt your computer’s performance, especially if you’re a frequent user of virtual machines.
By taking proactive measures and employing best practices like efficient virtual machine management and keeping your system and software up-to-date, you can prevent the recurrence of Vmmem-related performance woes. In doing so, you’ll ensure that your Windows 10 experience remains efficient, responsive, and hassle-free. If you have any question, you can click to Visit Our Discussion Board.

Nishant Verma is a senior web developer who love to share his knowledge about Linux, SysAdmin, and more other web handlers. Currently, he loves to write as content contributor for ServoNode.