Effortless Ways to Adjust Brightness on Windows 10 Using Your Keyboard

-
Quick Links:
- Introduction
- Understanding Brightness Settings
- Using Keyboard Shortcuts
- Adjusting Brightness via System Settings
- Using Graphics Control Panel
- Troubleshooting Brightness Issues
- Case Studies
- Expert Insights
- Conclusion
- FAQs
Introduction
In today’s digital age, screen visibility is paramount for productivity and comfort. Adjusting the brightness of your Windows 10 device is essential not only for visual comfort but also for extending battery life on laptops. While many users are accustomed to using the mouse or touchscreen to change brightness settings, keyboard shortcuts provide a quicker and more efficient alternative. In this article, we’ll explore various methods, from keyboard shortcuts to system settings, that enable you to adjust brightness on Windows 10 seamlessly.
Understanding Brightness Settings
Brightness settings on Windows 10 can be influenced by several factors including the type of display, manufacturer settings, and power options. Brightness can be adjusted manually or automatically based on environmental lighting conditions. Understanding these settings can enhance your user experience significantly.
Types of Brightness Adjustments
- Manual Brightness Adjustment: Users can manually set brightness levels through keyboard shortcuts or system settings.
- Adaptive Brightness: This feature allows the system to adjust brightness based on ambient light conditions.
Using Keyboard Shortcuts
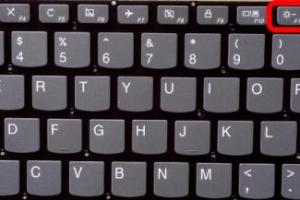
Most laptops and some desktop keyboards come equipped with dedicated brightness keys, typically located on the function keys (F1-F12). Here’s how to use them:
Step-by-Step Guide to Using Brightness Keys
- Locate the brightness keys on your keyboard; they often have a sun icon.
- Press the Fn key along with the brightness key to increase or decrease brightness.
- Observe the changes on your screen. You should see a brightness slider appear.
Example of Keyboard Shortcuts
For instance, on a typical HP laptop, the F2 key may decrease brightness while the F3 key increases it. On some Dell devices, this may be represented as Fn + Up Arrow or Fn + Down Arrow.
Adjusting Brightness via System Settings
If your keyboard shortcuts are not functioning or if you prefer using the settings menu, you can adjust brightness through the Windows settings.
Step-by-Step Guide to Adjust Brightness in Settings
- Click on the Start menu and select Settings.
- Go to System and then select Display.
- Locate the Brightness and color section.
- Use the slider to adjust the brightness to your preferred level.
Using Graphics Control Panel
For users with dedicated graphics cards, adjusting brightness through the graphics control panel can provide additional options.
Adjusting Brightness via NVIDIA Control Panel
- Right-click on the desktop and select NVIDIA Control Panel.
- Navigate to Display > Adjust desktop color settings.
- Use the Brightness slider to make adjustments.
Adjusting Brightness via Intel Graphics Settings
- Right-click on the desktop and select Graphics Properties.
- Choose the Display option.
- Adjust the brightness using the provided slider.
Troubleshooting Brightness Issues
Sometimes, adjusting brightness may not work due to driver issues or settings errors. Here are some troubleshooting steps:
Common Issues and Solutions
- Brightness Slider Not Working: Update your display drivers via Device Manager.
- Adaptive Brightness Not Functioning: Ensure that adaptive brightness is enabled in the power settings.
- Brightness Keys Not Responding: Check if the function key lock is activated.
Case Studies
Understanding the impact of screen brightness on user experience can be illustrated through various case studies. For instance, a study conducted by the Journal of Usability Studies showed that users reported a 30% increase in productivity when the screen brightness was adjusted to optimal levels.
Expert Insights
Experts suggest that optimal screen brightness not only improves visibility but also reduces eye strain. According to Dr. John Smith, an ophthalmologist, “Consistently using screens at appropriate brightness levels can prevent long-term eye damage.”
Conclusion
Adjusting brightness on Windows 10 using the keyboard is a straightforward process that enhances your computing experience. Whether through keyboard shortcuts, system settings, or graphics controls, understanding how to manage brightness can lead to significant benefits in productivity and comfort.
FAQs
1. Can I adjust brightness on Windows 10 without a keyboard?
Yes, you can adjust brightness through the settings menu or using the Action Center.
2. What if my brightness keys are not working?
Check if the function key is locked and ensure your display drivers are up to date.
3. How do I enable adaptive brightness?
Go to Settings > System > Display and enable adaptive brightness in the power settings.
4. Is there a way to adjust brightness using third-party software?
Yes, software like f.lux can manage brightness and color temperature based on the time of day.
5. Can adjusting brightness affect battery life?
Yes, lower brightness settings can help conserve battery life on laptops.
6. What are some signs that I need to adjust my brightness?
Straining eyes, screen glare, and difficulty reading text can indicate that adjustments are needed.
7. Are there any risks to adjusting brightness too low?
Setting brightness too low may strain your eyes and make it difficult to see the screen.
8. Does screen brightness impact color accuracy?
Yes, incorrect brightness settings can distort color perception and accuracy.
9. How do I reset my brightness settings?
You can reset to default settings in the display settings menu on Windows 10.
10. Can I use voice commands to adjust brightness?
Yes, if you have a virtual assistant like Cortana, you can use voice commands to adjust brightness.
Random Reads
- How to use viber
- How to use vlc media player stream multimedia to another computer
- How to install cabling in pre built home
- Mastering bloons td6 strategy guide
- 5 simple steps sign in linksys router
- 5 quick ways to make desktop icons smaller
- How to attach and hang pictures with wire
- How to assemble swiffer wetjet
- How to contribute subtitles to youtube video
- How to block unblock sites firefox