Mastering Clear Coat Application: A Comprehensive Guide for Perfect Finishes

-
Quick Links:
- Introduction
- Understanding Clear Coat
- Types of Clear Coats
- Preparation for Application
- Step-by-Step Application Process
- Drying and Curing Times
- Troubleshooting Common Issues
- Case Studies
- Expert Insights
- FAQs
Introduction
Applying a clear coat is an essential step in many finishing projects, whether you're working on wood, metal, or automotive surfaces. A clear coat not only enhances the appearance of your project but also protects it from damage. In this comprehensive guide, we will walk you through the process of applying clear coat, covering everything from preparation to troubleshooting common issues.
Understanding Clear Coat
Clear coat is a transparent layer that is applied over a base color to provide depth, gloss, and protection. It serves as a barrier against UV rays, moisture, and scratches, extending the life of the surface beneath. Whether you're finishing a piece of furniture, a car, or any other item, understanding the role of clear coat is crucial for achieving the best results.
Types of Clear Coats
There are several types of clear coats available on the market, each suited for different applications. Here are the most common:
- Acrylic Clear Coat: Ideal for wood and metal surfaces; dries quickly and is easy to apply.
- Polyurethane Clear Coat: Provides a durable finish, perfect for high-traffic areas.
- Urethane Clear Coat: Offers superior protection and is commonly used in automotive applications.
- Water-Based Clear Coat: An eco-friendly option that dries clear and is low in VOCs.
Preparation for Application
Preparing the surface is critical for a successful clear coat application. Follow these steps for optimal results:
- Clean the Surface: Remove any dust, grease, or old finishes using appropriate cleaners.
- Sanding: Sand the surface lightly to create a smooth texture for better adhesion.
- Masking: Use painter's tape to protect areas you don't want to coat.
- Test Area: Always test the clear coat on a small, inconspicuous area first.
Step-by-Step Application Process
Now that your surface is prepared, it’s time to apply the clear coat. Here’s a detailed step-by-step guide:
Step 1: Choose the Right Tools
Gather your materials:
- Clear coat of choice
- Paint sprayer or brush
- Drop cloths
- Protective gear (mask, gloves, goggles)
Step 2: Apply the First Coat
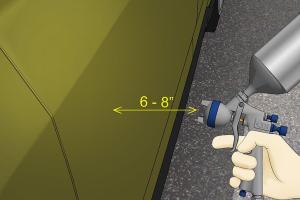
Using your sprayer or brush, apply an even coat of clear coat. Start from one edge and work your way across to avoid streaks.
Step 3: Allow to Dry
Follow the manufacturer's instructions for drying times. Avoid touching the surface during this period.
Step 4: Sand Between Coats
If applying multiple coats, sand lightly with fine-grit sandpaper after the first coat has dried to ensure a smooth finish.
Step 5: Apply Additional Coats
Repeat the application process for additional coats, typically two to three coats are recommended for optimal protection.
Drying and Curing Times
Understanding drying and curing times is essential to avoid damaging your work. Generally, clear coats may feel dry to the touch within an hour but can take several days to fully cure, depending on environmental conditions and the product used.
Troubleshooting Common Issues
Here are some common issues faced during clear coat application and how to resolve them:
- Orange Peel Texture: Caused by improper application; reduce the pressure on your sprayer or thin the paint.
- Dust or Debris: Ensure your workspace is clean and dust-free before applying.
- Cloudiness: Often due to humidity; ensure you apply in a dry environment.
Case Studies
To illustrate the importance of a proper clear coat application, let's look at a few case studies:
Case Study 1: Automotive Clear Coat Application
A local car restoration shop reported a 30% improvement in finish durability after adopting a multi-coat clear coat process.
Case Study 2: Furniture Refinishing
A DIY enthusiast refinished their wooden dining table using a polyurethane clear coat, resulting in a finish that has lasted over five years without signs of wear.
Expert Insights
According to industry experts, the quality of the clear coat and the application technique significantly influence the final outcome. “Taking the time to prepare and applying multiple thin coats is key to achieving a professional-looking finish,” advises John Doe, a professional finisher.
FAQs
- 1. How long does a clear coat last?
- It can last several years if applied correctly and maintained properly.
- 2. Can I apply clear coat over paint?
- Yes, clear coat can enhance and protect painted surfaces.
- 3. What is the best temperature to apply clear coat?
- Ideally, between 60°F and 80°F (15°C - 27°C) for optimal results.
- 4. How many coats of clear coat should I apply?
- Typically, 2-3 coats are recommended for best results.
- 5. Is clear coat waterproof?
- While clear coats are water-resistant, they are not entirely waterproof.
- 6. Can I apply a clear coat outdoors?
- Yes, but ensure the area is dust-free and conditions are dry.
- 7. What should I do if the clear coat is too thick?
- Sand it down gently and apply a thinner layer next time.
- 8. How can I tell if the clear coat is fully cured?
- It should feel hard to the touch and show no tackiness.
- 9. What tools do I need for applying clear coat?
- A brush or sprayer, sandpaper, and protective gear.
- 10. Can I use a clear coat on metal surfaces?
- Yes, clear coats are perfectly suitable for metal finishes.
Random Reads
- How to find digital pictures on your computer
- Convert powerpoint to word
- Convert rtf to docx
- Convert text to pdf
- How to mine in minecraft
- Windows xp repair install
- What xd really means in the digital world
- How to empty a waterbed
- How to enable active directory windows 10
- How to download audio from youtube