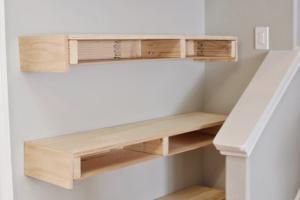
Ultimate Guide to Building Simple Floating Shelves for Any Room

-
Quick Links:
- Introduction
- Benefits of Floating Shelves
- Materials Needed
- Tools Required
- Step-by-Step Guide
- Design Considerations
- Case Studies
- Expert Insights
- Maintenance Tips
- FAQs
Introduction
Floating shelves have become increasingly popular in modern home decor due to their minimalist aesthetic and versatile functionality. These shelves create an illusion of space, making them ideal for small apartments and large homes alike. In this comprehensive guide, we will walk you through everything you need to know about building simple floating shelves, including materials, tools, and a step-by-step guide to installation.
Benefits of Floating Shelves
Floating shelves provide numerous advantages:
- Space-saving: They take up no floor space, making them perfect for small areas.
- Versatile design: Available in various styles and finishes, they can complement any decor.
- Easy to install: With the right tools and instructions, anyone can build floating shelves.
- Customizable: You can choose the size, color, and material to match your aesthetic needs.
Materials Needed
Here is a list of materials you will need:
- Wood planks (choose your preferred type: pine, oak, or plywood)
- Wood screws
- Wall brackets or mounting hardware
- Wood glue (optional)
- Sandpaper (various grits)
- Wood stain or paint (optional)
Tools Required
To complete your floating shelves, you will need the following tools:
- Measuring tape
- Level
- Drill
- Screwdriver
- Stud finder
- Paintbrush (if finishing)
- Clamps (optional)
Step-by-Step Guide
Step 1: Planning Your Shelves
Before you start building, determine how many shelves you want and their locations. Consider wall studs for mounting, as this will provide the necessary support.
Step 2: Cutting the Wood
Measure and cut your wood planks to the desired length. A standard shelf depth is usually between 10-12 inches. Use sandpaper to smooth the edges.
Step 3: Finishing the Wood
If you choose to stain or paint, apply your finish evenly and let it dry according to the manufacturer's instructions.
Step 4: Installing the Mounting Hardware
Using a stud finder, locate the studs in your wall. Mark where the brackets will go and drill pilot holes. Attach the brackets securely to the wall.
Step 5: Attaching the Shelves
Place your shelves on the mounted brackets. Ensure they are level and secure them in place using screws.
Step 6: Final Touches
Inspect your shelves for stability and make any necessary adjustments. Decorate them with your favorite items!
Design Considerations
When designing your floating shelves, consider the following:
- Color and finish: Choose a finish that complements your room.
- Weight capacity: Ensure shelves can support the items you plan to place on them.
- Spacing: Consider how much space you need between shelves for decor items.
Case Studies
Many homeowners have successfully integrated floating shelves into their spaces. For example, a small apartment in New York City utilized floating shelves to create additional storage without cluttering the floor space. By using reclaimed wood and industrial metal brackets, they achieved a rustic yet modern look.
Expert Insights
Home improvement expert Jane Doe advises, "Always consider the weight of the items you want to display. When in doubt, reinforce the brackets or choose thicker shelves." Her experience shows that proper planning leads to successful installations.
Maintenance Tips
To keep your floating shelves looking great:
- Dust regularly to prevent buildup.
- Check brackets periodically for looseness.
- Reapply finish as needed to maintain appearance.
FAQs
1. What materials are best for floating shelves?
Pine and oak are popular choices due to their durability and aesthetic appeal. Plywood is also a cost-effective option.
2. How much weight can floating shelves hold?
The weight capacity depends on the type of brackets used and how they are mounted. Typically, brackets can hold anywhere from 20 to 100 pounds.
3. Can I install floating shelves without brackets?
While brackets provide the best support, you can use hidden support systems designed for floating shelves.
4. How do I choose the right size for my shelves?
Consider the space available and what items you plan to display. A depth of 10-12 inches is standard for most decor.
5. Are floating shelves difficult to install?
With the right tools and instructions, floating shelves are relatively easy to install. Take your time and follow steps carefully.
6. Can floating shelves be used in the kitchen?
Yes! Floating shelves are great for kitchens to store spices, cookbooks, and decorative items.
7. How do I maintain my floating shelves?
Regular dusting and checking brackets for looseness will keep your shelves looking great and secure.
8. What style of floating shelves should I choose?
Choose a style that complements your existing decor, whether that’s rustic, modern, or industrial.
9. Can I customize the finish of my shelves?
Absolutely! You can stain, paint, or leave the wood natural depending on your design preference.
10. Where can I find inspiration for floating shelf designs?
Websites like Pinterest, Houzz, and home improvement blogs offer a plethora of ideas and inspiration.
Random Reads
- Mastering utorrent file sharing
- How to refinish brass
- How to reduce video size
- Pairing samsung remote tv troubleshooting
- Pair wireless headphones pc mac
- Deep web guide
- Delete horizontal line word
- A guide to using your samsung tv remote to control a cable box
- How to start programming in python
- How to steal rhino tank gta v