
This article here is subjected to help users to install latest version of VS (Visual Studio) Code on Ubuntu Linux versions like 21.04, 20.04, 18.04, and so on using various approaches.
Introduction To Visual Studio Code
Developed by Microsoft Inc., the Visual Studio Code is a very powerful and open source code editor application. It’s loaded with various features like debugging support, embedded GIT control, syntax highlighting, and many more options that altogether makes the coding very easy.
So, if you love coding and seeking such an application that can easily help you to do so, then VS Code is for you. Technically, it’s available for cross platforms including Windows, Mac OS, and Linux Versions as well. So, let’s learn how to install the VS Code on Ubuntu desktop environment.
How to install Visual Studio Code in Ubuntu?
To begin with VS Code on an Ubuntu OS and its derivatives, we can install the package easily with a number of approaches, which are discussed below:
Approach 1: Installing VS Code using Software Center
If you prefer to install various packages on your Ubuntu machine using its built-in Software Center app, the it’s too the easiest way to install VS Code too. Just launch Ubuntu Software or Software Center on your machine and type “visual studio code” to search for the package.
Click on the preferred package in the search results, and a button labelled “Install” will appear before you. Just click on the button to start installing the app easily.
The installation may take some time depending on your internet speed, however it should be completed in just a few minutes.
Approach 2: Installing VS Code using APT
The another easiest way to install Visual Studio Code on Ubuntu is via terminal using apt command. We will actually download the package from official Microsoft APT repositories, and install it on machine.
First of all, update the Ubuntu packages index and install required dependencies:
sudo apt update
sudo apt install software-properties-common apt-transport-https wget
Next is to use wget command to import Micosoft GPG key and enabling VS Code repository by running below commands:
wget -q https://packages.microsoft.com/keys/microsoft.asc -O- | sudo apt-key add -
sudo add-apt-repository "deb [arch=amd64] https://packages.microsoft.com/repos/vscode stable main"
Finally, install the Visual Studio Code package by running the command here:
sudo apt install code
This will easily install the latest version of VS Code on your system. If any new version is released later, you can update the installed package using either Software Update Tool in Ubuntu or with the commands here in terminal.
sudo apt update
sudo apt upgrade
Approach 3: Installing VS Code using Snap
Installing different packages using Snap package manager is quite easy. If you have not yet enabled the this package manager on your Ubuntu, you can read our previous article, “Installing Snap in Linux Distros“ to learn how to install this package manager on your machine.
After you have installed and enabled Snap on Ubuntu, run the following code to install Visual Studio Code easily.
sudo snap install code –classic
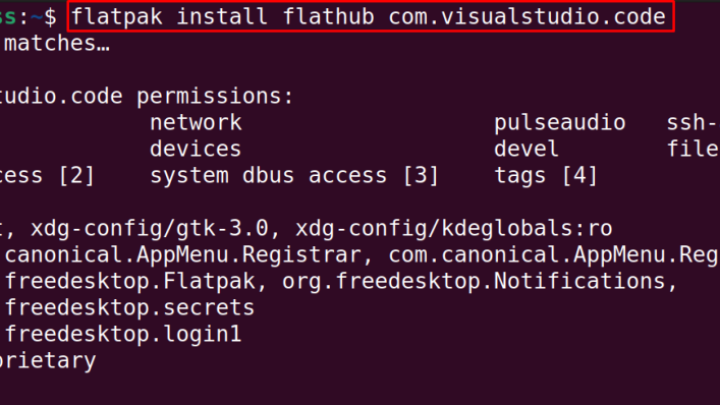
Approach 4: Installing VS Code using Flatpak
To begin with Visual Studio Code flatpak, you need to install Flatpak package manager first. Once done, you can install the VS Code easily by running the following command in terminal:
flatpak install flathub com.visualstudio.code
Alternatively, visit the Flathub Online Store and click on Install button to start the installation easily.
To launch VS Code flatpak on your system, run this command.
flatpak run com.visualstudio.code
Launching Visual Studio Code
In order to start the app if installed with first 3 methods, the easiest option is to search the package in Activities search bar in Ubuntu, and click on its icon to start the app.
Alternatively, you can also just type ‘code’ and press Enter to start the app through command line.
After the app starts for the first time, you can see the following screen, where you can install different extensions and configure the app according to your preferences easily.

Conclusion
Visual Studio Code is an open source application that is available for cross platforms. It offers wide range of features to users to write code and do more out of this package. And in this article, we have discussed how the app can easily be installed on Ubuntu Linux based computers. Do share this tutorial with your friends. If you have any question, you can click to Visit Our Discussion Board.

Nishant Verma is a senior web developer who love to share his knowledge about Linux, SysAdmin, and more other web handlers. Currently, he loves to write as content contributor for ServoNode.


