A Comprehensive Beginner's Guide to Mastering Microsoft Publisher

-
Quick Links:
- Introduction
- Getting Started with Microsoft Publisher
- Understanding the Microsoft Publisher Interface
- Creating Your First Document
- Designing Tips and Tricks
- Using Templates in Microsoft Publisher
- Importing Images and Graphics
- Printing and Publishing Your Work
- Case Studies and Real-World Applications
- Common Mistakes to Avoid
- Conclusion
- FAQs
Introduction
Microsoft Publisher is a powerful desktop publishing software that allows users to create a variety of professional-looking documents, from brochures to newsletters. Whether you are a small business owner, a teacher, or simply looking to enhance your personal projects, Publisher provides the tools needed to make your ideas a reality. In this comprehensive guide, we will explore the ins and outs of using Microsoft Publisher, focusing on practical tips, step-by-step instructions, and real-world applications.
Getting Started with Microsoft Publisher
Before diving into the features of Publisher, it’s essential to ensure you have the necessary software installed on your computer. Microsoft Publisher is part of the Microsoft Office suite, which can be purchased or subscribed to via Microsoft 365.
System Requirements
- Operating System: Windows 10 or later, or MacOS
- RAM: 4 GB (64-bit); 2 GB (32-bit)
- Processor: 1.6 GHz or faster
- Hard Disk: Up to 4 GB of available disk space
Installation Process
- Visit the official Microsoft website or open the Microsoft Store.
- Select Microsoft Publisher from the available products.
- Follow the on-screen prompts to download and install the software.
Understanding the Microsoft Publisher Interface
Once you have installed Microsoft Publisher, it’s crucial to familiarize yourself with its interface. The layout is user-friendly, allowing for seamless navigation.
Main Components of the Interface
- Ribbon: Contains tabs and commands for editing and formatting your document.
- Page Navigation Pane: Allows you to move between pages easily.
- Work Area: The central area where you create and edit your document.
- Status Bar: Displays information about the current document.
Creating Your First Document
To create a new document in Microsoft Publisher, follow these steps:
- Open Microsoft Publisher.
- Select 'New' from the File menu.
- Choose a Blank Document or a Template.
- Begin customizing your document using the Ribbon tools.
Designing Tips and Tricks
Design is a crucial aspect of desktop publishing. Here are some tips to enhance your design skills:
- Use Grids and Guides: Align elements neatly.
- Choose Complementary Colors: Stick to a color palette to maintain harmony.
- Limit Fonts: Use a maximum of two or three fonts to avoid clutter.
Using Templates in Microsoft Publisher
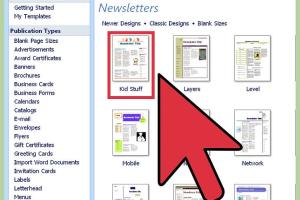
Templates can save you time and provide inspiration. Microsoft Publisher offers a variety of templates suitable for different projects.
To use a template:
- Select 'New' from the File menu.
- Browse through the available templates.
- Click on a template to preview it.
- Select 'Create' to start editing.
Importing Images and Graphics
Visual elements can significantly enhance your document. Here’s how to import images:
- Go to the 'Insert' tab in the Ribbon.
- Select 'Pictures' or 'Online Pictures'.
- Choose the image you want to import.
- Resize and position it as needed.
Printing and Publishing Your Work
Once you’re satisfied with your document, it’s time to print or publish it:
- Click on 'File' and select 'Print'.
- Choose your printer and settings.
- Click 'Print' to produce your document.
Case Studies and Real-World Applications
To illustrate the practical use of Microsoft Publisher, let’s explore some case studies:
Case Study 1: Small Business Marketing
A small coffee shop utilized Microsoft Publisher to create attractive flyers for promotions, resulting in a 30% increase in customer visits within a month.
Case Study 2: School Newsletter
A local school used Publisher to design a monthly newsletter, improving communication with parents and increasing engagement in school activities.
Common Mistakes to Avoid
Even seasoned users can make mistakes. Here are some common pitfalls to avoid:
- Overloading a design with text and images.
- Neglecting to proofread content before printing.
- Using low-resolution images that appear pixelated when printed.
Conclusion
Microsoft Publisher is an invaluable tool for anyone looking to create professional documents with ease. By understanding its features and functionalities, you can enhance your design skills and produce stunning publications. Practice regularly, utilize templates, and don’t hesitate to experiment with different designs. With time and experience, you'll be able to harness the full potential of Microsoft Publisher.
FAQs
- What is Microsoft Publisher used for? Microsoft Publisher is used for creating a variety of documents such as brochures, flyers, newsletters, and more.
- Is Microsoft Publisher free? No, Microsoft Publisher is not free, but it is available as part of the Microsoft Office suite or through a Microsoft 365 subscription.
- Can I create custom templates in Publisher? Yes, you can create and save custom templates for future use in Microsoft Publisher.
- What file formats can I export documents to in Publisher? You can export documents in formats like PDF, XPS, and image files.
- Is Microsoft Publisher suitable for beginners? Yes, it is designed to be user-friendly, making it suitable for beginners.
- Does Microsoft Publisher have customer support? Yes, Microsoft offers support through their website for Publisher and other Office products.
- Can I collaborate with others on a Publisher document? Collaboration is limited in Publisher, but you can share the document through email or cloud services.
- How does Publisher compare to other design software? Publisher is simpler to use than professional design software like Adobe InDesign, but it may lack some advanced features.
- Are there any online resources for learning Publisher? Yes, there are many tutorials and courses available online for free or at a cost.
- What is the latest version of Microsoft Publisher? As of October 2023, the latest version is part of Microsoft 365, which receives regular updates.