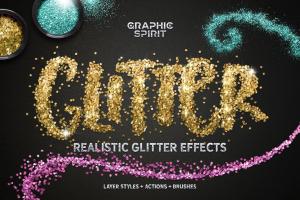
Create Stunning Glitter Effects in Photoshop: A Comprehensive Guide

-
Quick Links:
- Introduction
- What is a Glitter Effect?
- Why Use Glitter Effects in Design?
- Preparing Your Image for Glitter Effects
- Creating the Glitter Effect in Photoshop
- Advanced Techniques for Glitter Effects
- Case Studies and Examples
- Common Mistakes to Avoid
- Expert Insights on Glitter Effects
- FAQs
Introduction
Creating stunning visual effects is an essential skill for any graphic designer or digital artist. One of the most eye-catching and popular effects is the glitter effect. This guide will take you through the process of creating a glitter effect in Photoshop, from the basic steps to advanced techniques that will make your designs shine.
What is a Glitter Effect?
The glitter effect simulates the appearance of sparkling particles or glitter on a surface. It can be used in various design projects, such as invitations, party flyers, social media graphics, and more.
Why Use Glitter Effects in Design?
- Attention-Grabbing: Glitter effects draw the viewer's eye, making your designs more engaging.
- Versatile: They can be applied to text, backgrounds, and images for various effects.
- Creative Expression: Glitter effects allow designers to showcase their creativity and uniqueness.
Preparing Your Image for Glitter Effects
Before diving into the glitter effect creation process, it’s essential to prepare your image. Follow these steps:
- Choose a high-resolution image that will serve as a backdrop for your glitter effect.
- Open the image in Photoshop and create a new layer for the glitter effect.
- Adjust the image's brightness and contrast to ensure the glitter stands out.
Creating the Glitter Effect in Photoshop
Step 1: Create a New Layer
In your Layers panel, click on the "New Layer" button to add a new layer for the glitter effect.
Step 2: Select a Glitter Texture
You can find free glitter textures online or create your own. Import the texture into Photoshop and drag it onto your new layer.
Step 3: Blend the Glitter Texture
Change the blending mode of the glitter layer to "Screen" or "Overlay" to allow the background image to show through.
Step 4: Adjust Opacity
Reduce the opacity of the glitter layer to achieve the desired effect. A range between 50% to 80% usually works well.
Step 5: Add Layer Styles
Double-click the glitter layer to open the Layer Style dialog box. Experiment with styles such as Bevel & Emboss or Drop Shadow for added depth.
Step 6: Final Adjustments
Use the Eraser tool with a soft brush to remove any unwanted glitter areas. You can also apply a mask to fine-tune the effect further.
Advanced Techniques for Glitter Effects
Once you've mastered the basic glitter effect, consider trying these advanced techniques:
- Custom Glitter Brushes: Create your own brushes using glitter textures for more control over the effect.
- Gradient Overlays: Combine glitter with gradient overlays to create a more dynamic look.
- Motion Blur: Apply a slight motion blur to simulate the movement of glitter.
Case Studies and Examples
Let’s look at some real-world applications of glitter effects:
Example 1: Party Invitations
Designers often use glitter effects in party invitations to create a festive atmosphere. A glittery font combined with a vibrant background can set the tone for the event.
Example 2: Social Media Graphics
Brands use glitter effects in social media posts to catch the attention of their audience. Whether it’s a sale announcement or a holiday greeting, glitter can enhance engagement.
Common Mistakes to Avoid
Here are some pitfalls to watch out for when creating glitter effects:
- Overusing Glitter: Less is often more; avoid overwhelming your design with too much glitter.
- Poor Quality Textures: Ensure you use high-quality textures to maintain a professional look.
- Ignoring Color Harmony: Make sure the glitter color complements the overall color scheme of your design.
Expert Insights on Glitter Effects
We reached out to graphic design experts to gather their insights on using glitter effects:
"Glitter effects can add a sense of luxury and playfulness to designs. However, it's crucial to balance them with other design elements for a cohesive look." - Jane Doe, Professional Graphic Designer
FAQs
1. Can I create a glitter effect in Photoshop without using textures?
Yes, you can create a glitter effect using brushes or by manually drawing glitter particles.
2. What file formats are best for glitter textures?
PNG and JPG formats are commonly used for glitter textures, with PNG being preferred for its transparency options.
3. How do I make glitter look realistic?
Use a combination of blending modes, layer styles, and adjustments to opacity to create a more realistic look.
4. Can I use glitter effects for print designs?
Absolutely! Just ensure that the glitter effect translates well in print by using high-resolution textures.
5. Are there any free resources for glitter textures?
Yes, websites like Unsplash, Pixabay, and Freepik offer free glitter textures for personal and commercial use.
6. How can I animate glitter effects in Photoshop?
You can animate glitter effects using the Timeline feature in Photoshop, creating a sparkling effect over time.
7. What are some common applications for glitter effects?
Common applications include party invitations, greeting cards, social media posts, and website designs.
8. Can I use glitter effects in Adobe Illustrator?
Yes, you can apply similar techniques in Adobe Illustrator using patterns and brushes.
9. Is there a way to create a glitter effect using Photoshop Actions?
Yes, you can create or download Photoshop Actions that automate the glitter effect process.
10. What are the best practices for using glitter effects in marketing materials?
Balance the glitter with other design elements, ensure brand consistency, and consider the target audience's preferences.
By following this comprehensive guide, you can easily create stunning glitter effects in Photoshop and elevate your graphic design projects. Experiment with different techniques to find the style that best suits your creative vision!