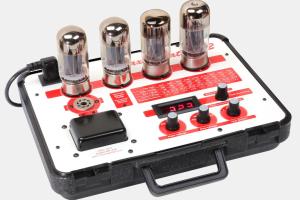
Mastering Vacuum Tube Testing: A Complete Guide for Enthusiasts

-
Quick Links:
- Introduction
- Understanding Vacuum Tubes
- Why Test Vacuum Tubes?
- Essential Tools and Equipment
- Step-by-Step Testing Guide
- Case Studies
- Expert Insights
- Common Issues with Vacuum Tubes
- Maintenance Tips for Vacuum Tubes
- FAQs
Introduction
Vacuum tubes have been a cornerstone of electronic technology for over a century, powering everything from vintage radios to modern audio amplifiers. Testing these components is essential to ensure optimal performance and longevity. In this comprehensive guide, we will explore how to test vacuum tubes effectively, providing you with the knowledge and tools needed to maintain your audio equipment and electronics.
Understanding Vacuum Tubes
Vacuum tubes, also known as electron tubes, are devices that control electric current flow in a vacuum environment. They are used primarily in amplification and switching applications. The basic components of a vacuum tube include:
- Cathode: Emits electrons when heated.
- Anode: Attracts electrons, allowing current to flow.
- Control Grid: Regulates the flow of electrons.
Understanding how these components interact is crucial for effective testing.
Why Test Vacuum Tubes?
Testing vacuum tubes is essential for several reasons:
- Performance: To ensure optimal sound quality and performance in audio equipment.
- Longevity: To identify weak tubes before they fail completely, preventing damage to other electronic components.
- Cost-Effectiveness: To avoid unnecessary replacements by accurately diagnosing issues.
Essential Tools and Equipment
Before diving into testing, you will need the following tools and equipment:
- Tube Tester: A dedicated device for testing vacuum tubes.
- Multimeter: For measuring voltage, current, and resistance.
- Oscilloscope: For analyzing the signal quality.
- Sockets: Compatible with the vacuum tubes you are testing.
- Safety Gear: Gloves and goggles for protection.
Step-by-Step Testing Guide
The following steps outline how to test vacuum tubes using a tube tester:
Step 1: Prepare the Tube
Ensure that the tube is clean and free of any dust or debris that may affect testing.
Step 2: Connect the Tube to the Tester
Place the tube securely in the appropriate socket on the tester.
Step 3: Set the Tester
Adjust the settings on the tube tester according to the tube type you are testing. Refer to the user manual for specific instructions.
Step 4: Conduct the Test
Activate the tester and observe the readings. Pay attention to both the emission and transconductance values.
Step 5: Interpret the Results
Compare the results with the manufacturer's specifications. A healthy tube will typically show values within the acceptable range.
Case Studies
Let’s explore some real-world scenarios in which vacuum tube testing made a significant difference:
Case Study 1: Restoring a Vintage Amplifier
A vintage amplifier was experiencing audio distortion. Testing the vacuum tubes revealed that one tube was weak, leading to a simple replacement that restored sound quality.
Case Study 2: Diagnosing a Home Audio System
In another case, a home audio system was producing intermittent sound. Testing identified a faulty tube, which, when replaced, led to consistent performance.
Expert Insights
We consulted with several audio engineers and technicians who emphasized the importance of regular vacuum tube testing. According to John Smith, a seasoned audio technician, "Regular testing not only prolongs the life of your tubes but also ensures that your audio equipment performs at its best."
Common Issues with Vacuum Tubes
Some common issues you may encounter include:
- Microphonics: Excessive noise due to vibrations.
- Weak Emission: Reduced output leading to poor performance.
- Short Circuits: Complete failure of the tube.
Maintenance Tips for Vacuum Tubes
To ensure the longevity of your vacuum tubes, consider the following maintenance tips:
- Store tubes upright in a cool, dry place.
- Handle tubes carefully to avoid damage.
- Regularly clean sockets and contacts.
- Monitor tube performance and replace weak tubes promptly.
FAQs
1. How often should I test my vacuum tubes?
It’s advisable to test your vacuum tubes every 6-12 months, or sooner if you notice performance issues.
2. Can I test vacuum tubes without a tube tester?
While it’s possible to test tubes with a multimeter or oscilloscope, a dedicated tube tester provides the most accurate results.
3. What are the signs of a failing vacuum tube?
Common signs include distortion, loss of sound, or occasional popping noises.
4. Are all vacuum tubes testable?
Most vacuum tubes can be tested; however, some rare or specialty tubes may require specific testers.
5. How do I know if a tube is good or bad?
Compare the test results with the manufacturer’s specifications; a good tube will fall within the recommended ranges.
6. Can I replace vacuum tubes myself?
Yes, if you are comfortable working with electronics. Ensure you follow safety procedures.
7. What is the lifespan of vacuum tubes?
The lifespan varies but typically ranges from 1,000 to 10,000 hours, depending on usage and quality.
8. Are there different types of tube testers?
Yes, there are simple emission testers and more complex mutual conductance testers. Choose one based on your needs.
9. Do I need any special skills to test vacuum tubes?
Basic knowledge of electronics is helpful, but many testers come with user-friendly instructions.
10. Where can I find replacement vacuum tubes?
Replacement tubes can be found at electronics stores, online retailers, and specialty audio shops.
Random Reads
- How to register a dll
- How to make your phone vibrate complete guide
- How to make your own video game
- How to turn on remote desktop using regedit
- How to turn on playstation 4
- How to replace rollers on sliding glass doors
- How to replace pur water filter
- How to turn on whatsapp notifications android
- Mastering reverse image search google lens
- Mastering relative frequency