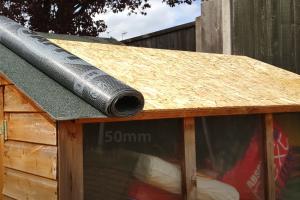
Mastering Roof Felt: A Comprehensive Guide to Attaching Roof Felt on Your Shed

-
Quick Links:
- 1. Introduction
- 2. Importance of Roof Felt
- 3. Types of Roof Felt
- 4. Materials Needed
- 5. Preparation Steps
- 6. Step-by-Step Installation Guide
- 7. Maintenance Tips
- 8. Common Issues and Solutions
- 9. Case Studies
- 10. Expert Insights
- 11. FAQs
1. Introduction
Building a shed is a rewarding project that not only enhances your outdoor space but also provides additional storage. One of the most crucial aspects of shed construction is ensuring that the roof is properly waterproofed. Roof felt, a type of roofing material, plays a vital role in protecting your shed from rain, snow, and UV rays. In this comprehensive guide, we will explore the entire process of attaching roof felt on a shed, ensuring it is both effective and durable.
2. Importance of Roof Felt
Roof felt serves multiple purposes:
- Waterproofing: It creates a barrier that prevents water from seeping into the structure.
- Protection from UV Rays: It protects the underlying materials from sun damage.
- Longevity: Proper installation of roof felt can significantly extend the lifespan of your shed.
- Energy Efficiency: It can contribute to better insulation, keeping the shed cooler in summer and warmer in winter.
3. Types of Roof Felt
There are two main types of roof felt:
- Asphalt-impregnated felt: Commonly used for residential roofing, it is durable and cost-effective.
- Synthetic felt: Made from plastic substrates, offering superior durability and lighter weight.
Choosing the right type depends on your shed's location, climate, and budget.
4. Materials Needed
Before you start, ensure you have the following materials:
- Roof felt rolls
- Utility knife
- Staple gun or roofing nails
- Measuring tape
- Hammer (if using nails)
- Roofing adhesives (optional)
- Ladder
- Safety goggles and gloves
5. Preparation Steps
Proper preparation is essential for a successful installation:
- Ensure your shed roof is clean and dry.
- Inspect for any damage that needs repair before applying felt.
- Measure the roof dimensions accurately to cut the felt to size.
6. Step-by-Step Installation Guide
Now, let's dive into the step-by-step installation process:
- Measure and Cut: Roll out the felt and cut it to the required size, allowing for overlap.
- Position the Felt: Start at the bottom edge of the roof, allowing the felt to hang over the edge slightly.
- Secure the Felt: Use a staple gun or roofing nails to secure the felt in place, starting from the center and working outwards.
- Overlap the Seams: Ensure each row overlaps the previous one by at least 4 inches to prevent water from seeping through.
- Finish the Top: Cut a piece to cover the peak of the roof, securing it down to ensure no gaps.
7. Maintenance Tips
To ensure your roof felt remains effective, follow these maintenance tips:
- Regularly inspect the roof for any signs of wear or damage.
- Clean debris off the roof to prevent moisture buildup.
- Replace any damaged sections of felt immediately to maintain waterproofing.
8. Common Issues and Solutions
Here are some common issues you might encounter and how to solve them:
- Bubbles or Wrinkles: Caused by improper installation; flatten out with a roller.
- Poor Adhesion: Ensure the surface is clean; use roofing adhesive for better grip.
- Rips and Tears: Patch with additional felt using roofing adhesive.
9. Case Studies
Consider these real-world examples:
- Case Study 1: A homeowner in Oregon successfully extended the life of their shed through proper installation and regular maintenance, resulting in a leak-free structure for over five years.
- Case Study 2: A DIY enthusiast in Texas faced issues with high winds. By using synthetic felt and securing it with adhesives, they mitigated future damage.
10. Expert Insights
Experts recommend:
- Investing in high-quality materials to save costs in the long run.
- Consulting local professionals for advice tailored to your climate.
11. FAQs
1. How long does roof felt last?
Typically, roof felt can last anywhere from 10 to 20 years depending on the type and maintenance.
2. Can I install roof felt myself?
Absolutely! With the right tools and following instructions, it’s a manageable DIY project.
3. What type of roof felt is best for my shed?
This depends on your local climate. Synthetic felt is often more durable, while asphalt felt is more cost-effective.
4. How do I know if my roof felt is damaged?
Look for signs like tears, water stains on the interior, or visible wear.
5. Can I use roof felt on a sloped roof?
Yes, roof felt is designed for sloped roofs and can help with water drainage.
6. Should I use adhesive with my roof felt?
Using adhesive can provide better adhesion, especially in windy areas.
7. Is it necessary to overlap the felt?
Yes, overlapping is essential to prevent water from penetrating through seams.
8. How can I remove old roof felt?
Carefully cut it away with a utility knife and remove any adhesive residues.
9. What tools do I need for installation?
You’ll need a utility knife, measuring tape, staple gun or roofing nails, and a ladder.
10. When is the best time to install roof felt?
Spring or early fall are ideal, avoiding extreme temperatures or rain.
Random Reads
- How to calculate cfm for range hoods
- How to calculate btu per square foot
- A guide to cleaning silver with baking soda
- Turn off ad blocking google chrome
- Turn off s mode windows 11
- How to clean sliding glass door tracks
- How to clean silicone phone case
- How to detect and survive a three way call
- How to clean and lubricate a sliding glass door
- How to clean and organize your room