Ultimate Guide to Installing a Drop Ceiling: Step-by-Step Instructions

-
Quick Links:
- Introduction
- What is a Drop Ceiling?
- Benefits of Drop Ceilings
- Tools and Materials Needed
- Planning the Installation
- Step-by-Step Installation
- Common Mistakes to Avoid
- Maintenance and Care
- Case Studies
- Expert Insights
- FAQs
Introduction
Installing a drop ceiling can be an excellent way to enhance the aesthetic appeal and functionality of a room while also providing a simple solution for hiding electrical wires, plumbing, and ductwork. This guide will walk you through the entire process, from understanding what a drop ceiling is to the final installation steps.
What is a Drop Ceiling?
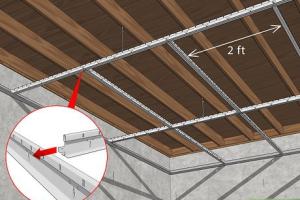
A drop ceiling, also known as a suspended ceiling, consists of a grid system that supports lightweight ceiling tiles. It is suspended from the original ceiling and allows for easy access to plumbing and electrical systems. Drop ceilings are commonly used in basements, offices, and commercial spaces.
Benefits of Drop Ceilings
- Easy Installation: Drop ceilings are relatively easy to install and can be a great DIY project.
- Accessibility: They provide easy access to wires and pipes.
- Sound Absorption: Many ceiling tiles are designed to absorb sound, making them ideal for offices and recreational spaces.
- Variety: Available in various styles, colors, and materials to suit any decor.
- Energy Efficiency: Helps with insulation and can reduce energy costs.
Tools and Materials Needed
Before you begin your drop ceiling installation, gather the following tools and materials:
- Tools:
- Measuring tape
- Level
- Utility knife
- Drill
- Stud finder
- Safety goggles
- Hearing protection
- Carpenter's square
- Materials:
- Ceiling tiles
- Grid system (main tees, cross tees, wall angles)
- Hangers
- Screws and anchors
- Mineral fiber or fiberglass insulation (optional)
Planning the Installation
Proper planning is crucial for a successful drop ceiling installation. Follow these steps:
- Measure the Room: Calculate the area of the room and determine how many tiles you will need.
- Decide on Height: Consider the height of the drop ceiling based on the existing infrastructure and desired look.
- Layout Design: Sketch a layout of the grid system and where the ceiling tiles will be placed.
Step-by-Step Installation
Step 1: Mark the Ceiling Height
Using a level and measuring tape, mark the desired height of the drop ceiling on the walls around the room.
Step 2: Install Wall Angles
Attach the wall angles to the marked height using screws. Ensure they are level.
Step 3: Install Hangers
Using a stud finder, locate ceiling joists. Install hangers every 4 to 6 feet along the joists, ensuring they are perpendicular to the direction of the grid.
Step 4: Install Main Tees
Attach the main tees to the hangers, ensuring they are level and spaced correctly.
Step 5: Install Cross Tees
Insert cross tees into the main tees, forming a grid pattern. Ensure they are secure.
Step 6: Insert Ceiling Tiles
Carefully insert the ceiling tiles into the grid, ensuring they fit snugly.
Step 7: Finish Up
Inspect the installation for any gaps or misalignments and make any necessary adjustments.
Common Mistakes to Avoid
- Not measuring accurately, which can lead to wasted materials.
- Failing to use a level during installation, leading to an uneven ceiling.
- Ignoring the alignment of the grid system.
- Overloading the grid with heavy tiles.
Maintenance and Care
To keep your drop ceiling looking great, regularly dust and clean the tiles. If you notice any damage, replace the tiles as needed.
Case Studies
Consider two case studies: a residential basement renovation and a commercial office upgrade. In both cases, drop ceilings were installed to enhance aesthetics and functionality, resulting in positive feedback from residents and employees alike.
Expert Insights
Professionals recommend considering insulation and soundproofing options when installing a drop ceiling, especially in multi-use spaces.
FAQs
- 1. How much does it cost to install a drop ceiling?
- The cost varies based on materials and room size but can range from $1 to $3 per square foot.
- 2. Can I install a drop ceiling over an existing ceiling?
- Yes, but ensure that the existing ceiling is secure and not sagging.
- 3. How long does it take to install a drop ceiling?
- A typical installation can take a few hours to a full day, depending on the room size.
- 4. Do I need a building permit for a drop ceiling?
- Check local regulations; permits may be required in some areas.
- 5. Can I install recessed lighting in a drop ceiling?
- Yes, many ceiling tiles are designed to accommodate recessed lighting.
- 6. How do I replace a damaged ceiling tile?
- Simply remove the tile from the grid and replace it with a new one.
- 7. Are drop ceilings suitable for bathrooms?
- Yes, but ensure that the tiles are moisture-resistant to prevent damage.
- 8. What is the best type of tile for a drop ceiling?
- Acoustic tiles are popular for their sound-absorbing qualities, while vinyl tiles offer moisture resistance.
- 9. How do I clean ceiling tiles?
- Use a damp cloth for dusting and a mild detergent for stains.
- 10. Can I paint drop ceiling tiles?
- Yes, but use paint specifically designed for ceiling tiles to ensure proper adhesion.
Random Reads
- How to share netflix content
- How to share google docs
- How to write a how to guide
- How to write a technical specification
- Move photos sd card samsung
- Monitor cpu temperature
- Mastering fishing wires conduits
- Mastering five nights at freddys 3
- Ultimate guide to making a map in minecraft
- How to switch email address to gmail