Ultimate Guide to Installing Vinyl Gutters: Step-by-Step Process

-
Quick Links:
- Introduction
- Why Choose Vinyl Gutters?
- Tools and Materials Needed
- Pre-Installation Preparation
- Step-by-Step Installation Process
- Maintenance Tips for Vinyl Gutters
- Common Mistakes to Avoid
- Case Studies: Successful Vinyl Gutter Installations
- Expert Insights on Vinyl Gutters
- FAQs
Introduction
Installing vinyl gutters is a rewarding home improvement project that not only enhances the aesthetic appeal of your home but also protects it from water damage. In this comprehensive guide, we will walk you through the entire installation process, from selecting the right materials to completing the installation successfully.
Why Choose Vinyl Gutters?
Vinyl gutters have become increasingly popular among homeowners due to their numerous benefits:
- Cost-effective: Vinyl gutters are typically cheaper than metal alternatives.
- Lightweight: Easier to handle and install.
- Corrosion-resistant: Unlike metal gutters, vinyl doesn’t rust.
- Low maintenance: They require less upkeep than other materials.
According to the U.S. Department of Housing and Urban Development, proper gutter installation can prevent significant water damage to homes, emphasizing the importance of selecting quality materials like vinyl.
Tools and Materials Needed
Before starting your installation, gather the following tools and materials:
- Vinyl gutter sections
- End caps
- Downspouts
- Brackets and hangers
- Sealant
- Measuring tape
- Level
- Power drill
- Hacksaw or gutter cutter
- Ladder
- Safety goggles and gloves
Pre-Installation Preparation
Proper preparation is crucial for a successful installation. Follow these steps:
- Measure your roofline: Determine the total length of gutters required by measuring the perimeter of your roof.
- Plan the layout: Decide where the downspouts will be placed; typically, they should be positioned every 20 to 30 feet.
- Check for pitch: Ensure that your gutters will slope toward the downspouts for effective drainage (a slope of 1 inch for every 10 feet is ideal).
Step-by-Step Installation Process
Now, let’s dive into the installation process:
Step 1: Install the Gutter Hangers
Start by attaching the gutter hangers to the fascia board. Space them about 24 inches apart to ensure proper support.
Step 2: Measure and Cut the Gutter Sections
Measure the required length of each gutter section and cut them with a hacksaw or gutter cutter. Always wear safety goggles during this process.
Step 3: Assemble the Gutter Sections
Connect the gutter sections using connectors. Ensure they fit snugly and use sealant to prevent leaks.
Step 4: Hang the Gutters
Lift the assembled gutters into place, securing them to the hangers. Use a level to ensure they are sloped correctly.
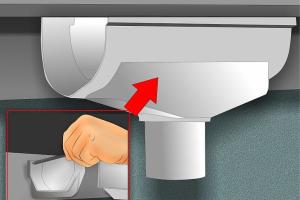
Step 5: Install Downspouts
Cut holes in the gutter for the downspouts and attach them securely. Ensure the bottom of the downspout directs water away from the foundation.
Step 6: Final Inspections
Inspect the entire installation for any gaps or misaligned sections. Apply sealant where necessary.
Maintenance Tips for Vinyl Gutters
To keep your vinyl gutters functioning efficiently, follow these maintenance tips:
- Clean gutters regularly, especially in the fall and spring.
- Inspect for cracks or leaks and repair immediately.
- Ensure downspouts are clear of debris to avoid blockages.
Common Mistakes to Avoid
Even experienced DIYers can make mistakes. Here are common pitfalls to avoid:
- Not checking for proper pitch.
- Using inadequate support for gutters.
- Forgetting to seal joints and connectors.
Case Studies: Successful Vinyl Gutter Installations
Here are some real-world examples of effective vinyl gutter installations:
Case Study 1: Residential Home in Virginia
A homeowner in Virginia replaced their aging metal gutters with vinyl alternatives, resulting in a 30% reduction in maintenance costs.
Case Study 2: New Construction in Texas
A new home builder opted for vinyl gutters due to their lightweight nature, allowing for easier installation and a quicker build time.
Expert Insights on Vinyl Gutters
According to gutter installation specialists, choosing vinyl gutters can result in significant long-term savings. A study by the Angi Home Services suggests that proper installation and maintenance can extend the lifespan of gutters by up to 20 years.
FAQs
1. How long do vinyl gutters last?
Vinyl gutters typically last between 20 to 30 years with proper maintenance.
2. Can I install vinyl gutters in winter?
While it’s possible, it’s best to install in mild weather to avoid complications with freezing temperatures.
3. Do vinyl gutters require painting?
No, vinyl gutters come in various colors and do not need painting.
4. How do I clean vinyl gutters?
Use a ladder, gloves, and a scoop to remove debris, then rinse with water.
5. Are vinyl gutters environmentally friendly?
Yes, they are recyclable and do not rust or corrode, making them a sustainable option.
6. What’s the best way to prevent clogs?
Installing gutter guards can help prevent leaves and debris from clogging the system.
7. Can I paint vinyl gutters?
It is not recommended as paint may not adhere well and can peel off.
8. How often should I inspect my gutters?
Inspect at least twice a year, particularly after storms or heavy winds.
9. What is the best pitch for gutters?
A slope of 1 inch for every 10 feet of gutter is recommended for optimal drainage.
10. Can I install vinyl gutters myself?
Yes, with the right tools and guidance, vinyl gutters can be successfully installed as a DIY project.
Random Reads
- How to reset router wifi network
- How to pin a program to the windows 10 taskbar
- How to quickly switch tabs in google chrome
- How to transfer files linux servers
- How to transfer music to sd card
- How to transfer notes huawei samsung 2020
- How to seal a door
- How to seal pavers
- How to seam carpet
- Keep clear case from turning yellow