Ultimate Guide to Repairing Cracked Ceramic: Step-by-Step Solutions

-
Quick Links:
- Introduction
- Understanding Ceramics
- Common Types of Cracks in Ceramic
- Tools and Materials Needed
- Step-by-Step Repair Guide
- Tips for Successful Repair
- Case Studies
- Expert Insights
- FAQs
- Conclusion
Introduction
Ceramics are not only functional but also served as decorative pieces in our homes. However, they can easily crack due to various reasons, such as accidental drops or thermal shock. Repairing cracked ceramic can seem daunting, but with the right tools and techniques, you can restore your beloved items to their former glory.
Understanding Ceramics
Ceramics are defined as non-metallic, inorganic materials that are typically made by heating and cooling. They are known for their durability, heat resistance, and aesthetic appeal. However, they are also brittle and can crack or break under stress.
The Science Behind Ceramics
The structure of ceramics consists of tightly packed atoms, which gives them their strength but also makes them susceptible to cracking. Understanding this material's properties can help you better approach repairs.
Common Types of Cracks in Ceramic
- Hairline Cracks: Minor fractures that do not affect the integrity of the ceramic.
- Surface Cracks: Cracks that are visible on the surface but may not penetrate deep.
- Deep Cracks: These cracks can affect the structural integrity and may require more intensive repair.
Tools and Materials Needed
Before you start your repair, gather the following tools and materials:
- Epoxy adhesive
- Super glue
- Sandpaper
- Acetone (for cleaning)
- Paintbrush (for applying glue)
- Clamps
- Protective gloves
- Sealant (optional)
Step-by-Step Repair Guide
Step 1: Prepare the Surface
Make sure the ceramic pieces are clean and dry. Use acetone to remove any dirt or grease.
Step 2: Choose the Right Adhesive
For hairline cracks, super glue may suffice, while deeper cracks might need epoxy adhesive for better durability.
Step 3: Apply the Adhesive
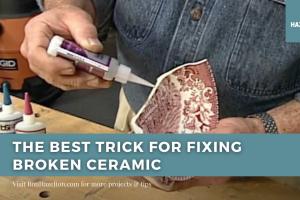
Using a paintbrush, apply a thin layer of adhesive to the crack. Ensure that the adhesive seeps into the crack for better bonding.
Step 4: Align and Clamp
Carefully align the cracked pieces and use clamps to hold them in place while the adhesive cures. Follow the manufacturer's instructions for curing time.
Step 5: Sand and Finish
Once cured, use sandpaper to smooth any rough edges. If necessary, apply a sealant to protect and enhance the appearance.
Tips for Successful Repair
- Work in a well-ventilated area to avoid strong adhesives fumes.
- Be patient and allow proper curing time for the adhesive.
- Consider painting over repairs to match the original color.
- Test the repaired item gently to ensure stability.
Case Studies
Case Study 1: Repairing a Family Heirloom
A family heirloom vase was cracked during a move. The owner used a two-part epoxy for a strong bond and was able to restore its original look with paint.
Case Study 2: Restoring Antique Dinnerware
Antique plates were repaired using super glue for hairline cracks. The owner applied a sealant, making them suitable for display again.
Expert Insights
We consulted with ceramic restoration experts who emphasize the importance of selecting the right adhesive based on the type of ceramic and the extent of the damage. They advocate for patience during the curing process to ensure a durable repair.
FAQs
1. Can all types of ceramic be repaired?
Most ceramics can be repaired, but the method depends on the type and extent of the damage.
2. Is it safe to use repaired ceramics for food?
Only use food-safe adhesives and sealants for items intended for food use.
3. How do I prevent future cracks in my ceramics?
Store ceramics properly and avoid extreme temperature changes to minimize the risk of cracks.
4. Can I paint over repaired areas?
Yes, after sanding, you can paint over the repaired area to match the original color.
5. How long does it take for the adhesive to cure?
Curing times vary but generally range from a few hours to overnight, depending on the adhesive used.
6. What type of glue is best for ceramics?
Epoxy adhesives are generally the best for strong, long-lasting repairs, especially for deep cracks.
7. Can I repair ceramics without professional help?
Yes, many repairs can be done at home with the right tools and patience.
8. What happens if I don’t repair a crack?
Unrepaired cracks can worsen, leading to further damage and potential breakage.
9. Are there any alternatives to glue for ceramic repair?
Some people use silicone sealants or even specialized ceramic repair kits available in stores.
10. Where can I find professional repair services?
Look for local pottery studios or restoration experts specializing in ceramics.
Conclusion
Repairing cracked ceramics is a rewarding process that can extend the life of your cherished items. With the right techniques and a bit of patience, you can restore both functionality and aesthetics to your ceramics. Armed with this guide, you're now ready to tackle any ceramic repair project!
External References
- Ceramic Arts Network
- The Balance SMB - Repairing Pottery
- Homedit - DIY Ceramic Repair
- This Old House - Pottery Repair Tips
Random Reads
- Mastering hanging red dead redemption
- Mastering happy wheels guide
- How to prepare a room for painting
- How to portforward minecraft
- How to make an icon in ms paint and paint 3d
- Mastering excel adding one month to date
- How to view google form responses iphone ipad
- How to unblock a number on android
- How to unblock fortinet
- How to play slots online for real money