Mastering Electric Motor Rewinding: A Comprehensive Guide for DIY Enthusiasts

-
Quick Links:
- Introduction
- Understanding Electric Motors
- Tools and Materials Needed
- Step-by-Step Guide to Rewind an Electric Motor
- Common Issues and Troubleshooting
- Case Studies and Real-World Examples
- Expert Insights on Electric Motor Rewinding
- Conclusion
- FAQs
Introduction
Rewinding an electric motor can seem like a daunting task, especially for beginners. However, with the right knowledge and tools, it can be a fulfilling DIY project. This guide will walk you through the entire process of rewinding an electric motor, from understanding the components to executing the rewind itself.
Understanding Electric Motors
Electric motors are crucial components in countless devices, ranging from household appliances to industrial machinery. They convert electrical energy into mechanical energy, using electromagnetic principles to function. Understanding how these motors work is fundamental when it comes to rewinding them.
The Basics of Electric Motors
| Type | Operation | Applications |
|---|---|---|
| AC Motors | Powered by alternating current | Fans, pumps, compressors |
| DC Motors | Powered by direct current | Electric vehicles, robotics |
Components of an Electric Motor
- Stator
- Rotor
- Windings
- Commutator (for DC motors)
- Bearings
Tools and Materials Needed
Before starting the rewinding process, gather the following tools and materials:
- Insulated copper wire
- Screwdrivers
- Wrench set
- Multimeter
- Insulation tape
- Wire cutters
- Drill (for some motor types)
- Safety glasses and gloves
Step-by-Step Guide to Rewind an Electric Motor
Now that you have a better understanding of electric motors and the necessary tools, let's delve into the rewinding process.
Step 1: Disassemble the Motor
Begin by disconnecting the motor from its power source. Carefully remove any external casing and components to access the windings.
Step 2: Remove the Old Windings
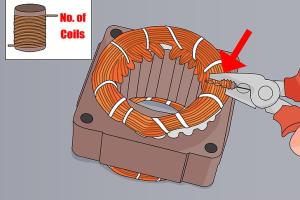
Take note of the winding configuration. You can make a diagram or take photos to refer to later. Cut and remove the old windings carefully.
Step 3: Prepare the Core
Inspect the stator and rotor for damage. Clean the core thoroughly to remove any debris or old insulation.
Step 4: Install the New Windings
Using your diagram, start winding new insulated copper wire onto the stator. Ensure that you maintain the same number of turns and winding direction as the original.
Step 5: Insulate the Windings
Once the new windings are in place, use insulation tape to secure the wire and prevent any short circuits.
Step 6: Reassemble the Motor
Carefully reassemble the motor, ensuring that all components are secure and properly aligned.
Step 7: Test the Motor
Before putting the motor back into operation, conduct a series of tests using a multimeter to check for continuity and insulation resistance.
Common Issues and Troubleshooting
Even with careful rewinding, issues can arise. Here are some common problems and their solutions:
- Motor won't start: Check for short circuits and ensure power supply connections are secure.
- Overheating: Verify that the windings are properly insulated and that the motor is not overloaded.
- Unusual noises: Inspect for loose components or misalignments.
Case Studies and Real-World Examples
Case studies provide valuable insights into the rewinding process. Here are two examples:
Case Study 1: Rewinding a Small AC Motor
A local repair shop faced frequent failures in a small AC motor used in a cooling system. After rewinding the motor with high-quality copper wire, the motor's efficiency improved significantly, leading to less energy consumption.
Case Study 2: Restoration of an Old DC Motor
A hobbyist restored a vintage DC motor from a toy train. By carefully rewinding the motor and using modern insulation techniques, the motor not only worked but also outperformed its original specifications.
Expert Insights on Electric Motor Rewinding
According to industry experts, the key to a successful rewind lies in precision and attention to detail. Ensuring the right gauge of wire and consistent winding patterns can drastically enhance motor performance.
Conclusion
Rewinding an electric motor is a valuable skill that can save money and extend the life of equipment. With this comprehensive guide, you now have the knowledge and tools to successfully tackle this project. Remember, practice makes perfect, so don't hesitate to take on more complex motors as you gain experience.
FAQs
1. How do I know if my motor needs to be rewound?
Signs include overheating, unusual noises, and failure to start.
2. Can I rewind any type of electric motor?
Most motors can be rewound, but the complexity may vary based on the type.
3. What gauge wire should I use for rewinding?
The gauge depends on the motor specifications; typically, 18 to 26 AWG is used.
4. Is it safe to rewind a motor myself?
Yes, as long as you follow safety protocols and understand the process.
5. How long does it take to rewind a motor?
It can take anywhere from a few hours to a full day, depending on the motor size.
6. Can I use any type of insulation tape?
Use high-temperature insulation tape specifically designed for electrical applications.
7. What is the cost of rewinding a motor?
The cost varies based on materials and labor; DIY can save significant costs.
8. How can I improve the efficiency of my rewound motor?
Use high-quality materials and ensure precise winding patterns.
9. Should I replace bearings when rewinding?
It's a good practice to replace bearings to ensure optimal performance.
10. Where can I find replacement parts for my motor?
Check local electrical supply stores or online marketplaces.
Random Reads