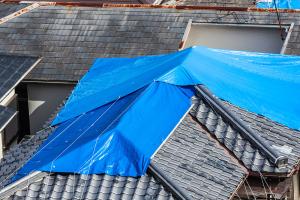
Mastering Roof Protection: The Ultimate Guide on How to Tarp a Roof

-
Quick Links:
- Introduction
- Why Tarp Your Roof?
- When to Tarp Your Roof
- Materials Needed
- Step-by-Step Guide to Tarping a Roof
- Safety Precautions
- Case Studies and Examples
- Expert Insights
- Maintenance and Care for Tarped Roofs
- Conclusion
- FAQs
Introduction
When your roof suffers damage, whether due to a storm, fallen tree, or other emergencies, it’s crucial to act quickly to prevent further issues. Tarping your roof can be a temporary yet effective solution to protect your home from water damage.
Why Tarp Your Roof?
Tarping your roof serves several essential purposes:
- Prevent Water Damage: A tarp acts as a barrier against rain, snow, and ice, minimizing the risk of leaks and mold.
- Cost-Effective Solution: Tarping is a low-cost, DIY temporary fix that can save you from more extensive repairs.
- Quick Installation: With the right materials, you can install a tarp in under an hour.
When to Tarp Your Roof
It’s important to know when to tarp your roof. Here are some scenarios:
- After a severe storm or high winds that may have caused damage.
- If you notice leaks or water stains on your ceiling.
- Before roofing repairs or replacements begin.
- During the winter months when snow accumulation can cause further damage.
Materials Needed
Before you begin, gather the following materials:
- Heavy-Duty Tarp: Ensure it’s waterproof and UV resistant.
- Rope or Bungee Cords: For securing the tarp in place.
- Ladder: Ensure it’s stable and tall enough to reach your roof.
- Roofing Nails or Screws: For securing the tarp edges.
- Safety Gear: Gloves, goggles, and a hard hat.
Step-by-Step Guide to Tarping a Roof
Follow these detailed steps to effectively tarp your roof:
Step 1: Assess the Damage
Inspect your roof for the extent of the damage. Look for missing shingles, cracks, or holes that need covering.
Step 2: Choose the Right Tarp
Select a tarp that is at least 1-2 feet larger than the damaged area to ensure full coverage.
Step 3: Position the Tarp
Climb your ladder carefully and unfold the tarp over the damaged area, allowing it to drape over the sides of the roof.
Step 4: Secure the Tarp
Use roofing nails or screws to secure the edges of the tarp. Ensure it’s tight to avoid flapping in the wind.
Step 5: Anchor the Tarp
Use rope or bungee cords to anchor the tarp down, tying it securely to the roof or nearby structures.
Step 6: Monitor the Tarp
After installation, check the tarp regularly for any signs of wear or looseness, especially after heavy winds or rain.
Safety Precautions
Safety should always come first. Here are some precautions to consider:
- Always use a stable ladder and ensure someone is holding it for added safety.
- Wear appropriate safety gear to protect against falls and sharp objects.
- Do not attempt to tarp a roof during inclement weather.
Case Studies and Examples
Here are a few real-world examples of successful tarping:
- Case Study 1: A homeowner in Florida tarped their roof after a hurricane, preventing significant water damage during the repair process.
- Case Study 2: A family in Chicago used a tarp to cover a hole left by heavy snowfall, successfully keeping their home dry until spring.
Expert Insights
According to roofing experts, tarping can be an essential skill for homeowners. “Understanding how to tarp a roof can save you thousands in potential damage,” says roofing consultant John Smith.
Maintenance and Care for Tarped Roofs
Regular maintenance is key to ensuring your tarp remains effective:
- Check the tarp for tears or loose edges weekly.
- Replace the tarp if it shows signs of wear or damage.
- Consider contacting a professional for permanent repairs as soon as possible.
Conclusion
Tarping your roof is a practical and effective way to protect your home from further damage during emergencies. By following the steps outlined in this guide, you can ensure that your temporary solution is effective and secure.
FAQs
Here are some common questions regarding tarping a roof:
1. How long can a tarp stay on a roof?
A tarp can stay on a roof for several weeks, but it's essential to check it regularly for wear.
2. Can I use any tarp for my roof?
It's best to use a heavy-duty, waterproof tarp designed for roofing needs.
3. How much does it cost to tarp a roof?
The cost varies, but a high-quality tarp usually ranges from $50 to $200.
4. Do I need a permit to tarp my roof?
Typically, no permit is required for temporary tarping, but check local regulations.
5. Can I tarp a sloped roof?
Yes, tarping a sloped roof is possible, but ensure it is secured properly to prevent sliding.
6. What if my roof has multiple leaks?
Consider tarping the entire area or contacting a professional for a more permanent solution.
7. Is it safe to tarp a roof alone?
It’s safer to have someone assist you while tarping a roof.
8. What type of tarp is best for winter?
A heavy-duty tarp rated for UV resistance and winter weather is ideal.
9. How do I remove the tarp safely?
Carefully climb the ladder, remove the anchors, and peel the tarp off from the edges.
10. Can I reuse a tarp?
If the tarp is still in good condition, it can be reused for future emergencies.