Transform Your Screen: 8 Simple Steps to Change Your Windows Computer Screen Saver

-
Quick Links:
- Introduction
- Step 1: Open Screen Saver Settings
- Step 2: Select a New Screen Saver
- Step 3: Customize Screen Saver Settings
- Step 4: Set a Time Limit
- Step 5: Preview Your Screen Saver
- Step 6: Save Your Changes
- Step 7: Explore Additional Features
- Step 8: Troubleshooting Common Issues
- FAQs
Introduction
Screen savers are not just a relic from the past; they are a fun and practical way to personalize your Windows computer. They can protect your screen from burn-in, provide security, and add a touch of flair to your workspace. In this comprehensive guide, we will walk you through the 8 easy steps to change your Windows computer screen saver effectively, ensuring that your PC reflects your personality and style.
Step 1: Open Screen Saver Settings
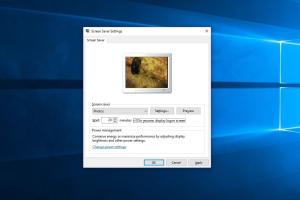
To start customizing your screen saver, you first need to access the screen saver settings. Here’s how:
- Click the Start button.
- Type Control Panel in the search bar and hit Enter.
- In the Control Panel, select Appearance and Personalization.
- Click on Personalization to access the settings.
- Scroll down and click on the Screen Saver option.
Step 2: Select a New Screen Saver
Once you are in the screen saver settings, you can choose a new screen saver:
- Click on the drop-down menu under Screen Saver.
- Browse through the available options. You’ll find settings like Blank, Bubbles, Photos, and more.
- Select a screen saver that appeals to you.
Step 3: Customize Screen Saver Settings
After selecting a screen saver, you can customize its settings:
- Depending on the chosen screen saver, click the Settings button next to the drop-down menu.
- Adjust settings such as speed, appearance, and other options available for that specific screen saver.
Step 4: Set a Time Limit
Setting a time limit for your screen saver is essential to ensure it activates at the right moment:
- In the same screen saver settings window, look for the Wait box.
- Enter the amount of idle time (in minutes) before the screen saver kicks in.
Step 5: Preview Your Screen Saver
It's always a good idea to preview your screen saver before finalizing your settings:
- Click the Preview button in the screen saver settings window.
- Your selected screen saver will appear on the screen. Move your mouse to exit the preview mode.
Step 6: Save Your Changes
After customizing and previewing your screen saver, it's time to save your changes:
- Click OK to apply your new settings.
- Close the Control Panel.
Step 7: Explore Additional Features
Windows also allows you to explore additional features that screen savers might offer:
- Using Personal Photos: If you choose a photo screen saver, you can select specific folders with images.
- Display Settings: Some screen savers allow you to change display settings like transitions and durations.
Step 8: Troubleshooting Common Issues
If you encounter issues with your screen saver, here are some troubleshooting tips:
- Ensure that your computer is not set to Never Sleep in power settings.
- Check for Windows updates that might affect screen saver functionality.
- If the screen saver is not activating, try restarting your computer.
FAQs
1. How do I access the screen saver settings on Windows 10?
Go to the Start menu, search for Control Panel, then navigate to Appearance and Personalization > Personalization > Screen Saver.
2. Can I use my own photos as a screen saver?
Yes, you can choose the 'Photos' screen saver option and select a folder containing your images.
3. What should I do if my screen saver doesn’t work?
Ensure your power settings allow for sleep mode and check for any active applications that might prevent it from starting.
4. Is it possible to have different screen savers for multiple monitors?
Yes, but it requires third-party software or specific settings in Windows.
5. How can I turn off my screen saver?
Access the screen saver settings and select 'None' from the drop-down menu.
6. Can I set a password on my screen saver?
Yes, in the screen saver settings, check the 'On resume, display logon screen' option to secure your computer.
7. Are there any animated screen savers available?
Yes, Windows includes several animated options, such as 'Bubbles' and 'Mystify.'
8. How do I download additional screen savers?
Search online for reputable sites offering screen savers compatible with Windows.
9. Can I schedule my screen saver to turn on at specific times?
Windows does not natively support scheduling screen savers, but you can use task scheduling to create a workaround.
10. Will changing my screen saver affect my computer's performance?
Generally, screen savers have minimal impact on performance, but resource-intensive animations may affect low-end systems.
Conclusion
Changing your Windows computer's screen saver is a straightforward process that allows for personalization and can enhance your computing experience. Whether you prefer a simple blank screen or a lively display of your favorite images, following these eight easy steps will help you set it up quickly. Enjoy your refreshed screen saver and the unique touch it brings to your workspace!