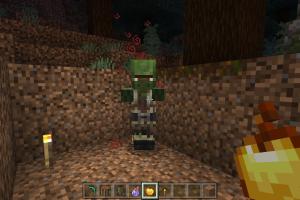
The Ultimate Guide to Healing Zombie Villagers in Minecraft: Step-by-Step Strategies

-
Quick Links:
- Introduction
- Understanding Zombie Villagers
- Why Heal a Zombie Villager?
- Items Needed for Healing
- Step-by-Step Guide to Heal a Zombie Villager
- Case Studies and Examples
- Expert Insights and Tips
- Common Mistakes to Avoid
- Conclusion
- FAQs
Introduction
Minecraft is a game brimming with creativity, adventure, and the unexpected. Among its various mobs, zombie villagers present a unique challenge and opportunity. Healing a zombie villager not only transforms them back into a regular villager but also opens the door to unique trades and benefits for players. This comprehensive guide will walk you through the simplest way to cure a zombie villager, ensuring that you have all the necessary information and resources to succeed in this endeavor.
Understanding Zombie Villagers
Zombie villagers are the undead counterparts of regular villagers, created when a villager is attacked by a zombie. They retain some characteristics of their original forms, such as profession and trades but are unable to interact with players in the same way. Understanding their behavior and spawning conditions is crucial for effectively curing them.
- Spawn Conditions: Zombie villagers spawn in villages at night or during a thunderstorm.
- Health Points: They have 20 health points (10 hearts), similar to regular zombies.
- Behavior: Zombie villagers will attack players and can infect regular villagers if they come into contact.
Why Heal a Zombie Villager?
Healing a zombie villager has several benefits:
- Trade Opportunities: Once healed, they can offer unique trades based on their previous profession.
- Achievements: Healing a zombie villager contributes to various in-game achievements.
- Community Building: Healed villagers can repopulate villages, enhancing gameplay experience.
Items Needed for Healing
To heal a zombie villager, you will need the following items:
- Golden Apple: Crafted using an apple and eight gold ingots.
- Splash Potion of Weakness: Requires brewing skills; made from fermented spider eye and water bottles.
- Zombie Villager: An active zombie villager that you wish to heal.
Step-by-Step Guide to Heal a Zombie Villager
Follow these steps to successfully heal a zombie villager:
Step 1: Prepare Your Items
Gather the necessary items mentioned above. Ensure you have everything ready before approaching the zombie villager.
Step 2: Find a Safe Location
Locate a secure area away from other mobs to avoid interruption during the healing process.
Step 3: Apply the Potion of Weakness
Throw the Splash Potion of Weakness at the zombie villager. This will weaken it, allowing for the healing process to begin.
Step 4: Feed the Golden Apple
After applying the potion, right-click on the zombie villager with the golden apple. This initiates the curing process.
Step 5: Wait for the Transformation
After a few minutes, the zombie villager will begin to shake and eventually transform back into a regular villager. This process takes about 2-5 minutes.
Case Studies and Examples
Numerous players have shared their experiences curing zombie villagers:
- Case Study 1: A player successfully cured a zombie villager in a survival world, resulting in a librarian who offered enchanted book trades.
- Case Study 2: Another player encountered challenges due to mob interference but learned to build a protective enclosure for successful healing.
Expert Insights and Tips
Here are some expert tips for a smoother healing process:
- Always carry extra golden apples and potions in case of emergencies.
- Consider building a secure area specifically designed for curing zombie villagers.
- Use name tags to prevent cured villagers from despawning.
Common Mistakes to Avoid
Learning from others can help you avoid pitfalls:
- Failing to apply the potion of weakness before feeding the golden apple.
- Attempting to cure multiple zombie villagers at once without proper planning.
- Ignoring the need for safety and allowing other mobs to interfere.
Conclusion
Curing a zombie villager in Minecraft is not only a rewarding experience but also beneficial for your gameplay. By following this guide, you can ensure a successful healing process while minimizing risks. Whether you aim to expand your trade options or contribute to your village's population, mastering this skill will enhance your Minecraft experience.
FAQs
- 1. Can any villager turn into a zombie villager?
- Yes, any villager can become a zombie villager if attacked by a zombie.
- 2. How long does it take to heal a zombie villager?
- The healing process typically takes between 2 to 5 minutes.
- 3. Can you cure multiple zombie villagers at once?
- Yes, but it's recommended to cure them one at a time for better control.
- 4. Do cured villagers retain their jobs?
- Yes, they will retain their previous profession after being cured.
- 5. What is the best way to protect a zombie villager while curing?
- Building a secure enclosure can help protect them from other mobs.
- 6. Can you cure a zombie villager in Peaceful mode?
- No, zombie villagers do not spawn in Peaceful mode.
- 7. What happens if a cured villager gets attacked again?
- If attacked again, they can turn back into a zombie villager if not adequately protected.
- 8. Is there a limit to how many times you can cure a zombie villager?
- No, you can cure zombie villagers as many times as you want; however, they will only turn back into villagers once.
- 9. Can villagers breed after being cured?
- Yes, cured villagers can breed and create new villagers.
- 10. What happens if a zombie villager is killed before curing?
- If killed, the zombie villager cannot be cured and will not return.
Random Reads