Mastering Euro-Style Cabinet Hinges: Your Comprehensive Guide to Adjusting & Repositioning

-
Quick Links:
- Introduction
- Understanding Euro-Style Hinges
- Tools Required
- Common Issues with Euro-Style Hinges
- Adjusting Euro-Style Hinges
- Repositioning Euro-Style Hinges
- Case Study: Successful Adjustment of Euro-Style Hinges
- Expert Insights
- Conclusion
- FAQs
Introduction
Euro-style cabinet hinges have become a popular choice for modern cabinetry, thanks to their sleek design and ease of installation. However, like any hardware, they may require adjustments and repositioning over time. Whether your cabinet doors are misaligned or not closing properly, understanding how to adjust and reposition euro-style hinges is essential for maintaining your furniture's functionality and aesthetics.
Understanding Euro-Style Hinges
Euro-style hinges, also known as concealed hinges, are designed to mount inside the cabinet frame, making them invisible when the door is closed. This design not only enhances the visual appeal of cabinetry but also provides flexibility for adjustments. These hinges typically have three adjustment points: height, depth, and side-to-side, allowing for precise alignment of the cabinet doors.
Types of Euro-Style Hinges
- Full Overlay Hinges: Designed for cabinets where doors completely cover the cabinet frame.
- Half Overlay Hinges: Used when the doors overlap partially, exposing some of the cabinet frame.
- Inset Hinges: For cabinets where the doors are flush with the cabinet frame.
Tools Required
Before starting the adjustment or repositioning process, gather the following tools:
- Phillips screwdriver
- Flat-head screwdriver
- Level
- Measuring tape
- Drill (for repositioning only)
- Wood filler (if necessary)
Common Issues with Euro-Style Hinges
Identifying the common issues that arise with euro-style hinges is the first step in the adjustment process:
- Misalignment: Doors may not align properly with adjacent doors or the cabinet frame.
- Gaps: Visible gaps may appear between the cabinet doors or between the doors and the frame.
- Difficulty Closing: Doors may not close completely or may swing open unexpectedly.
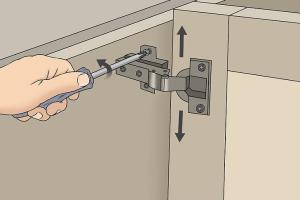
Adjusting Euro-Style Hinges
Adjusting euro-style hinges is generally straightforward. Here’s a step-by-step guide:
Step 1: Check Alignment
Start by closing the cabinet doors and visually checking their alignment. Use a level to ensure they are straight.
Step 2: Adjust Height
To adjust the height of the door, locate the height adjustment screw on the hinge. Turn the screw clockwise to raise the door and counterclockwise to lower it.
Step 3: Adjust Depth
For depth adjustment, find the depth adjustment screw. Turn it clockwise to move the door closer to the cabinet frame and counterclockwise to move it away.
Step 4: Adjust Side-to-Side
The side-to-side adjustment is made using the screw located at the back of the hinge. Adjust it until the door aligns evenly with adjacent doors.
Repositioning Euro-Style Hinges
If adjustment is insufficient, repositioning the hinges may be necessary. Follow these steps:
Step 1: Remove the Door
Using a screwdriver, remove the screws that hold the hinge to the cabinet and the door. Carefully lift the door off.
Step 2: Mark New Hinge Locations
Decide where you need to reposition the hinge and mark the new screw locations. Ensure they are level and evenly spaced.
Step 3: Drill New Holes
If you're drilling new holes, ensure to use a drill bit that matches the hinge size. Be cautious to avoid damaging the cabinet.
Step 4: Reattach the Hinge
Align the hinge with the new holes and secure it with screws. Reattach the door, ensuring it swings smoothly.
Case Study: Successful Adjustment of Euro-Style Hinges
Consider a homeowner who noticed their kitchen cabinet doors were not aligning correctly. After checking the hinges, they followed our guide to adjust the height and depth. Within minutes, they were able to achieve perfect alignment, demonstrating the effectiveness of proper hinge adjustment.
Expert Insights
We consulted woodworking experts and cabinet makers to gather insights on maintaining euro-style hinges. They emphasize the importance of regular checks and adjustments to prevent long-term issues.
Conclusion
Adjusting and repositioning euro-style cabinet hinges is an essential skill for homeowners and DIY enthusiasts alike. By following the steps outlined in this guide, you can ensure your cabinet doors are properly aligned and functional. Not only will this enhance the aesthetic of your kitchen or bathroom, but it will also extend the life of your cabinetry.
FAQs
- 1. How often should I adjust my euro-style hinges? Regularly check for alignment, especially if you notice any gaps or difficulty closing doors.
- 2. Can I use any tools for adjusting hinges? It's recommended to use a Phillips and flat-head screwdriver for best results.
- 3. What if the hinge holes are stripped? You can use wood filler to repair the holes before re-drilling for the hinge.
- 4. Are euro-style hinges adjustable? Yes, they have multiple adjustment points for height, depth, and side-to-side alignment.
- 5. How do I know if I need to reposition my hinges? If adjustments do not resolve misalignment issues, repositioning may be necessary.
- 6. Can I use euro-style hinges on any cabinet? They are versatile but best suited for frameless cabinetry.
- 7. How do I maintain my euro-style hinges? Regularly clean them and check for tightness in screws to maintain functionality.
- 8. What are the benefits of euro-style hinges? They offer a clean look, are easy to install, and provide multiple adjustment options.
- 9. Can I install euro-style hinges myself? Yes, with the right tools and guidance, it’s a manageable DIY project.
- 10. What should I do if my cabinet doors continue to stick? Check for obstructions, misalignment, or worn-out hinges that may need replacement.
Random Reads