Ultimate Guide to Caulking Shower Enclosures: A Step-by-Step Approach

-
Quick Links:
- Introduction
- Why Caulking is Important
- Tools and Materials Needed
- Preparation Steps
- Step-by-Step Caulk Application
- Tips for Success
- Common Mistakes to Avoid
- Case Studies
- FAQs
Introduction
Caulking shower enclosures is a vital part of bathroom maintenance that many homeowners overlook. Properly applied caulk prevents leaks, reduces the risk of mold and mildew, and enhances the overall appearance of your shower. In this comprehensive guide, we’ll delve into the various aspects of caulking shower enclosures, providing you with all the information necessary to accomplish this task efficiently and effectively.
Why Caulking is Important
Caulking is not just about aesthetics; it plays a crucial role in protecting your home from water damage. When water seeps into gaps around your shower enclosure, it can lead to:
- Mold and mildew growth
- Structural damage
- Increased maintenance costs
- Unpleasant odors
Understanding the importance of caulking will motivate you to keep your shower enclosure in optimal condition.
Tools and Materials Needed
Before you begin caulking your shower enclosure, gather the necessary tools and materials:
- Quality caulk (silicone or latex-based)
- Caulking gun
- Utility knife
- Rags or paper towels
- Masking tape
- Caulk remover (if needed)
- Cleaner (preferably a mildew remover)
Preparation Steps
Preparation is key to a successful caulking job. Follow these steps:
- **Remove Old Caulk:** Use a utility knife or caulk remover to carefully remove any existing caulk.
- **Clean the Area:** Thoroughly clean the surfaces to be caulked. Use a mildew remover to eliminate any mold or mildew.
- **Dry the Surface:** Ensure the area is completely dry before applying new caulk.
- **Tape Off Edges:** Apply masking tape along the edges where you will be caulking. This will help create clean lines.
Step-by-Step Caulk Application
To ensure a smooth caulking process, follow these detailed steps:
- **Load the Caulking Gun:** Cut the tip of the caulk tube at a 45-degree angle, creating an opening based on the desired bead size.
- **Test the Caulk:** Before applying it to the shower, squeeze out a small amount of caulk to ensure it flows smoothly.
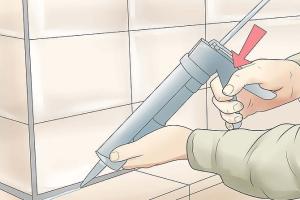
- **Apply the Caulk:** Start at one end of the joint and apply pressure to the trigger while moving the gun steadily along the joint. Aim for a continuous bead without breaks.
- **Smooth the Caulk:** Use a wet finger or a caulking tool to smooth the caulk bead, ensuring it adheres well to both surfaces.
- **Remove Tape:** Carefully pull the masking tape away while the caulk is still wet for clean lines.
- **Allow to Cure:** Follow the manufacturer's instructions for curing time before using the shower.
Tips for Success
To achieve the best results, consider the following tips:
- Choose the right caulk: Silicone caulk is recommended for wet areas due to its water-resistant properties.
- Work in sections: If you're caulking a large area, work in smaller sections to ensure neatness.
- Maintain a steady hand: Practice on a piece of cardboard if you're not confident in your application technique.
Common Mistakes to Avoid
Here are some pitfalls to avoid when caulking your shower enclosure:
- Skipping the cleaning step can lead to poor adhesion.
- Using the wrong type of caulk can result in leaks and mold growth.
- Applying caulk in high humidity can affect curing time and adhesion.
Case Studies
Let’s take a look at some real-world scenarios where proper caulking made a significant difference:
Case Study 1: Homeowner A
Homeowner A neglected caulking for years, leading to mold growth and extensive water damage. After following a proper caulking process, they reported reduced mold and an easier cleaning routine.
Case Study 2: Home Improvement Expert
A home improvement expert conducted a study on various caulking materials. They found that silicone caulk outperformed latex in wet areas, emphasizing the importance of material choice.
FAQs
- How often should I recaulk my shower enclosure?
It’s recommended to check your caulk every 6-12 months and replace it as needed. - Can I caulk over old caulk?
No, it’s best to remove old caulk for proper adhesion of the new caulk. - What type of caulk is best for showers?
Silicone caulk is ideal for wet areas due to its water resistance. - How long does caulk take to dry?
Most caulks require about 24 hours to cure, but check the manufacturer's instructions. - What causes caulk to crack or peel?
Moisture, poor surface preparation, and using the wrong caulk can lead to cracking. - Is it necessary to use masking tape?
While not necessary, masking tape helps create clean lines and avoid mess. - Can I paint over caulk?
Yes, but ensure you use paintable caulk and allow it to dry completely. - How do I remove caulk?
Use a utility knife or caulk remover tool to scrape it away carefully. - Can I use caulk in other areas of the bathroom?
Yes, caulk can be used around sinks, bathtubs, and other fixtures. - What should I do if I see mold after caulking?
Clean the area with a mildew remover and ensure proper ventilation.
Random Reads
- Mastering dust removal techniques
- How to manually upgrade android os
- How to make your toilet smell nice
- How to put video on dvd
- How to quickly delete a walmart account
- How to add borders in illustrator
- How to add bookmark microsoft word
- How to change a deadbolt lock
- How to change a light bulb
- How to make an armor stand in minecraft