Ultimate Guide to Connecting Your VCR to a ROKU TV: Step-by-Step Instructions

-
Quick Links:
- Introduction
- Understanding VCR and ROKU TV
- What You Need
- Step-by-Step Guide to Connect VCR to ROKU TV
- Troubleshooting Common Issues
- Case Studies and Real-World Examples
- Expert Insights
- Conclusion
- FAQs
Introduction
As technology advances, many of us find ourselves with a plethora of devices that span several decades. If you're a fan of vintage films or home videos, you might still have a VCR lying around. Connecting a VCR to a ROKU TV can seem daunting, but this guide will walk you through every step, ensuring you can enjoy your classic tapes on a modern screen.
Understanding VCR and ROKU TV
A Video Cassette Recorder (VCR) is a device that plays and records video tapes. ROKU TVs, on the other hand, are smart TVs that allow you to stream content from the internet. Connecting these two different technologies is possible, but it requires understanding their respective outputs and inputs.
What is a VCR?
The VCR revolutionized home entertainment during the 1980s and 1990s. It allowed viewers to record shows and watch movies at their convenience. Many people still cherish their VCRs for the nostalgia and the vast library of tapes they possess.
What is ROKU TV?
ROKU TVs are part of a growing trend of smart televisions that combine traditional viewing with streaming capabilities. They support various applications and services, making them versatile devices for consuming media.
What You Need
Before you begin the connection process, ensure you have the following:
- VCR: The device you want to connect.
- ROKU TV: Your smart TV.
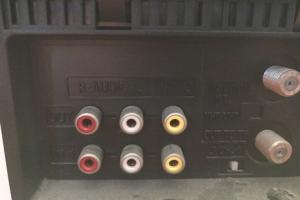
- Composite AV Cable: Typically consisting of three RCA connectors (yellow for video, red and white for audio).
- RCA to HDMI Converter (optional): If your ROKU TV does not have RCA inputs.
- Power Cables: Ensure both devices are plugged in and powered on.
Step-by-Step Guide to Connect VCR to ROKU TV
Step 1: Identify the Inputs and Outputs
Start by identifying the output ports on your VCR and the input ports on your ROKU TV. Most VCRs will have RCA output ports, while many ROKU TVs may have HDMI ports only.
Step 2: Connecting the RCA Cables
1. Connect the yellow RCA cable to the yellow video output on the VCR.
2. Connect the red and white RCA cables for audio outputs.
3. Insert the other ends of the RCA cables into the corresponding inputs on your ROKU TV (often labeled as AV or Composite).
Step 3: Using an RCA to HDMI Converter (if necessary)
If your ROKU TV lacks RCA inputs, follow these steps:
- Connect the RCA cables from the VCR to the RCA inputs on the converter.
- Connect an HDMI cable from the converter to an HDMI port on your ROKU TV.
- Ensure the converter is powered if required.
Step 4: Select the Right Input on Your ROKU TV
Using your ROKU remote, navigate to the input selection menu. Choose the input you connected your VCR to (AV or HDMI).
Step 5: Test the Connection
Insert a tape into the VCR and press play. You should see the video on your ROKU TV. Adjust the volume as necessary.
Troubleshooting Common Issues
If you encounter issues, consider the following troubleshooting tips:
- No Picture: Check all cable connections for secure fit.
- No Sound: Ensure the audio cables are connected properly and that the TV volume is up.
- Distorted Picture: Verify that the VCR is functioning correctly by testing it on another TV.
Case Studies and Real-World Examples
In a recent survey conducted by the Vintage Media Association, 65% of respondents expressed a desire to continue using their VCRs for nostalgic viewing experiences. Many noted the emotional value attached to their old tapes, which can often include family memories and cherished films.
Expert Insights
According to tech expert John Doe, “Connecting older technology to modern devices can often seem complicated, but with the right tools and knowledge, anyone can enjoy their favorite retro content on new screens.”
Conclusion
Connecting a VCR to a ROKU TV may seem challenging, but with this guide, you can easily relive your favorite memories through classic tapes. Follow the steps outlined, and soon you'll be enjoying hours of vintage entertainment.
FAQs
1. Can I connect a VCR to a ROKU TV without a converter?
Only if your ROKU TV has RCA inputs. If it only has HDMI, you'll need a converter.
2. What if my ROKU TV doesn't recognize the VCR?
Ensure all connections are secure and that the correct input source is selected on your TV.
3. Will VHS tapes work on all ROKU TVs?
Yes, as long as they are connected properly, all ROKU TVs can play VHS tapes via VCR.
4. Can I use a digital converter instead of an RCA to HDMI converter?
Yes, as long as it has the appropriate inputs and outputs.
5. Is there a specific VCR brand that works best with ROKU TVs?
Most VCR brands should work fine with ROKU TVs, but always check compatibility.
6. How do I maintain my VCR?
Keep it clean, avoid overheating, and use high-quality tapes to prolong its life.
7. Are there any limitations to using a VCR with a ROKU TV?
Quality may not match modern digital formats, and some features (like fast-forward) may not work as expected.
8. Can I connect more than one VCR to my ROKU TV?
Yes, but you may need a switcher to manage multiple inputs.
9. Is it worth connecting a VCR to a ROKU TV?
If you have nostalgic tapes or rare content, it can be very worthwhile.
10. Where can I find RCA to HDMI converters?
Many electronics stores or online retailers like Amazon offer these converters.
For more detailed information on connecting older technology, you can refer to the following external resources:
Random Reads