Ultimate Guide: How to Fix a Hole in a Wall Like a Pro

-
Quick Links:
- Introduction
- Understanding Different Wall Types
- Tools Needed for Wall Repair
- Step-by-Step Guide to Fixing a Hole in a Wall
- Real-World Case Studies
- Expert Insights on Wall Repair
- Maintenance Tips for Wall Longevity
- FAQs
Introduction
Having a hole in your wall can be a frustrating sight. Whether it's from a doorknob impact, a furniture mishap, or simply wear and tear, knowing how to fix a hole in a wall can save you time and money. This comprehensive guide will walk you through everything you need to know to repair wall damage like a pro, ensuring your walls look brand new again.
Understanding Different Wall Types
Before diving into repairs, it's essential to understand the type of wall you are dealing with. Here are the most common types:
- Drywall: The most common wall material in modern homes.
- Plaster: Older homes frequently feature plaster walls, which are more challenging to repair than drywall.
- Plywood: Often used in garages or sheds, plywood can be easier to work with.
Drywall
Drywall is composed of gypsum sandwiched between two sheets of thick paper. It is relatively easy to repair, making it a favorite for DIYers.
Plaster
Plaster walls are more rigid and can crack over time. They require a different approach than drywall repairs.
Tools Needed for Wall Repair
Having the right tools makes all the difference. Here’s a list of equipment you'll need:
- Spackling paste or joint compound
- Putty knife
- Sandpaper (120 and 220 grit)
- Paint (to match your wall)
- Primer (if necessary)
- Utility knife
- Paint roller or brush
- Dust mask and goggles
Step-by-Step Guide to Fixing a Hole in a Wall
Step 1: Assess the Damage
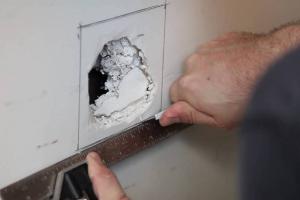
Determine the size and type of hole. Small nail holes can be fixed easily, while larger holes may require more extensive repair.
Step 2: Prepare the Area
Clear the area around the hole and lay down a drop cloth to catch debris. Wear a dust mask and goggles for protection.
Step 3: Clean the Hole
Use a utility knife to clean the edges of the hole. This ensures better adhesion for the patching material.
Step 4: Apply the Patch
For small holes, apply spackling paste with a putty knife. For larger holes, use a piece of drywall cut to fit, securing it with screws.
Step 5: Smooth the Surface
Once the patch is dry, sand it down until it's smooth and flush with the wall. Use 120-grit sandpaper first, followed by 220-grit for a finer finish.
Step 6: Prime and Paint
Apply primer if necessary, then paint to match the surrounding wall. Use a roller for larger areas and a brush for edges.
Real-World Case Studies
Case Study 1: Repairing a Doorknob Hole
In a recent project, a homeowner faced a fist-sized hole from a doorknob. After assessing the damage, they followed the outlined steps, resulting in a flawless repair. This case highlights the effectiveness of using a drywall patch for larger holes.
Case Study 2: Cracked Plaster Walls
An older home with cracked plaster walls posed a greater challenge. The homeowner used a specialized plaster repair compound and followed up with texture matching, achieving an impressive result.
Expert Insights on Wall Repair
Experts recommend using high-quality materials for wall repairs to ensure longevity. Additionally, they suggest taking the time to prep the area properly, as it significantly affects the end result. Remember, a well-done repair can last years if maintained properly.
Maintenance Tips for Wall Longevity
To keep your walls looking their best, consider the following maintenance tips:
- Regularly inspect walls for cracks or holes.
- Keep furniture away from high-traffic areas to prevent impacts.
- Use touch-up paint as needed to maintain appearance.
FAQs
1. What is the best material for patching drywall?
Spackling paste is ideal for small holes, while joint compound is better for larger repairs.
2. Can I paint over a spackled area immediately?
It's essential to wait for the spackling to dry completely before painting, usually a few hours.
3. How do I fix a hole in plaster?
Use a plaster repair compound and follow the same steps as for drywall, ensuring to match the texture.
4. Is it necessary to prime before painting?
Priming is recommended, especially for larger repairs, to ensure even paint coverage.
5. How can I prevent future holes in my wall?
Using wall protectors and being mindful of furniture placement can help prevent damage.
6. Can I use caulk to fix a hole?
Caulk is better suited for gaps and cracks rather than holes; opt for spackling or joint compound instead.
7. How long does it take to fix a hole in the wall?
The repair time can vary, but most small repairs can be completed in a few hours, including drying time.
8. Should I hire a professional for large repairs?
For extensive damage or structural issues, hiring a professional is advisable to ensure safety and quality.
9. What is the best way to hide a repair?
Using matching paint and texture can help blend repairs seamlessly into the surrounding wall.
10. Are there any eco-friendly options for wall repair?
Yes, look for low-VOC paints and natural plaster repair compounds for a more eco-friendly approach.
For further reading on home improvements, check out Houzz and This Old House.
Random Reads
- Create 3d sphere photoshop
- Create a gaming computer
- 3 simple ways transfer whatsapp audio messages
- How to use imessage
- How to use icloud storage
- Bypass age restrictions youtube
- Bypass activation lock
- How to fill a log book
- How to save powerpoint presentation thumbdrive
- How to save pictures onto your pc