Mastering the Art of Hanging Picture Frames Over Stairs: A Complete Guide

-
Quick Links:
- Introduction
- Understanding the Space
- Choosing the Right Frames
- Designing Your Layout
- Tools and Materials Needed
- Hanging Techniques
- Common Mistakes to Avoid
- Maintenance and Adjustments
- Case Studies
- Expert Insights
- FAQs
Introduction
Hanging picture frames over stairs can transform a mundane area into a stunning focal point of your home. However, it requires careful planning and execution to achieve the desired effect. This comprehensive guide will walk you through the entire process, from choosing the right frames to executing the perfect hang.
Understanding the Space
Stairs can be tricky when it comes to decor. The angle, height, and visibility all play a role in how your pictures will be viewed. Here are some key considerations:
- Height: Consider the height of the frames. They should be easily visible from the bottom of the stairs.
- Angle: The angle of the staircase may affect how the frames look from different perspectives.
- Lighting: Ensure adequate lighting to highlight the frames and the artwork.
Choosing the Right Frames
The choice of frames is crucial for creating a cohesive look. Here are some tips:
- Material: Wood, metal, or plastic frames can each convey a different style.
- Color: Choose colors that complement your walls and decor.
- Size: Mix and match different sizes for an eclectic look, or stick to uniform sizes for a more structured arrangement.
Designing Your Layout
Before you start hanging, it's critical to design your layout. Here’s how:
1. Create a Mockup
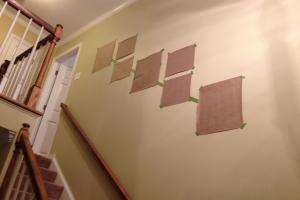
Use painter’s tape to outline the frames on the wall. This helps visualize the arrangement before making any holes.
2. Consider Symmetry vs. Asymmetry
Decide whether you want a symmetrical arrangement (uniformly spaced) or an asymmetrical one (varied spacing).
3. Use a Template
Consider using craft paper cutouts of your frames to experiment with placement on the wall.
Tools and Materials Needed
Here’s a list of tools and materials you will need:
- Picture frames
- Measuring tape
- Painter’s tape
- Level
- Hammer
- Nails or picture hanging hooks
- Stud finder (if needed)
Hanging Techniques
There are various techniques to hang frames over stairs, depending on the type of wall and frames. Here are some methods:
1. Standard Wall Hang
For most frames, using nails or hooks will suffice. Make sure to use a level to keep frames straight.
2. Using Picture Hanging Strips
For a no-damage option, consider adhesive picture hanging strips, which are great for lightweight frames.
3. Anchoring Frames
For heavier frames, use wall anchors to ensure stability and prevent falling off.
Common Mistakes to Avoid
Avoid these pitfalls to ensure a successful hanging experience:
- Not measuring the height correctly.
- Choosing frames that are too small for the space.
- Neglecting the lighting considerations.
Maintenance and Adjustments
Once your frames are hung, periodic maintenance is essential. Dust frames regularly and check for any loose nails or hooks.
Case Studies
Here are some examples of successful frame arrangements over stairs:
Case Study 1: The Eclectic Gallery Wall
A homeowner combined various frame sizes and styles, creating a vibrant gallery wall that captivated guests.
Case Study 2: The Minimalist Approach
Another homeowner chose a uniform size and color palette, resulting in a sleek and modern appearance.
Expert Insights
We reached out to interior designers for their take on hanging frames over stairs. Many emphasized the importance of balance and proportion.
FAQs
1. How high should I hang frames over stairs?
Frames should be hung at eye level, typically 57 to 60 inches from the floor.
2. What types of frames are best for stairways?
Lightweight frames are preferable, especially if you are using adhesive hangers.
3. Can I use adhesive strips for heavy frames?
No, adhesive strips are best for lightweight frames. Use nails or hooks for heavier options.
4. How do I ensure my frames are straight?
Use a level tool after hanging to ensure everything is aligned properly.
5. What should I do if I make a mistake while hanging?
Fill any holes with wall filler, and repaint if necessary before re-hanging.
6. Can I mix different frame styles in one display?
Yes, mixing styles can create a dynamic and personalized look.
7. Is it okay to hang frames at an angle?
Yes, hanging frames at an angle can add a unique touch, but ensure it aligns with the overall design.
8. How often should I change the pictures in the frames?
Changing pictures seasonally can keep the display fresh and interesting.
9. What is the best way to plan my layout?
Use painter’s tape to outline frame sizes on the wall before making any commitments.
10. How do I handle uneven walls?
Use a stud finder and adjust your frame heights accordingly to create an even look.