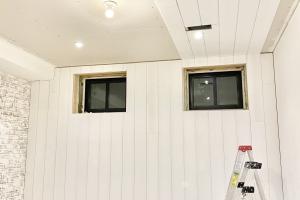
Ultimate Guide to Installing Shiplap: Transform Your Home with Ease

-
Quick Links:
- Introduction
- What is Shiplap?
- Benefits of Shiplap
- Tools and Materials Needed
- Preparation
- Installation Process
- Finishing Touches
- Maintenance of Shiplap
- Case Studies
- Expert Insights
- FAQs
Introduction
Shiplap is a popular choice among homeowners and designers seeking to add character and charm to their spaces. Its clean lines and rustic aesthetic make it ideal for various styles, from modern farmhouse to coastal chic. In this guide, we will provide you with all the information you need to install shiplap like a professional, transforming your home into a stylish haven.What is Shiplap?
Shiplap is a type of wooden board that is typically used for siding. Characterized by its overlapping design, shiplap boards fit together tightly to create a weatherproof seal. Originally used in exterior applications, shiplap has become a popular interior design element, often seen on accent walls, ceilings, and even furniture.Benefits of Shiplap
- Visual Appeal: Shiplap adds depth and texture to walls, enhancing the overall aesthetic of a room.
- Versatility: It can be painted or stained to match any decor style.
- Easy Installation: With basic tools and skills, shiplap can be installed by DIY enthusiasts.
- Durability: Made from high-quality wood, shiplap is built to last.
Tools and Materials Needed
Before you start your shiplap installation project, gather the following tools and materials:Tools
- Measuring tape
- Level
- Stud finder
- Saw (miter saw or circular saw)
- Nail gun or hammer
- Paintbrush or roller
- Caulk gun
Materials
- Shiplap boards (wood or MDF)
- Wood adhesive (optional)
- Paint or stain
- Wood filler
- Primer (if painting)
Preparation
Before you begin your installation, follow these preparation steps: 1. **Choose Your Shiplap:** Decide on the type of shiplap you want to use. Options include natural wood, pre-primed, or MDF. 2. **Measure Your Space:** Measure the area where you will install the shiplap. Calculate how many boards you will need based on the dimensions. 3. **Prepare the Wall:** Ensure the wall is clean, dry, and free of holes or imperfections. Patch any holes and sand the wall if necessary. 4. **Gather Your Tools:** Have all your tools and materials within reach to streamline the installation process.Installation Process
Installing shiplap can be broken down into several easy-to-follow steps:Step 1: Mark the Studs
Using a stud finder, locate the studs in the wall. Mark their positions with a pencil for reference during installation.Step 2: Cut the Boards
Measure and cut your shiplap boards to fit the wall. Ensure that the cuts are straight and the lengths match your measurements.Step 3: Start at the Bottom
Begin installation at the bottom of the wall. Position the first board so that it aligns with the floor.Step 4: Secure the Boards
Using a level, ensure the board is straight. Nail it into place, securing it to the studs. Repeat this process for subsequent boards, ensuring the shiplap overlaps correctly.Step 5: Continue Upwards
Continue installing the boards upward, checking for level as you go. Use wood adhesive for added stability if desired.Step 6: Fill Gaps and Nail Holes
Once all boards are installed, fill any gaps or nail holes with wood filler. Allow it to dry, then sand it smooth.Step 7: Final Touches
Apply primer if painting, followed by your chosen paint or stain. Allow it to dry completely.Finishing Touches
To enhance the look of your newly installed shiplap, consider adding trim around the edges. This not only provides a polished look but also covers any rough edges.Maintenance of Shiplap
To keep your shiplap looking its best: - Dust regularly to prevent buildup. - Wipe down with a damp cloth as needed. - Repaint or stain every few years to maintain its appearance.Case Studies
**Case Study 1:** A family in a suburban home transformed their living room with shiplap, increasing their home value by 15%. They chose a rustic finish, complementing their existing decor. **Case Study 2:** An urban apartment utilized shiplap in the kitchen, creating a focal point that led to a quicker sale when the owners moved. The clean, white finish opened up the space visually.Expert Insights
According to interior designer Jane Doe, "Shiplap is not just about aesthetics. It can also improve the thermal efficiency of your home when installed correctly." Additionally, contractor John Smith states, "Using high-quality materials ensures durability and a beautiful finish that lasts for years."FAQs
1. Can I install shiplap over drywall?
Yes, shiplap can be installed directly over drywall, but ensure the wall is sturdy and free of damage.2. How do I choose the right type of wood for shiplap?
Consider your budget and the desired look. Pine is affordable and easy to work with, while cedar offers natural resistance to decay.3. Is shiplap suitable for bathrooms?
Yes, shiplap can be used in bathrooms, but it's advisable to use moisture-resistant materials.4. How do I maintain shiplap?
Regular dusting and occasional cleaning with a damp cloth will keep it looking fresh.5. Can shiplap be painted?
Absolutely! Shiplap can be painted to match any design scheme.6. What is the average cost of shiplap installation?
Costs can vary, but expect to pay between $1.50 and $7.00 per square foot for materials and installation.7. How long does it take to install shiplap?
A typical installation can take anywhere from a few hours to a couple of days, depending on the size of the area.8. Is shiplap environmentally friendly?
If sourced responsibly, shiplap can be an eco-friendly choice, especially when using reclaimed wood.9. Can I do it myself?
Yes, shiplap installation is a great DIY project for those with basic carpentry skills.10. Do I need to seal shiplap after installation?
If you choose a natural wood finish, sealing may be necessary to protect against moisture.Random Reads