Effortless Guide to Repairing Pop Up Sprinkler Heads: Step-by-Step Instructions

-
Quick Links:
- Introduction
- Common Issues with Pop Up Sprinkler Heads
- Tools Needed for Repair
- Step-by-Step Repair Process
- Maintenance Tips for Sprinkler Heads
- Case Studies: Real-Life Repairs
- Expert Insights on Sprinkler Repair
- Conclusion
- FAQs
Introduction
Pop-up sprinkler heads are essential for maintaining a lush, green lawn. However, like any mechanical system, they can encounter issues that require repair. In this guide, we'll explore how to effectively repair a pop-up sprinkler head, helping you save money on professional irrigation services and ensuring your lawn stays hydrated.
Common Issues with Pop Up Sprinkler Heads
Understanding the common problems that can arise with pop-up sprinkler heads is vital for effective repairs. Here are some of the typical issues:
- Sprinkler Not Pop-Up: Often caused by low water pressure or debris obstructing the mechanism.
- Leaking Water: Water leaks from the base of the head due to a worn-out seal.
- Uneven Water Distribution: May result from a clogged nozzle or an improperly adjusted sprinkler.
- Broken Sprinkler Head: Physical damage can occur due to lawn maintenance or extreme weather.
Tools Needed for Repair
Before you begin the repair process, gather the necessary tools:
- Adjustable wrench
- Screwdriver (flat-head and Phillips)
- Replacement parts (seals, heads, or nozzles as needed)
- Garden trowel
- Pipe wrench
- Water source for testing
Step-by-Step Repair Process
Follow these detailed steps to repair your pop-up sprinkler head:
Step 1: Identify the Problem
Examine the sprinkler head to determine the exact issue. Check for any visible signs of damage or blockage.
Step 2: Turn Off the Water Supply
Before proceeding with repairs, ensure the water supply to the sprinkler system is turned off to prevent accidental spraying.
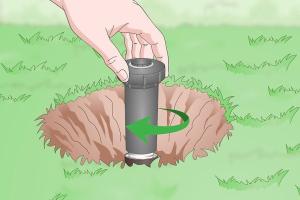
Step 3: Remove the Sprinkler Head
Using your adjustable wrench, unscrew the sprinkler head from its base. Be cautious not to damage the surrounding components.
Step 4: Inspect and Clean the Components
Inspect the head, seals, and nozzles for wear and debris. Clean any dirt or gunk using a soft brush or cloth.
Step 5: Replace Worn Parts
If you notice any damaged seals or nozzles, replace them with new ones. Ensure that the replacement parts match the original specifications.
Step 6: Reassemble the Sprinkler Head
Reattach the sprinkler head to the base, ensuring a snug fit. Avoid over-tightening as this can cause damage.
Step 7: Test the Sprinkler
Turn the water supply back on and test the sprinkler. Observe the operation for a few minutes to ensure proper function.
Maintenance Tips for Sprinkler Heads
Regular maintenance can prevent many issues:
- Inspect your sprinklers at least twice a year.
- Clear debris around the heads to avoid blockages.
- Adjust sprinkler heads seasonally for optimal coverage.
Case Studies: Real-Life Repairs
Let's look at a few examples where homeowners successfully repaired their pop-up sprinkler heads:
Case Study 1: The Clogged Sprinkler Head
In Springfield, a homeowner faced recurring issues with a clogged sprinkler head. After following the steps outlined above, they discovered that a simple cleaning of the nozzle resolved the problem. Regular maintenance checks have since prevented re-clogging.
Case Study 2: Broken Head Replacement
A resident in Green Valley found a broken sprinkler head after lawn mowing. By purchasing a compatible replacement and following the repair steps, they efficiently restored their watering system without hiring a professional.
Expert Insights on Sprinkler Repair
According to irrigation experts, understanding your sprinkler system is key to effective maintenance. Here are some insights:
- Regularly check water pressure; low pressure can lead to malfunctions.
- Insulate sprinkler heads during winter to prevent freeze damage.
- Consider investing in smart irrigation technology for efficiency.
Conclusion
Repairing pop-up sprinkler heads is a manageable task for homeowners willing to invest a little time and effort. By following the steps and tips provided in this guide, you can ensure your lawn remains vibrant and healthy.
FAQs
- 1. How often should I check my sprinkler heads?
- It’s advisable to check at least once every season and after extreme weather conditions.
- 2. What causes a sprinkler head to not pop up?
- Low water pressure, debris, or mechanical failure can prevent the head from popping up.
- 3. Can I repair a broken sprinkler head myself?
- Yes, most repairs can be done DIY with basic tools and replacement parts.
- 4. How do I know if my sprinkler head is clogged?
- If water sprays unevenly or not at all, the head may be clogged.
- 5. What type of replacement parts do I need?
- Match the parts to your specific sprinkler model for best results.
- 6. Are there any tools I shouldn’t use?
- Avoid using excessive force with tools to prevent damaging components.
- 7. How can I maintain my sprinkler system?
- Regular inspections, cleaning, and seasonal adjustments will enhance system performance.
- 8. Should I call a professional for complicated repairs?
- If the problem persists or involves complex issues, consulting a professional is recommended.
- 9. What should I do if my sprinkler head leaks?
- Inspect the seals and replace them if necessary to stop the leak.
- 10. How can I prevent future sprinkler issues?
- Implementing a regular maintenance schedule can prevent many common problems.
Random Reads
- Mastering taping floating drywall
- Mastering googles impossible tic tac toe
- View downloaded files iphone
- Using kik on a computer
- Mastering plague inc parasite brutal mode
- Mastering ping in linux
- How to hide link html css
- How to hide a file in an image file
- How to use cell phone plan on tablet
- How to use boosters in candy crush