4 Simple Steps to Create Stunning Gradients in GIMP

-
Quick Links:
- Introduction
- What is a Gradient?
- Why Use Gradients in Design?
- Step-by-Step Guide to Creating Gradients in GIMP
- Case Studies and Examples
- Expert Insights on Gradient Usage
- FAQs
Introduction
In the world of graphic design, gradients add depth, dimension, and a unique flair to your artwork. Whether you're creating a poster, a website, or a digital painting, knowing how to effectively use gradients can elevate your work to the next level. In this article, we will guide you through four easy steps to create beautiful gradients in GIMP, one of the most popular open-source graphic design tools available today.
What is a Gradient?
A gradient is a gradual transition from one color to another. Gradients can be linear, radial, or angular, resulting in a blend of colors that can create a visually appealing effect. In graphic design, gradients are often used to create backgrounds, highlights, and shadows, enhancing the overall aesthetic of an image.
Why Use Gradients in Design?
Gradients serve multiple purposes in design:
- Add Visual Interest: They break the monotony of solid colors and make designs more engaging.
- Convey Depth: Gradients can simulate light and shadow, adding a three-dimensional effect.
- Branding: Gradients can be a part of a brand's identity, creating a unique visual language.
- Versatility: They can be applied to various elements, including backgrounds, buttons, and text.
Step-by-Step Guide to Creating Gradients in GIMP
Creating gradients in GIMP can be accomplished in just four simple steps. Here’s how:
Step 1: Set Up Your Workspace
Before diving into creating gradients, ensure your GIMP workspace is set up correctly:
- Open GIMP on your computer.
- Create a new project by going to File > New.
- Select the canvas size according to your design requirements.
- Familiarize yourself with the toolbox on the left and the layers panel on the right.
Step 2: Choose the Gradient Tool
Now that your workspace is ready, follow these steps to select the gradient tool:
- Select the Gradient Tool from the toolbox (it looks like a gradient bar).
- Look for the gradient options in the tool options below the toolbox. You will see a dropdown menu of available gradients.
- Click on the gradient to preview it and select one that suits your design.
Step 3: Apply the Gradient
With your gradient selected, it’s time to apply it to your canvas:
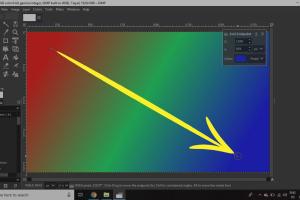
- Click and drag your mouse across the canvas in the direction you want the gradient to flow.
- Experiment with different lengths and angles to see how they affect the gradient.
- Use the Undo function (Ctrl + Z) if you need to try again.
Step 4: Fine-tune Your Gradient
The final step is to adjust and fine-tune your gradient:
- Access the Gradient Editor by double-clicking the gradient bar in the tool options.
- Adjust the colors and stops to create a unique gradient.
- Save your custom gradient for future use by clicking Save in the editor.
Case Studies and Examples
Understanding the application of gradients can be greatly enhanced by studying real-world examples. Let’s explore a few:
Example 1: Website Background
Many modern websites use gradients as background elements to create an engaging user experience. For instance, the popular website Spotify often utilizes vibrant gradients to enhance its aesthetic appeal, creating contrast with text and images.
Example 2: Digital Art
Digital artists frequently use gradients to add depth to their paintings. A study conducted by Digital Arts Online showcased artists who created stunning portraits using gradients to enhance skin tones and shadows.
Expert Insights on Gradient Usage
According to design experts, gradients are making a comeback in modern design. Renowned graphic designer Jessica Walsh mentions that gradients can evoke emotion and set the tone for a design. She emphasizes the importance of color psychology in gradient selection, where the right combination of colors can enhance user interaction and engagement.
FAQs
1. What types of gradients can I create in GIMP?
You can create linear, radial, and angular gradients in GIMP, each offering a different visual effect.
2. Can I create custom gradients in GIMP?
Yes, GIMP allows you to create and save custom gradients using the Gradient Editor!
3. How do I find more gradient options?
Explore the GIMP gradient library or download additional gradient packs from online resources.
4. Can I apply gradients to text in GIMP?
Yes, you can apply gradients to text by converting it to a path and then filling it with a gradient.
5. Are gradients still relevant in design?
Absolutely! Gradients are a trendy design element that adds depth and modernity to graphics.
6. What is the best way to learn GIMP?
Practice consistently, explore online tutorials, and join design communities for tips and feedback.
7. Can I export my gradients for use in other software?
While GIMP gradients are specific to GIMP, you can recreate them in other software by noting the colors used.
8. How do I troubleshoot gradient issues in GIMP?
Check your layer settings and ensure you are using the correct tool. Also, ensure no other layer is obstructing your gradient.
9. Are there any shortcuts for using gradients in GIMP?
Yes, familiarize yourself with GIMP’s keyboard shortcuts to speed up your workflow.
10. How can I improve my gradient skills?
Experiment with different color combinations and seek inspiration from professional designers.
By following these four easy steps and utilizing gradients effectively, you'll find an enhanced ability to create visually appealing designs in GIMP. Whether you're a beginner or an experienced designer, mastering gradients is a crucial skill that will elevate your work.
As graphic design continues to evolve, keep experimenting with gradients and incorporating them into your projects. Happy designing!