Ultimate Guide to Caulking Baseboards: Tips, Techniques, and Tools

-
Quick Links:
- Introduction
- Understanding Caulking
- Essential Tools and Materials
- Preparation Steps
- Step-by-Step Caulking Technique
- Finishing Touches
- Common Mistakes to Avoid
- Case Studies
- Expert Insights
- FAQs
Introduction
Caulking baseboards is a crucial step in home improvement that not only enhances the appearance of your rooms but also provides essential protection against moisture and pests. In this guide, we will delve into the ins and outs of caulking baseboards, ensuring you achieve professional results whether you're a seasoned DIYer or a first-timer.
Understanding Caulking
Caulking is the process of sealing joints or seams to prevent leakage in various structures and piping. In the context of baseboards, caulking helps to fill gaps between the baseboard and the wall or floor, providing a smooth, finished look while also preventing dust and moisture from accumulating.
Why is Caulking Important?
- Sealing Gaps: Prevents dust and allergens from entering the living space.
- Moisture Protection: Helps avoid water damage and mold growth.
- Aesthetic Appeal: Creates a clean, polished look in your home.
Essential Tools and Materials
Before you begin caulking, gather the following tools and materials:
- Caulk (latex, silicone, or acrylic)
- Caulking gun
- Utility knife
- Putty knife or caulk smoothing tool
- Painter’s tape
- Rags or paper towels for cleanup
- Cleaning solution (optional)
Preparation Steps
Proper preparation will set you up for success. Follow these steps:
- Choose the Right Caulk: Select the appropriate caulk based on the material of your baseboards and the area’s moisture level.
- Clean the Area: Remove dust, dirt, and old caulk from the baseboard and wall.
- Apply Painter’s Tape: For a clean line, apply painter’s tape along the edges where you will apply the caulk.
Step-by-Step Caulking Technique
Now that you’re prepared, follow these steps to caulk your baseboards:
- Load the Caulk into the Gun: Cut the tip of the caulk tube at a 45-degree angle and insert it into the caulking gun.
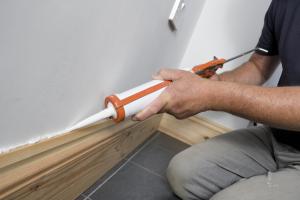
- Apply the Caulk: Place the nozzle at the joint and squeeze the trigger gently, moving along the seam at a steady pace.
- Smooth the Caulk: Use a putty knife or smoothing tool to create a smooth finish. Dampen your finger or tool for a cleaner look.
- Remove Painter’s Tape: Carefully pull off the tape while the caulk is still wet for a crisp line.
- Clean Up: Wipe any excess caulk with a rag and allow the caulk to dry according to the manufacturer’s instructions.
Finishing Touches
Once the caulk has dried, you can paint over it if necessary. Choose a paint that matches your baseboards for a seamless look. Ensure the caulk is fully cured before applying any paint to avoid adhesion issues.
Common Mistakes to Avoid
- Using the wrong type of caulk for the job.
- Not cleaning the surface properly before application.
- Applying too much or too little caulk.
- Removing painter’s tape after the caulk has dried.
Case Studies
To illustrate the effectiveness of proper caulking techniques, we gathered case studies from homeowners who experienced significant improvements in their home's aesthetics and functionality after caulking their baseboards.
Case Study 1: The Smith Family
The Smith family noticed an increase in dust accumulation along their baseboards. After following our guide, they reported a cleaner home environment and improved air quality.
Case Study 2: The Johnsons
The Johnsons had persistent moisture issues in their basement. By caulking their baseboards, they significantly reduced moisture levels, preventing mold growth and enhancing their living space.
Expert Insights
We consulted with home improvement experts to gain additional insights into the caulking process. Experts emphasize the importance of choosing the right caulk for specific applications, particularly in high-moisture areas such as bathrooms and kitchens.
FAQs
1. How often should I re-caulk my baseboards?
It is advisable to check your caulk annually and reapply as needed, especially in high-moisture areas.
2. Can I paint over caulk?
Yes, as long as the caulk is fully cured, it can be painted over to match your baseboards.
3. What type of caulk is best for baseboards?
For most interior baseboards, a latex or acrylic caulk is suitable. For areas with high moisture, consider silicone caulk.
4. How do I remove old caulk?
Use a utility knife to carefully cut away the old caulk, then clean the area with a solvent if necessary.
5. Can I caulk without a caulking gun?
While it's possible to use a caulk tube without a gun, a caulking gun provides better control and ease of application.
6. Is caulk waterproof?
Some types of caulk, such as silicone, are waterproof, making them ideal for bathrooms and kitchens.
7. How long does caulk take to dry?
Drying times vary, but most caulks will be dry to the touch in 30 minutes to an hour; full curing can take up to 24 hours.
8. Can caulk be used outdoors?
Yes, but ensure you use a caulk specifically labeled for outdoor use to withstand the elements.
9. What is the difference between latex and silicone caulk?
Latex caulk is easier to apply and clean up, while silicone caulk is more flexible and waterproof.
10. Should I use a caulking tool?
A caulking tool can help achieve a smoother finish and better adhesion, making it a worthwhile investment.
Random Reads