Ultimate Guide to Connecting LED Strip Lights: Step-by-Step Instructions for Home Decor

-
Quick Links:
- Introduction
- What are LED Strip Lights?
- Types of LED Strip Lights
- Tools and Materials Needed
- Step-by-Step Guide to Connect LED Strip Lights
- Common Issues and Solutions
- Case Studies: Real-Life Applications
- Expert Insights on LED Strip Lighting
- FAQs
Introduction
LED strip lights have transformed the way we illuminate our homes. They offer flexibility, energy efficiency, and a myriad of colors to enhance any space. Whether you want to create a cozy atmosphere in your living room or add some flair to your kitchen, understanding how to connect LED strip lights is essential.
What are LED Strip Lights?
LED strip lights, also known as LED tape lights or ribbon lights, are flexible circuit boards populated with LED lights. They can be cut to size and are often used for accent lighting, task lighting, and decorative purposes.
Benefits of LED Strip Lights
- Energy efficiency
- Long lifespan
- Variety in colors and brightness
- Flexibility in installation
Types of LED Strip Lights
Understanding the different types of LED strip lights will help you choose the best one for your needs:
- Single Color LED Strips: These strips emit a single color of light, ideal for uniform lighting.
- RGB LED Strips: Capable of emitting multiple colors, these strips are perfect for creating dynamic lighting effects.
- RGBW LED Strips: These include an additional white LED, providing both colorful and warm white light.
- Smart LED Strips: These can be controlled via apps or voice commands, offering the greatest convenience.
Tools and Materials Needed
Before you begin, ensure you have the following tools and materials:
- LED strip lights
- Power supply
- Connector clips or soldering tools
- Wire strippers
- Scissors
- Measuring tape
- Adhesive backing (if not pre-installed)
Step-by-Step Guide to Connect LED Strip Lights
Connecting LED strip lights may seem daunting, but following these steps will make the process simple.
Step 1: Measure and Cut
First, measure the area where you want to install the LED strip lights. Most strips can be cut at designated spots marked on the strip. Use scissors to cut the strip to the desired length.
Step 2: Prepare the Power Supply
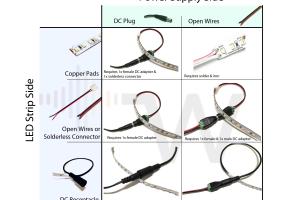
Ensure the power supply is appropriate for the LED strip you are using. Most strips require a specific voltage (12V or 24V). Connect the power supply to the LED strip using clips or by soldering wires.
Step 3: Attach the LED Strip
If your LED strip has an adhesive backing, peel off the protective layer and stick it to the desired surface. For extra security, consider using adhesive clips.
Step 4: Connect to Power
Plug the power supply into a wall outlet. If you’re using a dimmer or controller, connect the LED strip to it before plugging in.
Step 5: Test the Lights
Once everything is connected, turn on the power supply to test the lights. If they don’t light up, double-check all connections.
Common Issues and Solutions
While connecting LED strip lights is generally straightforward, you may encounter some issues:
- LEDs Not Lighting Up: Check all connections and ensure the power supply is functioning.
- Flickering Lights: This may indicate a poor connection or insufficient power supply.
- Shortened Lifespan: Ensure the strip is not overloaded with voltage beyond its specifications.
Case Studies: Real-Life Applications
Let’s explore how LED strip lights have been effectively used in various settings:
Case Study 1: Residential Use
A family decided to use RGB LED strips in their living room. They connected the strips to a smart controller, allowing them to change colors based on mood or occasion. This not only enhanced their decor but also provided a fun element during gatherings.
Case Study 2: Commercial Use
A local cafe used warm white LED strips under shelves and along the walls to create a cozy atmosphere. This lighting choice attracted more customers and increased their evening sales.
Expert Insights on LED Strip Lighting
According to lighting expert John Doe, “LED strip lights are a versatile and cost-effective solution for modern lighting needs. They can transform any space when installed correctly.”
Additionally, the energy savings associated with LED technology can lead to significant cost reductions over time, making them an excellent investment for both residential and commercial applications.
FAQs
1. Can I cut LED strip lights to fit my space?
Yes, most LED strips can be cut at designated points without damaging them.
2. Do I need a special power supply for my LED strips?
Yes, ensure the power supply matches the voltage requirements of your LED strip lights.
3. How long can LED strip lights be?
LED strips can typically be connected in lengths of about 16.4 feet (5 meters) before needing to be powered again.
4. Are LED strips safe to use indoors?
Yes, as long as they are rated for indoor use and installed correctly.
5. Can I use LED strips outdoors?
Yes, if they are specifically designed for outdoor use and are waterproof.
6. How do I connect multiple LED strips together?
You can use connectors or solder additional strips to the existing ones, ensuring proper polarity.
7. Can I dim my LED strip lights?
Yes, using a compatible dimmer or smart controller allows you to adjust brightness.
8. What is the lifespan of LED strip lights?
LED strip lights can last anywhere from 25,000 to 50,000 hours, depending on usage.
9. Do LED strip lights generate heat?
They generate minimal heat compared to traditional incandescent bulbs, making them safer to touch.
10. How can I clean my LED strip lights?
Use a soft, dry cloth to wipe away dust; avoid using liquids that could damage the LEDs.
Random Reads