Ultimate Guide: How to Safely Disassemble a PlayStation 2 for Repair and Maintenance

-
Quick Links:
- Introduction
- Tools Needed
- Safety Precautions
- Disassembly Steps
- Common Issues and Fixes
- Reassembly Guide
- Case Studies
- Expert Insights
- FAQs
Introduction
The PlayStation 2 (PS2) is one of the most beloved gaming consoles of all time, known for its extensive library of games and robust hardware. However, like any electronic device, the PS2 can encounter issues over time, necessitating maintenance or repairs. Disassembling your PS2 allows you to clean, repair, or replace faulty components, extending its lifespan and ensuring optimal performance. This guide will walk you through the process of safely disassembling a PlayStation 2, step by step.
Tools Needed
Before you begin disassembling your PlayStation 2, gather the following tools:
- Small Phillips screwdriver
- Small flathead screwdriver
- Tweezers
- Plastic spudger or guitar pick (for prying open the case)
- Anti-static wrist strap (optional but recommended)
- Container for screws
Safety Precautions
When working with electronics, it’s crucial to take safety precautions to avoid damage to the console or injury to yourself. Follow these guidelines:
- Ensure the PS2 is unplugged from any power source.
- Ground yourself to prevent static electricity damage to sensitive components.
- Handle all components carefully to avoid breaking fragile parts.
Disassembly Steps
Follow these detailed steps to disassemble your PlayStation 2:
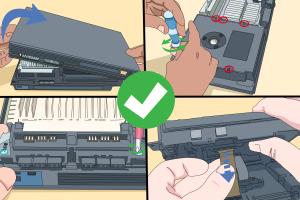
Step 1: Remove the Top Cover
Using the Phillips screwdriver, remove the screws located on the bottom of the console. Keep the screws in a container for easy access later. Once the screws are removed, use the plastic spudger to gently pry open the top cover, starting from the back and working your way forward.
Step 2: Disconnect the Power Supply
Once the top cover is off, locate the power supply connector on the motherboard. Gently unplug the connector from the motherboard to avoid damaging it.
Step 3: Remove the Optical Drive
Next, unscrew the screws holding the optical drive in place. Carefully lift the drive out and disconnect any remaining cables.
Step 4: Access the Motherboard
To remove the motherboard, unscrew the screws securing it to the bottom casing. Once the screws are out, carefully lift the motherboard, ensuring no cables are still connected.
Step 5: Disassemble Additional Components
If further disassembly is needed, such as accessing the cooling fan or other internal components, continue to carefully remove screws and connectors. Always document your steps to make reassembly easier.
Common Issues and Fixes
As you work with your PlayStation 2, you may encounter common issues that require attention:
- Disc Read Errors: Usually caused by a dirty lens; clean the lens carefully with a microfiber cloth.
- Overheating: Ensure the cooling fan is functioning properly and clean any dust buildup.
- Power Issues: Check the power supply for damage or loose connections.
Reassembly Guide
Reassembling your PlayStation 2 is the reverse of disassembly. Follow these steps to ensure a successful reassembly:
- Reattach the motherboard, ensuring all connectors are securely plugged in.
- Reinstall the optical drive and connect all necessary cables.
- Reconnect the power supply to the motherboard.
- Carefully place the top cover back on and secure it with screws.
Case Studies
Here are a few examples of successful PlayStation 2 repairs through disassembly:
Case Study 1: Cleaning the Optical Lens
A user reported persistent disc read errors. After disassembling the unit and cleaning the optical lens, the console functioned as new.
Case Study 2: Replacing the Cooling Fan
Another user experienced overheating issues. By replacing the cooling fan during disassembly, they resolved the problem and improved longevity.
Expert Insights
Experts recommend that users regularly clean their consoles to prevent common issues. Routine disassembly for cleaning can enhance performance and longevity.
FAQs
1. Is it safe to disassemble my PlayStation 2?
Yes, as long as you follow safety precautions and handle components carefully.
2. What if I lose screws during disassembly?
Keep screws in a container or labeled bags to avoid losing them.
3. Can disassembling void my warranty?
Yes, if your console is still under warranty, disassembly may void it.
4. How can I clean the inside of my PS2?
Use compressed air and a microfiber cloth to clean dust and debris.
5. Can I upgrade parts of my PS2?
While certain components can be replaced, upgrades are limited due to the console's age.
6. What tools do I need for disassembly?
A small Phillips screwdriver, flathead screwdriver, and other basic tools are required.
7. How often should I disassemble my PS2 for maintenance?
It’s advisable to check and clean your PS2 every 2-3 years, or more frequently if you use it often.
8. Is professional help necessary for disassembly?
Not necessarily. With this guide, many users can disassemble their PS2 safely on their own.
9. What are signs that my PS2 needs disassembly?
Common signs include disc read errors, overheating, and unusual noises during operation.
10. Where can I find replacement parts for my PS2?
Online marketplaces like eBay, Amazon, or specialized gaming stores often have replacement parts.