Ultimate Guide to Fixing Ceiling Cracks: Step-by-Step Solutions

-
Quick Links:
- Introduction
- Understanding Ceiling Cracks
- Types of Ceiling Cracks
- Causes of Ceiling Cracks
- Tools and Materials Needed
- Step-by-Step Guide to Fix Ceiling Cracks
- Case Studies
- Expert Insights
- Preventive Measures
- Conclusion
- FAQs
Introduction
Ceiling cracks can be an eyesore and may also indicate underlying issues in your home. Whether they are small hairline fractures or larger, more extensive cracks, knowing how to fix ceiling cracks effectively is essential for maintaining the integrity of your home. In this comprehensive guide, we will explore various types of ceiling cracks, their causes, and provide you with a detailed step-by-step process to repair them successfully.
Understanding Ceiling Cracks
Ceiling cracks are common in many homes, and understanding the nature of these cracks is crucial for effective repair. They can appear in various forms and can result from different factors including structural movement, temperature changes, and moisture.
Types of Ceiling Cracks
1. Hairline Cracks
These are very thin cracks that often occur due to settling of the house or minor temperature changes.
2. Larger Cracks
These cracks can be indicative of more serious issues such as structural problems or significant moisture damage.
3. Settlement Cracks
These cracks occur as a house settles into its foundation over time, typically showing up within the first few years of construction.
4. Cracks Due to Water Damage
Moisture damage may lead to cracks caused by mold growth or the weakening of ceiling materials.
Causes of Ceiling Cracks
Understanding the causes of ceiling cracks can help prevent them in the future. Here are some common causes:
- Foundation settlement
- Temperature fluctuations
- Moisture and humidity
- Improper installation of ceiling materials
- Structural issues
Tools and Materials Needed
Before you start fixing ceiling cracks, gather the following tools and materials:
- Drywall patching compound
- Putty knife
- Sandpaper
- Primer and paint
- Caulk (for smaller cracks)
- Paintbrush
- Drop cloths
Step-by-Step Guide to Fix Ceiling Cracks
Follow these steps to repair ceiling cracks effectively:
Step 1: Assess the Crack
Identify the type of crack and determine whether it’s superficial or indicative of a structural issue.
Step 2: Prepare the Area
Clear the area beneath the crack and cover the floors with drop cloths to protect them from debris and materials.
Step 3: Clean the Crack
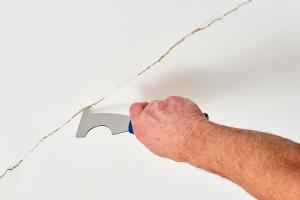
Use a putty knife to widen the crack slightly, allowing for better adhesion of the filler material.
Step 4: Apply the Filler
For hairline cracks, apply a paintable caulk. For larger cracks, use drywall patching compound applied with a putty knife.
Step 5: Smooth the Surface
Once the filler has dried, sand the area smooth with sandpaper to ensure it’s flush with the ceiling surface.
Step 6: Prime and Paint
Apply a primer over the repaired area, followed by paint that matches the rest of the ceiling.
Case Studies
Case Study 1: Repairing a Hairline Crack
In a recent project, a homeowner noticed a hairline crack in their living room ceiling. Using a simple caulking method, they were able to repair it in under an hour, saving significant money on professional repairs.
Case Study 2: Addressing Water Damage
A couple discovered larger cracks in their ceiling after a plumbing leak. After addressing the leak and allowing the area to dry, they followed the guide above to repair the damage, which restored the ceiling’s integrity.
Expert Insights
According to builders and home repair experts, regular maintenance and inspections can catch potential ceiling issues before they become serious. Addressing small cracks promptly can save homeowners from costly repairs down the line.
Preventive Measures
To prevent ceiling cracks from reappearing, consider the following measures:
- Maintain proper humidity levels in your home.
- Regularly inspect your ceilings for signs of moisture or damage.
- Ensure your home’s foundation is stable.
Conclusion
Fixing ceiling cracks may seem daunting, but with the right tools and knowledge, it can be accomplished effectively. Regular maintenance and timely repairs can help maintain the visual appeal and structural integrity of your home.
FAQs
1. What causes hairline cracks in ceilings?
Hairline cracks are often caused by normal settling of the house or minor temperature changes.
2. How can I tell if a ceiling crack is serious?
If the crack is wider than 1/4 inch or appears to be growing, it may indicate a structural issue and should be evaluated by a professional.
3. Can I fix ceiling cracks myself?
Yes, many ceiling cracks can be fixed using basic tools and materials as outlined in this guide.
4. How long does it take for ceiling crack repairs to dry?
Drying time varies based on the materials used; typically, patching compound takes 24 hours to dry completely.
5. Is it safe to paint over ceiling cracks?
Only paint over cracks after they have been properly repaired; otherwise, the cracks may reappear.
6. Should I worry about ceiling cracks?
Minor cracks are common and usually not a concern, but larger, developing cracks may require professional assessment.
7. How much does it cost to repair ceiling cracks?
Repair costs can vary widely, but DIY repairs can be done for as little as $20-$50 for materials.
8. What materials do I need to fix ceiling cracks?
Common materials include drywall patching compound, caulk, primer, and paint.
9. Can I prevent ceiling cracks?
Maintaining stable humidity levels and monitoring your home’s foundation are key preventive measures.
10. When should I call a professional for ceiling cracks?
If cracks are more than 1/4 inch wide, growing, or associated with water damage, consult a professional.