Ultimate Guide to Fixing and Replacing Your Toilet Flapper

-
Quick Links:
- Introduction
- Understanding Toilet Flappers
- Common Issues with Flappers
- Tools and Materials Needed
- Step-by-Step Guide to Fixing a Flapper
- When to Replace a Flapper
- Step-by-Step Guide to Replacing a Flapper
- Case Studies and Expert Insights
- Preventive Maintenance for Toilet Flappers
- FAQs
Introduction
Toilet flappers are an essential component of your bathroom plumbing system. They control the flow of water from the tank to the bowl during a flush. Over time, flappers can wear out or malfunction, leading to leaks and inefficient toilet performance. In this comprehensive guide, we will explore how to fix or replace a toilet flapper, ensuring your toilet operates efficiently and saves water.
Understanding Toilet Flappers
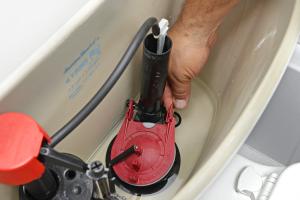
A toilet flapper is a rubber or plastic valve located at the bottom of the toilet tank. When you flush the toilet, the flapper lifts, allowing water to flow into the bowl. Once the tank empties, the flapper falls back into place, sealing the tank and preventing leaks. Understanding how this mechanism works is crucial for effective troubleshooting and repairs.
Common Issues with Flappers
Several problems can arise with toilet flappers, including:
- Flapper Leaks: This is the most common issue, often caused by wear and tear or mineral buildup.
- Flapper Sticking: Sometimes, flappers can stick in the open position due to debris or corrosion.
- Flapper Not Lifting: If the flapper does not lift properly, it can prevent the toilet from flushing effectively.
Tools and Materials Needed
Before starting your repair or replacement project, gather the following tools and materials:
- Adjustable wrench
- Screwdriver
- Replacement flapper
- Bucket
- Sponges or towels
- Gloves (optional)
Step-by-Step Guide to Fixing a Flapper
Step 1: Turn Off the Water Supply
Locate the shut-off valve, usually found behind the toilet. Turn the valve clockwise to stop the water flow.
Step 2: Remove the Toilet Tank Lid
Carefully take off the lid of the toilet tank and place it aside in a safe location.
Step 3: Inspect the Flapper
Check the condition of the flapper. Look for signs of wear, such as cracks or mineral buildup. Clean the flapper and the area around it if necessary.
Step 4: Adjust the Chain
If the chain connected to the flapper is too loose or too tight, adjust it. The ideal slack allows the flapper to lift completely during a flush.
Step 5: Test the Flush
After making adjustments, turn the water supply back on and test the flush. Observe if the flapper seals properly and prevents leaks.
When to Replace a Flapper
It may be time to replace the flapper if:
- The flapper is cracked or damaged.
- Cleaning does not resolve flushing issues.
- Flushing is inconsistent even after adjustments.
Step-by-Step Guide to Replacing a Flapper
Step 1: Turn Off the Water Supply
As in the previous section, turn off the water supply to the toilet.
Step 2: Remove the Old Flapper
Detach the old flapper by unhooking the chain and removing it from the pegs on the overflow tube.
Step 3: Install the New Flapper
Attach the new flapper to the overflow tube and connect the chain, ensuring it has the right amount of slack.
Step 4: Test the Toilet
Turn the water supply back on and test the flush. Ensure the flapper seals properly and operates smoothly.
Case Studies and Expert Insights
According to a study by the American Water Works Association, faulty toilet flappers can waste over 200 gallons of water per day. This not only impacts your water bill but also contributes to environmental concerns. Experts recommend regular maintenance checks to identify and fix issues before they escalate.
Preventive Maintenance for Toilet Flappers
To prolong the life of your toilet flapper, follow these maintenance tips:
- Regularly check for leaks.
- Clean the flapper and surrounding parts every few months.
- Replace flappers every few years, even if they appear to be working.
FAQs
1. How often should I replace my toilet flapper?
It's recommended to replace your toilet flapper every 3-5 years or sooner if you notice leaks or poor flushing performance.
2. Can I fix a toilet flapper without replacing it?
Yes, many flapper issues can be resolved by cleaning or adjusting the existing flapper rather than replacing it.
3. What type of flapper do I need?
Flappers come in various sizes and styles. Check your toilet's manual or take the old flapper to a hardware store for a match.
4. How do I know if my flapper is leaking?
A simple test is to place a few drops of food coloring in the tank. If color appears in the bowl after 30 minutes, your flapper may be leaking.
5. What causes flappers to wear out?
Flappers can wear out due to age, constant exposure to water, and mineral buildup from hard water.
6. How do I clean a flapper?
Remove the flapper and soak it in vinegar to dissolve mineral deposits. Rinse it thoroughly before reattaching.
7. Can I use any flapper for my toilet?
No, flappers are designed for specific toilet models. Ensure you purchase the right type for your toilet.
8. Will a faulty flapper affect my water bill?
Yes, a leaking flapper can waste a significant amount of water, leading to higher water bills.
9. How can I prevent flapper issues?
Regular maintenance, including cleaning and timely replacements, can help prevent flapper issues.
10. Is it difficult to replace a toilet flapper?
No, replacing a toilet flapper is a relatively simple DIY task that can be completed in under 30 minutes.