Ultimate Guide to Fixing Sticky Drawers: Tips and Tricks

-
Quick Links:
- Introduction
- Understanding Sticky Drawers
- Common Causes of Sticky Drawers
- Tools and Materials Needed
- Step-by-Step Guide to Fix Sticky Drawers
- Preventative Measures to Avoid Sticky Drawers
- Case Studies: Real-World Solutions
- Expert Insights on Drawer Maintenance
- Conclusion
- FAQs
Introduction
Sticky drawers can be a source of frustration in any home. Whether it's a kitchen drawer that won’t budge or a dresser that seems glued shut, understanding how to fix these issues can save you time and money. In this guide, we'll explore the various causes of sticky drawers, the tools you need, and provide a comprehensive step-by-step repair process.
Understanding Sticky Drawers
Sticky drawers are characterized by difficulty in opening or closing. This can lead to wear and tear, damaging both the drawer and the furniture it's a part of. It's essential to address these issues promptly to maintain the integrity of your furniture and ensure ease of use.
Common Causes of Sticky Drawers
- Moisture: High humidity can cause wood to swell, leading to sticky drawers.
- Misalignment: Drawers can become misaligned due to improper installation or wear over time.
- Dirt and debris: Accumulated dirt can obstruct drawer slides.
- Improper lubrication: Lack of lubrication can cause friction, making drawers difficult to open.
- Warped wood: Wooden drawers can warp over time due to temperature changes.
Tools and Materials Needed
Before starting your repairs, gather the following tools and materials:
- Wood lubricant (such as silicone spray or beeswax)
- Screwdriver (flathead and Phillips)
- Wood glue
- Sandpaper (fine and coarse grit)
- Measuring tape
- Level
- Cloth for cleaning
Step-by-Step Guide to Fix Sticky Drawers
Step 1: Remove the Drawer
Start by removing the sticky drawer from the furniture. This will give you better access to the slides and allow you to inspect the drawer for damage.
Step 2: Clean the Drawer and Slides
Use a cloth to clean both the drawer and the slides. Remove any dust, dirt, or debris that may be causing friction.
Step 3: Check for Misalignment
Using a level, check if the drawer is aligned properly. If it is misaligned, adjust the screws on the slides to reposition the drawer.
Step 4: Lubricate the Slides
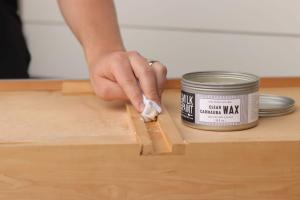
Apply wood lubricant to the slides. A silicone spray or beeswax works best, as they reduce friction and allow for smooth movement.
Step 5: Inspect for Warping
Check the drawer for any signs of warping. If it is warped, you may need to sand it down or replace it entirely.
Step 6: Reassemble and Test
Once cleaned and lubricated, reinsert the drawer into its place and test its movement. Make additional adjustments as necessary.
Preventative Measures to Avoid Sticky Drawers
To keep your drawers functioning smoothly, consider these preventative measures:
- Regularly clean the slides and the drawer compartment.
- Keep humidity levels in your home stable.
- Lubricate drawer slides every six months.
- Check for alignment periodically and make adjustments as needed.
Case Studies: Real-World Solutions
Case Study 1: The Kitchen Drawer Dilemma
A homeowner faced persistent issues with a kitchen drawer that would stick, especially after cooking. After following the step-by-step guide, they discovered moisture as the main culprit. By installing a dehumidifier, the problem was resolved.
Case Study 2: The Bedroom Dresser
A couple's bedroom dresser had a sticky drawer due to misalignment. They adjusted the screws on the slides, lubricated them, and the drawer moved smoothly afterward.
Expert Insights on Drawer Maintenance
According to furniture restoration experts, regular maintenance is key to preventing sticky drawers. They recommend a bi-annual check-up of all drawers in the home, including cleaning and lubrication, to maintain optimal performance.
Conclusion
Fixing sticky drawers doesn't have to be a daunting task. With the right tools, knowledge, and maintenance, you can ensure your drawers operate smoothly and effectively. Remember to stay proactive about maintenance to prevent future issues.
FAQs
1. What causes drawers to stick?
Drawers can stick due to moisture, dirt, misalignment, or lack of lubrication.
2. How can I tell if my drawer is misaligned?
Use a level to check if the drawer is sitting evenly within its compartment.
3. What type of lubricant is best for drawer slides?
Silicone spray or beeswax are excellent choices for lubricating drawer slides.
4. Can I fix a warped drawer?
Yes, you can sand down the warped areas or replace the drawer if the damage is extensive.
5. How often should I clean and lubricate my drawers?
It’s recommended to clean and lubricate your drawers every six months to prevent sticking.
6. Are there any preventive products I can use?
Dehumidifiers can help manage moisture levels, and drawer liners can reduce friction.
7. What should I do if a drawer won’t come out?
Check for obstructions, misalignment, or damage to the slides, and address them accordingly.
8. Can I use oil instead of silicone spray?
Oil can attract dirt, so it's best to use silicone spray or wax for a cleaner solution.
9. How can I improve the longevity of my drawers?
Regular maintenance, proper use, and avoiding overloading will help improve drawer longevity.
10. When should I consider replacing a drawer?
If a drawer is extensively damaged, warped, or beyond repair, it may be time to replace it.
Random Reads
- Mastering command strips
- Mastering color blending in photoshop
- How to change bathtub faucet
- Asbestos in plaster walls
- Attach send photos gmail
- How to do boolprop cheat sims 2
- How to do seo
- How you can still use windows photo gallery today
- How to defuse bomb counter strike
- How to defrost samsung ice maker