Ultimate Guide to Installing a Chair Rail: Transform Your Space with Style

-
Quick Links:
- Introduction
- Benefits of Installing a Chair Rail
- Essential Tools and Materials
- Preparation Steps
- Step-by-Step Installation Process
- Finishing Touches
- Case Studies and Examples
- Expert Insights and Tips
- FAQs
Introduction
Installing a chair rail can dramatically enhance the aesthetics of a room while providing practical benefits. This guide will walk you through the process step-by-step, ensuring you achieve a professional-looking result even as a DIY beginner.
Benefits of Installing a Chair Rail
Chair rails serve multiple functions in interior design:
- Aesthetic Appeal: They add visual interest and can define spaces.
- Wall Protection: Prevents damage from furniture and creates a buffer zone.
- Color Blocking: Allows for creative color schemes and contrasts with wall paint.
- Increased Home Value: Enhances the overall design, appealing to potential buyers.
Essential Tools and Materials
Before you start, gather the following tools and materials:
- Chair rail molding
- Miter saw
- Measuring tape
- Level
- Nail gun or hammer
- Wood glue
- Caulk
- Paint (optional)
- Stud finder
- Pencil
Preparation Steps
Preparation is crucial for a successful installation:
- Choose Your Height: The standard height for a chair rail is typically 30-36 inches from the floor. Use a level to mark the desired height around the room.
- Measure the Wall: Measure the total length of the wall where the chair rail will be installed. Make sure to account for any corners or interruptions.
- Select Your Molding: Choose a style that complements your decor. Consider materials like wood or composite based on your budget and aesthetic.
Step-by-Step Installation Process
Step 1: Cut the Molding
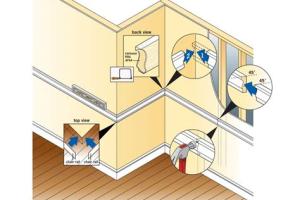
Using a miter saw, cut the chair rail to the appropriate lengths. For corners, make 45-degree cuts to ensure a seamless fit.
Step 2: Position the Molding
Starting at one end of the wall, hold the molding in place. Use a level to ensure it’s straight, then mark where it meets the wall.
Step 3: Secure the Molding
Apply a bead of wood glue to the back of the molding and press it against the wall. Use your nail gun or a hammer and nails to secure it in place.
Step 4: Fill Gaps and Holes
Fill in any nail holes with wood filler, and use caulk to smooth over any gaps between the molding and the wall.
Finishing Touches
Once the installation is complete, you may choose to paint the chair rail to match or contrast with your wall color. Allow it to dry completely for the best finish.
Case Studies and Examples
Many homeowners have transformed their spaces with chair rails. For instance, a recent study showed that homes with decorative moldings sold for 10-15% more than comparable homes without.
Another case involved a family who opted for a two-tone wall design, using a chair rail to separate the colors, which not only created a stunning visual effect but also made their small dining room feel more spacious.
Expert Insights and Tips
According to interior designer Jane Smith, “Chair rails can be a game-changer in your home. They allow for a mix of textures and colors, enhancing any room's design.”
Remember to always take your time during installation, as precision is key to achieving a professional look.
FAQs
1. What is the standard height for a chair rail?
The standard height is typically between 30 to 36 inches from the floor.
2. Can I install a chair rail without a nail gun?
Yes, you can use a hammer and finishing nails, but a nail gun can make the process faster and easier.
3. How do I choose the right style of chair rail for my home?
Consider the overall decor of your home and choose a style that complements it. Traditional homes may benefit from more ornate styles, while modern homes may look best with simple, clean lines.
4. Is it necessary to paint the chair rail?
While it’s not mandatory, painting can enhance the appearance and protect the wood.
5. What type of wood is best for chair rails?
Popular choices include oak, maple, and pine, but it ultimately depends on your budget and desired aesthetic.
6. Can I install a chair rail myself?
Absolutely! With the right tools and this guide, even beginners can install a chair rail.
7. What if my walls are not perfectly straight?
You can use caulk to fill in any gaps, or adjust the angle of your cuts slightly to fit the wall contours.
8. How long does it take to install a chair rail?
The installation process can take a few hours, depending on the room size and your experience level.
9. What if I need to remove the chair rail later?
Removing a chair rail can be done carefully with a pry bar and will typically require some touch-up paint afterwards.
10. Are chair rails still in style?
Yes, chair rails remain a popular design element, appreciated for their versatility and ability to enhance decor.
Conclusion
Installing a chair rail is a rewarding project that can significantly enhance the look of your home. With the right tools and techniques, you can achieve a professional finish that adds both beauty and value to your space. Start planning your chair rail installation today and transform your room!