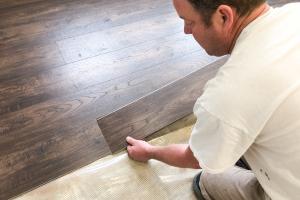
Step-by-Step Guide to Installing Vinyl Flooring for Beginners

-
Quick Links:
- Introduction
- Benefits of Vinyl Flooring
- Types of Vinyl Flooring
- Materials Needed for Installation
- Preparing Your Space
- Step-by-Step Installation Process
- Maintaining Your Vinyl Flooring
- Case Study: Real-World Installation
- Expert Insights on Vinyl Flooring
- FAQs
Introduction
Installing vinyl flooring can be a rewarding home improvement project. Whether you're updating your kitchen, bathroom, or living area, vinyl flooring offers durability and style at an affordable price. In this comprehensive guide, we will explore the process of installing vinyl flooring step-by-step, along with tips and tricks to ensure a successful outcome.
Benefits of Vinyl Flooring
Vinyl flooring has gained popularity in recent years for several reasons:
- Durability: Vinyl is resistant to scratches, dents, and stains, making it ideal for high-traffic areas.
- Water Resistance: Many vinyl products are waterproof, making them perfect for kitchens and bathrooms.
- Variety of Styles: Available in various colors, patterns, and textures, vinyl can mimic hardwood, stone, or tile.
- Easy Installation: Many vinyl flooring options are designed for DIY installation, saving you money on labor costs.
Types of Vinyl Flooring
Before diving into the installation process, it's important to understand the different types of vinyl flooring available:
1. Vinyl Sheet Flooring
This type of flooring comes in large sheets that can cover a wide area with minimal seams. It's ideal for bathrooms and kitchens.
2. Vinyl Plank Flooring
Vinyl planks are designed to look like hardwood and come in various lengths and widths. They are easier to install than sheets.
3. Vinyl Tile Flooring
Vinyl tiles are square pieces that can be arranged in patterns. They are versatile and can be used in various spaces.
Materials Needed for Installation
To successfully install vinyl flooring, gather the following materials:
- Vinyl flooring (sheets, planks, or tiles)
- Utility knife
- Measuring tape
- Flooring adhesive (if needed)
- Underlayment (optional, depending on the product)
- Roller or flooring roller
- Cleaning supplies (broom, vacuum, mop)
Preparing Your Space
Preparation is key to a successful installation. Follow these steps:
- Clear the Area: Remove all furniture and appliances from the space.
- Clean the Subfloor: Ensure the subfloor is clean, dry, and level. Repair any imperfections.
- Acclimate the Flooring: Allow the vinyl to acclimate in the room for at least 48 hours.
Step-by-Step Installation Process
Now that your space is ready, follow these steps to install your vinyl flooring:
Step 1: Measure and Cut
Measure the area where you will install the flooring. Use a utility knife to cut the vinyl to size, leaving a little extra for adjustments.
Step 2: Lay the Underlayment (if applicable)
If your vinyl flooring requires underlayment, lay it down now, ensuring it is smooth and without wrinkles.
Step 3: Apply Adhesive (if needed)
For vinyl sheets, apply adhesive to the subfloor using a notched trowel. Be sure to follow the manufacturer’s instructions regarding drying time.
Step 4: Install Vinyl Flooring
Start laying the vinyl flooring, either from the center of the room or from one corner. Press down firmly to ensure good adhesion.
Step 5: Trim Edges
Once the flooring is laid, trim the edges with a utility knife for a clean finish.
Step 6: Roll the Flooring
Use a flooring roller to ensure the vinyl adheres properly to the subfloor.
Maintaining Your Vinyl Flooring
To keep your vinyl flooring looking great, follow these maintenance tips:
- Regularly sweep or vacuum to remove dirt and debris.
- Use a damp mop with a gentle cleaner to keep the surface clean.
- Avoid harsh chemicals that can damage the vinyl.
Case Study: Real-World Installation
Let's explore a case study of a family who installed vinyl flooring in their kitchen. The Johnsons opted for vinyl planks to mimic hardwood...
Expert Insights on Vinyl Flooring
We spoke to industry experts about the latest trends in vinyl flooring and what homeowners should consider...
FAQs
- 1. How long does vinyl flooring last?
- Vinyl flooring can last between 10 to 25 years, depending on the quality and maintenance.
- 2. Is vinyl flooring waterproof?
- Many vinyl flooring options are waterproof, but it’s essential to check the product specifications.
- 3. Can I install vinyl flooring over existing floors?
- Yes, as long as the existing floor is level, clean, and in good condition.
- 4. Do I need to use glue for vinyl planks?
- Many vinyl plank products are designed for a floating installation and do not require glue.
- 5. How do I clean vinyl flooring?
- Regular sweeping and occasional mopping with a gentle cleaner will keep your vinyl flooring looking great.
- 6. Can I use steam cleaners on vinyl flooring?
- It’s best to avoid steam cleaners, as the heat can damage the vinyl.
- 7. What is the best underlayment for vinyl flooring?
- A foam underlayment is ideal for reducing noise and providing comfort underfoot.
- 8. How do I repair scratches on vinyl flooring?
- Minor scratches can be filled with a vinyl repair kit. For deeper scratches, consult a professional.
- 9. Can vinyl flooring be installed in a bathroom?
- Yes, vinyl flooring is an excellent choice for bathrooms due to its water resistance.
- 10. Is vinyl flooring eco-friendly?
- Some vinyl flooring products are made with recycled materials and are PVC-free, making them more eco-friendly.
Random Reads
- Master your digital skills
- Mastering 2 player split screen fortnite
- How to remove background photoshop cs6
- How to remove oil stains from concrete driveway and garage
- Installing corrugated roofing yourself
- Join discord server android
- Unlocking precision 5 quick steps to enable aim assist in fortnite
- How to unclog a toilet without a plunger
- How to secure your website
- What to do with your chromebook after end of life