Ultimate Guide to Fitting a Cooker Hood: Step-by-Step Instructions

-
Quick Links:
- 1. Introduction
- 2. Types of Cooker Hoods
- 3. Tools and Materials Needed
- 4. Preparation Steps
- 5. Installation Process
- 6. Testing Your Cooker Hood
- 7. Maintenance Tips
- 8. Common Issues and Troubleshooting
- 9. Case Studies
- 10. Conclusion
- 11. FAQs
1. Introduction
In modern kitchens, cooker hoods play a crucial role in maintaining air quality and comfort. They help eliminate smoke, steam, and odors, keeping your cooking space fresh. However, fitting a cooker hood may seem daunting at first. In this comprehensive guide, we will walk you through the entire process, ensuring you have all the information needed to successfully install a cooker hood in your home.
2. Types of Cooker Hoods
Before diving into the installation process, it’s essential to understand the different types of cooker hoods available. Each type offers unique features and benefits:
- Wall-Mounted Hoods: These are installed on the wall above the cooktop and are popular for their effectiveness in ventilation.
- Island Hoods: Ideal for kitchen islands, these hoods provide a stylish solution for open kitchen layouts.
- Under-Cabinet Hoods: Designed to fit under kitchen cabinets, these hoods are space-saving and efficient.
- Downdraft Hoods: These retractable hoods rise from behind the cooktop when needed, providing a sleek look.
3. Tools and Materials Needed
Before starting your installation, gather the following tools and materials:
- Drill and drill bits
- Screwdriver
- Measuring tape
- Level
- Stud finder
- Wire cutters/strippers
- Electrical tape
- Cooker hood installation kit (included with the hood)
4. Preparation Steps
Proper preparation is key to a successful installation. Follow these steps:
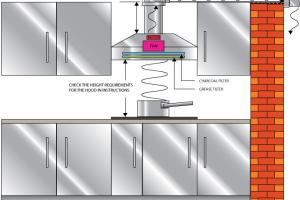
- Choose the Right Location: Ensure the cooker hood is positioned above the cooktop, ideally 65 to 75 cm above the surface for effective ventilation.
- Check for Electrical Supply: Ensure access to electrical outlets, and consider hiring a professional electrician if needed.
- Measure and Mark: Use your measuring tape to mark the drill holes on the wall for mounting brackets.
5. Installation Process
Follow these detailed steps to install your cooker hood:
- Install the Mounting Bracket: Use the drill to secure the mounting bracket to the wall, ensuring it’s level.
- Connect the Ducting: If your cooker hood is ducted, connect the ducting to the hood according to the manufacturer’s instructions.
- Hang the Cooker Hood: Lift the cooker hood onto the mounting bracket and secure it with screws.
- Electrical Connections: Connect the electrical wiring as per the installation manual. Make sure to turn off the power supply before handling electrical components.
6. Testing Your Cooker Hood
Once installed, it’s time to test your cooker hood:
- Turn on the power supply.
- Test the fan and light settings to ensure everything is functioning properly.
- Check for any unusual noises or vibrations.
7. Maintenance Tips
Regular maintenance is essential for optimal performance:
- Clean the filters monthly to prevent grease buildup.
- Wipe down the exterior regularly with a damp cloth.
- Check ducting for obstructions.
8. Common Issues and Troubleshooting
Here are some common issues you might encounter:
- Weak suction: Ensure filters are clean and ducts are unobstructed.
- Noise: Check for loose screws or improper installation.
9. Case Studies
Real-world examples can provide valuable insights. For instance, a homeowner in a compact urban kitchen successfully installed an under-cabinet hood, enhancing airflow without compromising space. This case highlighted the importance of proper measurements and choosing the right type of hood for the kitchen layout.
10. Conclusion
Fitting a cooker hood can be a straightforward DIY project if you follow our step-by-step guide. With the right tools, preparation, and attention to detail, you can improve your kitchen's air quality significantly.
11. FAQs
- 1. How high should a cooker hood be installed?
- Typically, a cooker hood should be installed 65 to 75 cm above the cooking surface.
- 2. Can I install a cooker hood myself?
- Yes, with the right tools and knowledge, you can install a cooker hood yourself. However, consult a professional for electrical connections.
- 3. What type of ducting is best for a cooker hood?
- Rigid ducting is preferred for better airflow, but flexible ducting can be used for ease of installation.
- 4. How often should I clean my cooker hood?
- Clean the filters at least once a month and the exterior as needed.
- 5. What should I do if my cooker hood is making noise?
- Check for loose screws or if the fan is obstructed. If the problem persists, consider consulting a professional.
- 6. Is it necessary to use a ducted hood?
- Ducted hoods are more efficient at removing smoke and odors, but ductless hoods can be used if ducting is not feasible.
- 7. How do I know if my cooker hood is working properly?
- Check for adequate suction and ensure that lights and fans operate correctly during testing.
- 8. Can a cooker hood reduce energy costs?
- Yes, a proper cooker hood can improve kitchen ventilation, potentially reducing energy costs by improving appliance efficiency.
- 9. What if my cooker hood is too powerful?
- Adjust the fan speed settings or consult the manual for recommendations on optimal usage.
- 10. What are the benefits of installing a cooker hood?
- Cooker hoods help eliminate smoke, steam, and odors, improve air quality, and enhance the overall kitchen environment.
Random Reads
- How to stop seeing google ads
- How to export imovie video hd
- How to export image files from video using vlc
- Remove bing from computer
- Remove bing
- Remove account google chrome
- How to charge laptop portable charger
- How to charge ps3 controller
- How to install outdoor electric wiring
- Remove blank home screen android