Mastering the Art of Shingle Installation: A Comprehensive Guide

-
Quick Links:
- 1. Introduction
- 2. Types of Shingles
- 3. Tools and Materials Needed
- 4. Preparation Steps
- 5. Step-by-Step Installation Process
- 6. Finishing Touches
- 7. Maintenance Tips
- 8. Case Studies and Real-World Examples
- 9. Expert Insights
- 10. FAQs
1. Introduction
Laying shingles is an essential skill for homeowners and DIY enthusiasts alike. Whether you're repairing a roof or installing a new one, understanding how to lay shingles correctly can save you time and money in the long run. This comprehensive guide will walk you through the entire process, from selecting the right type of shingles to ensuring a quality installation that will stand the test of time.
2. Types of Shingles
Before diving into the installation process, it’s crucial to understand the different types of shingles available. Each type has its unique properties, benefits, and installation methods.
- Asphalt Shingles: The most common type, known for their affordability and ease of installation.
- Wood Shingles: Offer a natural aesthetic but require more maintenance and are prone to rot.
- Metal Shingles: Durable and energy-efficient, metal shingles can be more expensive upfront.
- Slate Shingles: Highly durable and beautiful but also the most expensive option.
- Composite Shingles: Made from a mixture of materials, they provide a balance between cost and durability.
3. Tools and Materials Needed
Before you start, gather all necessary tools and materials:
- Shingles (type based on your choice)
- Roofing nails
- Hammer or nail gun
- Utility knife
- Measuring tape
- Chalk line
- Safety goggles and gloves
- Ladder
- Roofing underlayment
- Sealant for flashing
4. Preparation Steps
Proper preparation can make or break your roofing project. Follow these steps to prepare your roof for shingle installation:
- Inspect the Roof: Check for any damage, rot, or structural issues that need addressing.
- Remove Old Shingles: If replacing shingles, strip the roof down to the plywood. Be careful not to damage the underlayment.
- Install Underlayment: Lay down a waterproof underlayment to protect against leaks.
- Check the Weather: Ensure that you have a clear weather forecast for the duration of your installation.
5. Step-by-Step Installation Process
Now that you’re prepared, it’s time to install the shingles. Follow these detailed steps:
Step 1: Starting with the First Row
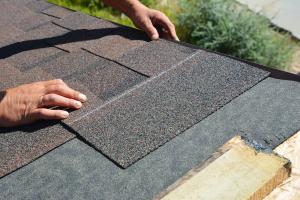
Begin at the bottom edge of the roof. Lay the first row of shingles, ensuring they overhang the edge slightly. Secure with nails, placing them below the adhesive strip.
Step 2: Overlapping Rows
For subsequent rows, stagger the seams by at least six inches. This prevents water from seeping through the gaps.
Step 3: Nailing Technique
Use four to six nails per shingle. Avoid over-nailing, which can cause issues with water pooling.
Step 4: Installing Flashing
Flashing should be installed around chimneys, vents, and valleys. Use a sealant to ensure a watertight installation.
Step 5: Final Row and Ridge Cap
For the top row, use a ridge cap or cut shingles to fit. Ensure they cover the top edge completely.
6. Finishing Touches
After installation, review your work:
- Check for exposed nails.
- Seal any gaps with roofing cement.
- Clean the area of debris.
7. Maintenance Tips
To prolong the life of your roofing, follow these maintenance tips:
- Inspect your roof at least twice a year.
- Clear debris from the roof and gutters.
- Look for signs of wear and replace damaged shingles promptly.
8. Case Studies and Real-World Examples
Consider this case study:
A homeowner in Denver, CO, opted for asphalt shingles due to their cost-effectiveness. After five years, they experienced a severe hailstorm. The shingles held up well, but a few were damaged. The homeowner replaced the affected shingles and added a protective sealant, extending the roof's life significantly.
9. Expert Insights
According to roofing expert John Doe, “One of the most critical aspects of laying shingles is ensuring proper ventilation in the attic. This prevents moisture buildup, which can lead to premature roof failure.”
10. FAQs
1. How long does it take to install shingles?
Installation time varies based on roof size and type of shingles but generally takes 1-3 days.
2. What is the best time of year to install shingles?
Late spring and early fall are ideal due to moderate temperatures and lower chances of rainfall.
3. Can I install shingles over old shingles?
While it's possible, it's not recommended as it can lead to issues with ventilation and weight.
4. What should I do if I find a leak?
Identify the source of the leak, make temporary repairs, and consult a professional for a thorough inspection.
5. How do I choose the right shingles?
Consider factors like climate, aesthetic preferences, and budget when selecting shingles.
6. Do I need a permit to install shingles?
Many areas require a permit for roofing work. Check your local regulations beforehand.
7. What are the signs of a failing roof?
Look for missing shingles, curling edges, or leaks inside your home.
8. How can I increase my roof's lifespan?
Regular maintenance, including inspections and cleaning, can significantly extend your roof's lifespan.
9. Is professional installation worth it?
If you're inexperienced or have a complex roof, hiring a professional can ensure quality and safety.
10. How much does it cost to lay shingles?
Costs vary widely based on materials, labor, and roof size, typically ranging from $3,000 to $10,000.
Random Reads
- How to search for file types in finder on a mac
- Unclog main sewer line without snake
- How to log out of telegram pc mac
- How to log into ultipro
- How to turn off restrictions on an iphone
- How to minimize full screen computer program
- How to mod an xbox
- Ultimate guide replacing light switches
- How to open eml files
- How to open excel files