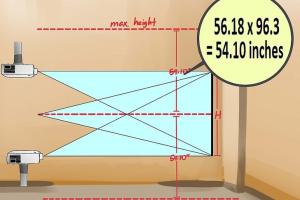
Ultimate Guide to Mounting a Projector: Tips, Tricks, and Techniques

-
Quick Links:
- Introduction
- Why Mount a Projector?
- Types of Projector Mounts
- Tools and Materials Needed
- Step-by-Step Guide to Mounting a Projector
- Common Mounting Mistakes to Avoid
- Case Studies: Successful Installations
- Expert Insights
- Maintenance Tips for Projector Longevity
- FAQs
Introduction
Mounting a projector can transform your viewing experience, whether you're setting up a home theater, a conference room, or a classroom. This comprehensive guide will walk you through the entire process of mounting a projector, from understanding the benefits to choosing the right mount and installing it correctly. By the end of this article, you’ll have all the knowledge you need to create an outstanding viewing environment.
Why Mount a Projector?
Mounting a projector offers several advantages:
- Space Efficiency: Mounting frees up floor space, allowing for better furniture arrangement.
- Improved Viewing Experience: A properly mounted projector can enhance image quality and reduce glare.
- Increased Safety: Ceiling mounting can prevent accidental damage or tipping.
- Professional Appearance: A mounted projector looks cleaner and more polished.
Types of Projector Mounts
There are various types of projector mounts available, each suited to different needs:
- Ceiling Mounts: Ideal for permanent installations where the projector is mounted on the ceiling.
- Wall Mounts: Suitable for limited space or where the ceiling is not an option.
- Portable Mounts: Best for temporary setups; these mounts can be easily moved.
- Adjustable Mounts: Allow for tilt and swivel adjustments to optimize the projector's angle.
Tools and Materials Needed
Before you start, gather the following tools and materials:
- Projector mount kit
- Power drill
- Screwdriver
- Stud finder
- Level
- Tape measure
- Pencil
- Safety goggles
- Wire management tools (cable ties, clips)
Step-by-Step Guide to Mounting a Projector
Follow these detailed steps to successfully mount your projector:
Step 1: Choose the Right Location
Decide on the optimal location for your projector based on your viewing area. Consider factors such as:
- Distance from the screen
- Obstructions (furniture, walls)
- Access to power outlets
Step 2: Measure and Mark
Use a tape measure to determine the ideal height for mounting the projector. Mark the location on the ceiling/wall with a pencil.
Step 3: Locate the Studs
Use a stud finder to locate the ceiling/wall studs. This is crucial for ensuring a secure mount.
Step 4: Install the Mounting Bracket
Attach the mounting bracket to the ceiling or wall using screws. Ensure it is level using a level tool.
Step 5: Attach the Projector
Carefully attach the projector to the mount according to the manufacturer’s instructions. Ensure it is securely fastened.
Step 6: Connect Cables
Run the necessary cables for power and video connectivity. Use wire management tools to keep cables neat and organized.
Step 7: Test the Setup
Turn on the projector and test the image quality. Adjust the position if necessary.
Step 8: Finalize Your Setup
Once you are satisfied with the image quality, finalize your setup by securing and organizing any loose cables.
Common Mounting Mistakes to Avoid
Here are some pitfalls to watch out for:
- Not checking for obstructions before mounting.
- Ignoring the projector’s throw ratio.
- Failing to secure the mount properly.
- Neglecting to manage cables effectively.
Case Studies: Successful Installations
Case Study 1: A home theater setup in a small apartment utilized a ceiling mount to maximize space while providing an immersive viewing experience.
Case Study 2: A corporate office used a wall mount to create a professional presentation environment, enhancing their meeting efficiency.
Expert Insights
Experts recommend considering the projector's throw distance and ensuring proper ventilation when mounting. This can prevent overheating and prolong the projector’s life.
Maintenance Tips for Projector Longevity
To keep your projector in top shape, follow these maintenance tips:
- Regularly clean the lens to avoid dust accumulation.
- Check the bulb life and replace when necessary.
- Ensure proper airflow around the projector.
FAQs
1. Can I mount a projector on drywall?
Yes, but it's best to anchor it into a stud for stability.
2. How high should I mount my projector?
The height depends on the screen size and projector throw distance; generally, it should align with the top of the screen.
3. Can I use a regular ceiling mount for my projector?
Not all ceiling mounts are suitable; ensure it is designed specifically for projectors.
4. How do I hide projector cables?
You can use cable management systems, raceways, or even paint them the same color as the wall.
5. What’s the best distance to mount a projector from the screen?
This varies by projector model; refer to the user manual for specific throw distance recommendations.
6. How do I troubleshoot a blurry image?
Check the focus settings and ensure the projector is mounted at the correct distance from the screen.
7. Can I mount a projector outside?
Yes, but ensure it is weatherproof and has adequate ventilation.
8. How much weight can a projector mount hold?
This depends on the mount; always check the manufacturer's specifications before purchasing.
9. Is it necessary to mount the projector upside down?
Not necessarily; it depends on the projector’s orientation settings and your setup preferences.
10. How often should I maintain my projector?
Regular maintenance is recommended every few months, depending on usage.
Random Reads
- Logging out of netflix on tv
- Log out amazon prime video
- Lock folder windows
- Mastering coaxial cable connections
- How to remove paint from iron railings
- Simple ways to set up dual monitors
- How to put video on dvd
- How to quickly delete a walmart account
- How to install cabling in pre built home
- How to install car mods gta san andreas