Ultimate Guide to Removing a Drain from Your Tub: Step-by-Step Instructions

-
Quick Links:
- Introduction
- Tools Required
- Preparation Steps
- Drain Removal Process
- Common Issues & Solutions
- Case Studies
- Expert Insights
- FAQs
Introduction
Removing a drain from a bathtub might seem like a daunting task, but with the right tools and guidance, it can be a straightforward DIY project. Whether you’re replacing an old drain, fixing a leak, or remodeling your bathroom, this comprehensive guide will cover everything you need to know.Tools Required
Before diving into the removal process, gather the following tools:- Flathead screwdriver
- Phillips screwdriver
- Pliers
- Drain wrench
- Bucket
- Towels or rags
- Plumber's tape
- Safety goggles
Preparation Steps
Preparation is key to a successful drain removal. Follow these steps:- Clear the area around the tub to ensure full accessibility.
- Turn off the water supply to the tub to avoid any unexpected leaks.
- Place a bucket under the drain to catch any residual water.
- Wear safety goggles to protect your eyes from debris.
Drain Removal Process
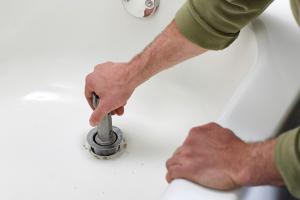
Now that you are prepared, follow these detailed steps to remove the drain from your tub:Step 1: Remove the Drain Cover
Using a flathead screwdriver, gently pry off the drain cover. If it’s stuck, wiggle it back and forth to loosen it.Step 2: Unscrew the Drain Flange
Use a Phillips screwdriver to remove the screws securing the drain flange. Be careful not to strip the screws.Step 3: Use a Drain Wrench
If the drain is stubborn, a drain wrench can provide the leverage you need. Insert the wrench into the drain and turn it counterclockwise to loosen it.Step 4: Remove the Drain Assembly
Once loose, carefully pull the drain assembly out of the tub. You may need to wiggle it slightly to free it.Step 5: Clean the Area
Once the drain is removed, clean the area thoroughly. Remove any debris or old plumber's tape that may be left behind.Common Issues & Solutions
While removing a drain, you may encounter various issues. Here are some common problems and how to address them:- Stuck Drain: Apply penetrating oil and let it sit for a few minutes before attempting to loosen it again.
- Broken Screws: If screws break during removal, use a screw extractor to remove the remnants.
- Corroded Parts: In cases of corrosion, consider replacing the entire drain assembly to avoid future problems.
Case Studies
**Case Study 1: A Leaky Drain** A homeowner discovered a small leak coming from their tub drain. After following the steps outlined in this guide, they successfully replaced the drain and resolved the leak, saving hundreds in plumbing costs. **Case Study 2: Remodeling** During a bathroom remodel, another homeowner needed to replace the drain to match their new design. They found the process straightforward and were able to complete the project in under an hour.Expert Insights
We consulted with plumbing professionals who emphasized the importance of regular maintenance. "Regular inspection of your tub drain can prevent bigger issues down the line," advises John Doe, a licensed plumber with over 15 years of experience.FAQs
1. How often should I check my bathtub drain?
It’s recommended to check your bathtub drain at least twice a year for clogs and leaks.
2. Can I use chemical drain cleaners?
While they can be effective, they may also damage your plumbing. It’s better to use a mechanical method first.
3. What if my drain is still leaking after replacement?
Check the installation and ensure all connections are tight. If problems persist, consult a professional plumber.
4. Is it necessary to turn off the water supply?
Yes, turn off the water supply to avoid any spills or leaks during the removal process.
5. How do I know if my drain needs replacing?
Signs include frequent clogs, visible rust, or leaks around the drain area.
6. Can I do this without professional help?
Absolutely! Many homeowners successfully complete this task with the right tools and guidance.
7. What if I lose a screw down the drain?
Use a magnet to retrieve it if possible. If not, you may need to remove the trap to retrieve it.
8. How long does the process take?
The entire process typically takes 30 minutes to an hour, depending on your experience.
9. Will I need to call a plumber after this?
If done correctly, you shouldn’t need to call a plumber unless you encounter unforeseen issues.
10. What type of drain should I replace with?
Choose a drain that matches the size and type of your current setup to ensure compatibility.
Random Reads