Ultimate Guide on How to Repair Rotted Wood: Step-by-Step Strategies

-
Quick Links:
- Introduction
- Understanding Wood Rot
- Identifying Rotted Wood
- Essential Tools and Materials
- Step-by-Step Repair Process
- Preventive Measures for Future Protection
- Case Studies of Successful Wood Repair
- Expert Insights on Wood Care
- FAQs
Introduction
Wood is a versatile and beautiful material used in various applications, from furniture to structural elements in homes. However, it is prone to rotting when exposed to moisture and other environmental factors. In this comprehensive guide, we will explore how to repair rotted wood effectively, ensuring that your wooden structures and items remain robust and aesthetically pleasing.
Understanding Wood Rot
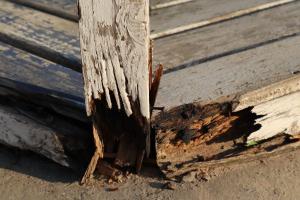
Wood rot is a natural process caused by fungi that decompose wood, leading to structural failure. There are two primary types of wood rot:
- Brown Rot: This type of rot breaks down the cellulose in wood, resulting in a brown, crumbly texture.
- White Rot: This type affects both cellulose and lignin, causing a softer, lighter wood that may appear whitish.
The Science Behind Wood Rot
Wood rot occurs when wood is exposed to moisture (above 20% humidity) and has insufficient ventilation. Fungi thrive in damp conditions, leading to the decay of wood over time.
Identifying Rotted Wood
Before embarking on repairs, it's crucial to identify the extent of the damage:
- Visual Inspection: Look for discoloration, soft spots, or a spongy texture.
- Sound Test: Tap the wood with a hammer; hollow sounds indicate rot.
- Moisture Meter: Use a moisture meter to check the wood's moisture content.
Essential Tools and Materials
Equipping yourself with the right tools and materials is vital for an effective repair:
- Chisel
- Saw (hand saw or jigsaw)
- Wood filler
- Sandpaper
- Wood preservative
- Paint or stain
- Safety gear (gloves, goggles)
Step-by-Step Repair Process
Follow these steps to repair rotted wood effectively:
Step 1: Assess the Damage
Determine how much wood is affected and whether it can be repaired or needs replacement.
Step 2: Remove the Rotted Wood
Use a chisel or saw to carefully cut away the rotted sections. Ensure you cut at least 1 inch beyond the rot.
Step 3: Treat the Area
Apply a wood preservative to prevent future rot. Allow it to dry completely.
Step 4: Fill the Gaps
Use a high-quality wood filler to fill in any voids left after removing the rot. Smooth it out with a putty knife.
Step 5: Sand and Finish
Once the filler has dried, sand the area until smooth. Then, repaint or stain to match the surrounding wood.
Preventive Measures for Future Protection
To prevent wood rot in the future, consider these tips:
- Ensure proper ventilation in areas with wood.
- Regularly inspect and maintain wooden structures.
- Use sealants and wood preservatives.
Case Studies of Successful Wood Repair
Let's take a look at a few real-world examples:
Case Study 1: Restoring a Rotted Deck
A homeowner discovered extensive rot in their wooden deck. By following a thorough repair process, including the use of preservatives, they ensured the deck's longevity.
Case Study 2: Reviving Antique Furniture
An antique dresser showed signs of rot. The owner opted for careful removal and restoration, which preserved its historical value while ensuring its functionality.
Expert Insights on Wood Care
Experts recommend regular inspections and prompt repairs to combat wood rot effectively. Additionally, understanding the environment in which wood is situated can help mitigate risks.
FAQs
1. What causes wood to rot?
Wood rot is primarily caused by moisture and fungal growth.
2. How can I tell if wood is rotted?
Check for discoloration, softness, and hollow sounds when tapped.
3. Can I repair wood rot myself?
Yes, with the right tools and knowledge, you can repair wood rot.
4. How long does wood filler last?
High-quality wood fillers can last for many years if applied properly.
5. Is wood rot dangerous?
Yes, if left untreated, wood rot can compromise structural integrity.
6. Can I use regular paint on repaired wood?
It’s best to use paint or stain that is suitable for exterior or treated wood.
7. How can I prevent wood rot?
Ensure proper ventilation, use wood preservatives, and perform regular maintenance.
8. What is the best wood filler for repairs?
Look for a two-part epoxy filler for best results in rotted areas.
9. Can I replace just a section of rotted wood?
Yes, replacing sections is often more cost-effective than replacing entire structures.
10. When should I consult a professional?
If the rot is extensive or affects structural components, consult a professional.
Conclusion
Repairing rotted wood is a manageable task with the right tools, techniques, and preventive measures. By understanding the causes of wood rot and following a systematic repair process, you can restore your wooden items and structures to their former glory.
External References
- Wood Magazine - How to Repair Wood Rot
- HGTV - How to Repair Wood Rot
- Fine Homebuilding - Repairing Wood Rot
Random Reads
- How to make audio sound better in audacity
- How to make blinds
- How to ping an ip address
- How to ping on mac os
- How to plane a door
- Unlocking world 4 super mario bros ds
- How to make google maps default iphone
- How to make godzilla in little alchemy
- Manage android home screen icons
- How to partition a thumb drive