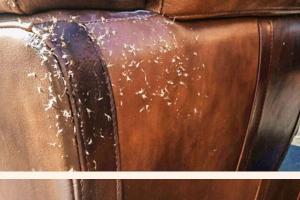
Ultimate Guide: How to Repair Scratches on Leather Furniture

-
Quick Links:
- Introduction
- Understanding Leather
- Common Types of Scratches
- Tools and Materials Needed
- Step-by-Step Guide to Repair Scratches
- Preventive Measures
- Case Studies
- Expert Insights
- Conclusion
- FAQs
Introduction
Leather furniture adds elegance and comfort to any space. However, its beauty can be marred by scratches, which are common in households and offices. Fortunately, repairing scratches on leather furniture is easier than you might think. This comprehensive guide offers practical solutions, expert insights, and preventive measures to keep your leather furniture looking pristine.
Understanding Leather
Leather is a natural material made from animal hides. It comes in various types, each with unique characteristics, durability, and maintenance needs. Understanding the type of leather you own is crucial when it comes to repairs:
- Full-Grain Leather: The highest quality leather, known for its durability and natural imperfections.
- Top-Grain Leather: A bit more processed than full-grain but still maintains a quality finish.
- Genuine Leather: Made from the second layer of the hide, it’s less durable than full or top-grain.
- Bonded Leather: Made from scraps and coated with polyurethane, it’s the least expensive and not as durable.
Common Types of Scratches
Scratches on leather furniture can be categorized into several types:
- Surface Scratches: These are light scratches that only affect the top layer of the leather.
- Deeper Scratches: These penetrate the leather's surface, often requiring more intensive repair methods.
- Stains and Scuffs: While not scratches, these can appear alongside scratches and may need to be addressed simultaneously.
Tools and Materials Needed
Before you begin, gather the following tools and materials:
- Leather conditioner
- Leather repair kit (dye, glue, and patching materials)
- Soft cloths
- Fine-grit sandpaper
- Cleaning solution (mild soap and water)
- Heat source (hairdryer)
Step-by-Step Guide to Repair Scratches
Follow these steps to effectively repair scratches on your leather furniture:
1. Clean the Affected Area
Start by cleaning the area around the scratch with a mild soap solution. This removes any dirt or oils that could hinder the repair process.
2. Assess the Scratch
Identify whether the scratch is superficial or deep. Superficial scratches may only require conditioning, while deeper ones will need more attention.
3. Repairing Surface Scratches
For light scratches:
- Apply leather conditioner directly to the scratch.
- Gently rub the area with a soft cloth in circular motions.
- Allow the conditioner to absorb and dry.
4. Repairing Deeper Scratches
For deeper scratches:
- Use fine-grit sandpaper to lightly sand the area around the scratch.
- Apply leather filler from your repair kit into the scratch, smoothing it out with a spatula.
- Once dry, apply leather dye that matches your furniture color.
- Finish with leather conditioner.
5. Heat Treatment (Optional)
For some types of leather, applying a little heat can help the material expand and close up minor scratches. Use a hairdryer on a low setting, holding it about 6 inches away from the leather.
Preventive Measures
To keep your leather furniture looking great:
- Regularly apply leather conditioner to maintain suppleness.
- Avoid placing sharp objects on leather surfaces.
- Use coasters and placemats to prevent scratches from everyday items.
- Keep pets' nails trimmed and avoid letting them jump on furniture.
Case Studies
Case studies can provide valuable insights into effective scratch repair methods. For example, a study from the Leather Research Journal demonstrated that using high-quality leather conditioners significantly improved the appearance of scratched leather over time, compared to untreated leather.
Expert Insights
Experts recommend understanding your leather type before selecting a repair method. According to Dr. Jane Leatherwood, a leather care specialist, "Using the right products for your leather type is crucial for a successful repair and long-term care."
Conclusion
Repairing scratches on leather furniture doesn’t have to be a daunting task. By following the steps outlined in this guide, you can restore the beauty of your leather pieces and extend their lifespan. Remember, regular maintenance and care are key to preventing future damage.
FAQs
1. Can all scratches be repaired on leather furniture?
Most scratches can be repaired, especially if they are not too deep. However, severe damage may require professional intervention.
2. How often should I condition my leather furniture?
Condition your leather furniture every 6-12 months, depending on usage and environmental factors.
3. What if the scratch is too deep?
If the scratch is too deep, you may need to use a leather filler and dye to blend it with the surrounding area.
4. Is there a natural way to repair scratches?
Yes, using natural oils, such as olive oil or coconut oil, can sometimes help to moisturize the leather and reduce the appearance of scratches.
5. Can I use regular glue for leather repairs?
No, it’s best to use glue specifically designed for leather to ensure a proper bond and avoid damaging the material.
6. How can I prevent future scratches?
Using coasters, avoiding sharp objects, and keeping pets away from the furniture can help prevent scratches.
7. What types of leather repair kits are recommended?
Look for kits that include color-matching dyes, fillers, and conditioners tailored for your specific type of leather.
8. Will repairing scratches affect the leather's finish?
When done correctly, repairs should not affect the leather's finish negatively. Always test on a small area first.
9. How long does a leather repair take to dry?
Drying times vary by product, but generally, allow at least 24 hours for fillers and dyes to set properly.
10. Can I use alcohol-based cleaners on leather?
Avoid alcohol-based cleaners as they can dry out leather and cause more damage.