Step-by-Step Guide to Replacing Your Bathroom Sink Like a Pro

-
Quick Links:
- Introduction
- Tools and Materials Needed
- Preparation Steps
- Removing the Old Sink
- Installing the New Sink
- Connecting Plumbing Fixtures
- Testing for Leaks and Proper Function
- Maintenance Tips for Your New Sink
- Case Studies
- Expert Insights
- FAQs
Introduction
Replacing a bathroom sink can seem like a daunting task, but with the right tools and a bit of guidance, it can be a straightforward DIY project. In this comprehensive guide, we will walk you through each step of the process, from choosing your new sink to ensuring it is installed correctly. Whether you're updating your bathroom for functionality or aesthetics, this guide will provide you with all the necessary information to achieve a professional result.
Tools and Materials Needed
Before getting started, gather the following tools and materials:
- Adjustable wrench
- Screwdriver set
- Pliers
- Plumber's putty
- Silicone caulk
- New bathroom sink
- New faucet (if needed)
- Towel or sponge
- Bucket (to catch any water)
Preparation Steps
Preparation is key in any DIY project. Follow these steps before you begin:
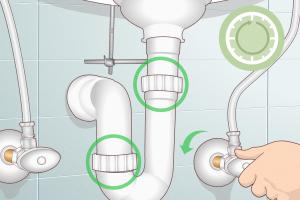
- Turn off the water supply to the sink. This is usually located under the sink.
- Clear the area around the sink to ensure you have enough space to work.
- Remove any items from the sink and countertop.
- Check the condition of plumbing fixtures and pipes; make any necessary repairs before installation.
Removing the Old Sink
Once you’re prepared, follow these steps to remove the old sink:
- Disconnect water supply lines using the adjustable wrench.
- Remove the drain trap by unscrewing the slip nuts with pliers.
- Unscrew any mounting clips or brackets holding the sink in place.
- Carefully lift the old sink out of the countertop, using a towel or sponge to catch any residual water.
Installing the New Sink
Now it's time to install your new sink. Follow these steps:
- Position the sink into the cutout in the countertop, ensuring a snug fit.
- Apply plumber's putty around the drain hole of the sink.
- Insert the drain assembly into the hole and secure it according to the manufacturer's instructions.
- Secure the sink with mounting clips or brackets as needed.
Connecting Plumbing Fixtures
Next, reconnect the plumbing:
- Reattach the drain trap, ensuring all connections are tight.
- Reconnect the water supply lines to the faucet.
- If replacing the faucet, follow the manufacturer's instructions for installation.
Testing for Leaks and Proper Function
After installation, it’s crucial to test for leaks:
- Turn on the water supply slowly.
- Check all connections for leaks and tighten as necessary.
- Run water through the sink and drain to ensure proper flow.
Maintenance Tips for Your New Sink
To ensure longevity and functionality of your new sink:
- Clean regularly to prevent buildup of soap and grime.
- Check for leaks periodically, especially after heavy use.
- Avoid harsh chemicals that can damage the sink's finish.
Case Studies
Many homeowners have successfully replaced their bathroom sinks and encountered both challenges and triumphs. Here are a few case studies:
Case Study 1: The DIY Enthusiast
John, a first-time DIYer, replaced his sink in under three hours. He faced some challenges with old plumbing but was able to adapt and complete the project successfully.
Case Study 2: The Renovation Expert
Susan, an experienced renovator, replaced two sinks in her home in one day. She shared tips on choosing the right materials and ensuring proper installation to avoid future issues.
Expert Insights
Experts recommend planning your project carefully, including selecting a sink that fits both your aesthetic and plumbing needs. Consulting with a plumber can also save time and potential issues down the line.
FAQs
- 1. How long does it take to replace a bathroom sink?
- It typically takes between 2 to 4 hours, depending on your experience and the complexity of the installation.
- 2. Do I need a plumber to replace my sink?
- While it’s possible to do it yourself, hiring a plumber can ensure proper installation and prevent future issues.
- 3. What type of sink should I choose?
- Consider factors like size, material, and style that match your bathroom's decor.
- 4. Can I replace the sink without replacing the faucet?
- Yes, you can replace just the sink, but ensure compatibility with existing plumbing.
- 5. What should I do if I encounter a leak?
- Turn off the water supply immediately and check all connections for tightness. If the leak persists, consult a plumber.
- 6. Is it better to use silicone or plumber’s putty?
- Use plumber's putty for drain assemblies and silicone caulk for sealing edges around the sink.
- 7. How do I know if my sink needs to be replaced?
- Signs include cracks, leaks, or significant wear and tear.
- 8. Can I install a vessel sink on my own?
- Yes, but you may need additional plumbing fittings for the drain and faucet.
- 9. What are the common mistakes when replacing a sink?
- Common mistakes include not checking for compatibility, failing to secure connections properly, and neglecting to test for leaks.
- 10. How can I ensure my new sink lasts?
- Regular maintenance, choosing high-quality materials, and ensuring proper installation will help your sink last longer.
Replacing a bathroom sink can be a rewarding project, allowing you to enhance both the functionality and aesthetics of your bathroom. With this detailed guide, you're well-equipped to tackle this DIY task with confidence.