Step-by-Step Guide: How to Replace a Doorbell Chime Easily

-
Quick Links:
- Introduction
- Understanding Doorbell Chimes
- Tools and Materials Needed
- Safety Precautions
- Step-by-Step Guide to Replacing a Doorbell Chime
- Common Issues and Solutions
- Expert Tips for a Successful Installation
- Conclusion
- FAQs
Introduction
Replacing a doorbell chime may seem like a daunting task, but it is a straightforward project that can enhance your home's functionality and aesthetic. Whether your current chime is outdated, broken, or you simply want to upgrade to a more modern design, this guide will walk you through the entire process step-by-step.
Understanding Doorbell Chimes
Before diving into the replacement process, it's essential to understand how doorbell chimes work. A typical doorbell system consists of three main components:
- The Button: This is the part guests press to ring the doorbell.
- The Chime Unit: This unit produces the sound when the button is pressed.
- The Transformer: This component converts the high voltage from your home into a low voltage suitable for the doorbell system.
Most doorbell chimes operate on low voltage (usually between 8-24 volts), making them relatively safe to work with. However, understanding the components can help troubleshoot any issues or determine which type of chime you want to install.
Tools and Materials Needed
Gathering the right tools and materials is crucial for a successful replacement. Here’s a comprehensive list:
- New doorbell chime
- Screwdriver (flathead and Phillips)
- Wire cutters/strippers
- Voltage tester
- Electrical tape
- Drill (if installing a new chime location)
- Measuring tape
Safety Precautions
Safety should always be your top priority when working with electrical components. Here are some essential precautions:
- Turn Off Power: Always turn off the power to the doorbell circuit at the breaker box before starting work.
- Use a Voltage Tester: Check that the power is off by using a voltage tester on the wires.
- Wear Safety Gear: Consider wearing gloves and safety glasses to protect yourself from any accidents.
Step-by-Step Guide to Replacing a Doorbell Chime
Follow these steps to replace your doorbell chime:
Step 1: Remove the Old Chime
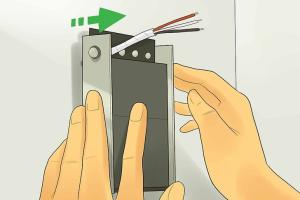
Start by unscrewing the old chime from the wall. Carefully pull it away to access the wires connected to it. Take note of how the wires are connected, as you'll need to replicate this setup with the new chime.
Step 2: Disconnect the Wires
Using your screwdriver, disconnect the wires from the old chime. If you're unsure about which wire goes where, take a picture for reference.
Step 3: Prepare the New Chime
Unbox your new doorbell chime and read the manufacturer's instructions. This will help you understand any specific installation requirements.
Step 4: Connect the Wires to the New Chime
Attach the wires to the new chime according to the instructions provided. Typically, there will be two or three terminals for connection. Make sure to secure them tightly.
Step 5: Mount the New Chime
Secure the new chime to the wall using the screws provided. Ensure it is level and flush with the surface.
Step 6: Restore Power and Test
Turn the power back on at the breaker box and test your new chime by pressing the doorbell button. Ensure that the sound is clear and that the chime functions properly.
Common Issues and Solutions
After installing your new chime, you may encounter some common issues. Here are solutions to address these:
- Issue: Chime does not sound.
Solution: Check that the wires are connected securely and that the power is on. - Issue: Chime sounds continuously.
Solution: This could indicate a stuck button or a wiring short circuit. - Issue: Poor sound quality.
Solution: Ensure the chime is mounted firmly and check for any obstructions.
Expert Tips for a Successful Installation
To ensure a smooth installation process, consider the following expert tips:
- Choose a chime that matches your home’s decor for a cohesive look.
- Consider a wireless doorbell chime for easier installation and flexibility.
- Label the wires before disconnecting them to avoid confusion during reinstallation.
- Regularly check the doorbell system for any maintenance needs.
Conclusion
Replacing a doorbell chime is an achievable task that can significantly improve your home's entryway experience. With the right tools, safety precautions, and a step-by-step approach, you'll be able to install a new chime with ease. Enjoy the satisfaction of enhancing your home while welcoming guests with a pleasant sound!
FAQs
1. How do I know if my doorbell chime needs replacing?
If your chime is not functioning correctly, has a poor sound quality, or is outdated, it may be time for a replacement.
2. Can I replace a doorbell chime myself?
Yes, replacing a doorbell chime is a DIY-friendly project that most homeowners can complete with basic tools.
3. What type of doorbell chime should I buy?
Choose a doorbell chime that fits your style and meets the electrical requirements of your existing system.
4. What safety measures should I take?
Always turn off the power to the doorbell circuit and use a voltage tester to ensure safety while working.
5. Do I need an electrician for this task?
Most homeowners can replace their doorbell chime without an electrician, but if you’re uncomfortable with electrical work, consider hiring a professional.
6. How long does it take to replace a doorbell chime?
The process typically takes about 30 minutes to an hour, depending on your experience level.
7. Can I install a wireless doorbell chime?
Yes, wireless doorbell chimes are easy to install and do not require complex wiring.
8. What tools do I need for the replacement?
You will need screwdrivers, wire cutters/strippers, a voltage tester, and electrical tape.
9. How can I troubleshoot my doorbell chime?
Check the wiring connections, ensure the power is on, and test the button for functionality.
10. Are there any maintenance tips for doorbell chimes?
Regularly check connections, clean the chime to remove dust, and test the system periodically to ensure proper functioning.