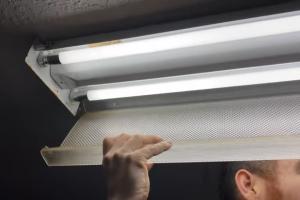
Essential Guide to Replacing Fluorescent Lighting: Steps, Tips, and Insights

-
Quick Links:
- Introduction
- Why Replace Fluorescent Lighting?
- Tools and Materials Needed
- Safety Considerations
- Step-by-Step Guide to Replacement
- Tips for Success
- Case Studies
- Expert Insights
- Conclusion
- FAQs
Introduction
Fluorescent lighting has been a popular choice for homes and businesses for decades due to its energy efficiency and longevity. However, as technology has progressed, many are turning to LED lighting for its enhanced benefits. This comprehensive guide will walk you through the process of replacing fluorescent lighting, highlighting the benefits, safety considerations, and tips for a successful upgrade.
Why Replace Fluorescent Lighting?
Fluorescent lights are gradually becoming outdated for several reasons:
- Energy Efficiency: LED lights consume less power than fluorescent bulbs, leading to lower electricity bills.
- Longevity: LEDs last significantly longer than fluorescent bulbs, reducing the frequency of replacements.
- Quality of Light: LED lighting offers better color rendering and brightness levels compared to fluorescent options.
- Environmental Impact: LEDs are free from toxic substances like mercury, making them safer for the environment.
Tools and Materials Needed
Before beginning your project, gather the following tools and materials:
- LED replacement bulbs
- Screwdriver (flathead and Phillips)
- Wire strippers
- Voltage tester
- Safety goggles
- Gloves
Safety Considerations
Safety should always come first when dealing with electrical components. Follow these precautions:
- Always turn off the power at the circuit breaker before starting any work.
- Use a voltage tester to ensure that the power is off.
- Wear safety goggles and gloves to protect yourself from debris and electrical shock.
Step-by-Step Guide to Replacement
Follow these detailed steps to successfully replace your fluorescent lighting:
Step 1: Turn Off the Power
Locate your circuit breaker and turn off the power to the lighting fixture. Use a voltage tester to confirm that the power is off.
Step 2: Remove the Old Fluorescent Bulbs
Carefully remove the old fluorescent bulbs by rotating them and pulling them out of the fixture.
Step 3: Take Out the Fluorescent Fixtures
Unscrew the fluorescent fixture from the ceiling or wall. Note how the existing wiring is connected.
Step 4: Disconnect the Wiring
Using wire strippers, disconnect the wiring connected to the fluorescent fixture. Ensure that you properly label the wires for reconnection.
Step 5: Install the New LED Fixture
Connect the new LED fixture following the manufacturer's instructions. Ensure that the wiring is secure and matches the previous setup.
Step 6: Insert the LED Bulbs
Place the new LED bulbs into the fixture, ensuring they fit snugly. Follow any specific instructions provided with the LED bulbs.
Step 7: Turn the Power Back On
Return to the circuit breaker and turn the power back on. Test the new LED lights to ensure they work correctly.
Tips for Success
- Choose the right LED bulbs based on lumens and color temperature for your space.
- Consider using smart LED bulbs for added functionality and convenience.
- Replace multiple fixtures at once for greater energy savings.
Case Studies
Several organizations and homeowners have successfully upgraded from fluorescent to LED lighting:
Case Study 1: Office Building Upgrade
An office building replaced 200 fluorescent fixtures with LED equivalents, resulting in a 60% reduction in energy costs and an improved work environment.
Case Study 2: Home Renovation
A homeowner upgraded their kitchen lighting from fluorescent to LED, enhancing brightness and reducing energy consumption, while also increasing the home’s value.
Expert Insights
Industry experts recommend evaluating your lighting needs based on the space and usage. Proper placement and the right type of LED lights can greatly enhance the ambiance and functionality of any room.
Conclusion
Replacing fluorescent lighting with LED alternatives is a wise investment that offers numerous benefits, including energy savings, longer lifespan, and improved quality of light. By following the steps outlined in this guide, you can successfully upgrade your lighting and enjoy a brighter, more efficient space.
FAQs
1. Can I replace fluorescent bulbs with LED bulbs directly?
It depends on the type of fluorescent fixture you have. Some fixtures require a complete replacement, while others can accommodate direct LED replacements.
2. Are LED lights more expensive than fluorescent lights?
LED bulbs typically have a higher initial cost, but they last longer and consume less energy, leading to savings over time.
3. How do I know if my fixture is compatible with LED bulbs?
Check the packaging of the LED bulbs for compatibility information or consult the fixture manufacturer.
4. What is the average lifespan of LED bulbs?
LED bulbs can last anywhere from 15,000 to 50,000 hours, significantly longer than traditional fluorescent bulbs.
5. Do LED lights flicker?
Some low-quality LED bulbs may flicker, but high-quality options are designed to provide stable lighting without flicker.
6. Can I dim LED lights?
Yes, but you need to ensure that you have dimmable LED bulbs and compatible dimmer switches.
7. Is there any maintenance required for LED lights?
LED lights require minimal maintenance; however, keeping fixtures clean can help maximize their efficiency.
8. Are LED lights safe for the environment?
Yes, LED lights are free of hazardous materials like mercury and are more energy-efficient, reducing carbon emissions.
9. How do I dispose of old fluorescent bulbs?
Fluorescent bulbs contain mercury and should be disposed of at a designated hazardous waste facility.
10. Will changing to LED lighting affect my electricity bill?
Yes, switching to LED lighting can significantly reduce your electricity bill due to lower energy consumption.