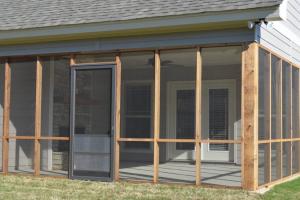
How to Screen a Porch: The Complete DIY Guide for Homeowners

-
Quick Links:
- Introduction
- Benefits of Screening a Porch
- Materials Needed for Screening
- Step-by-Step Guide to Screening a Porch
- Case Studies and Real-Life Examples
- Expert Insights and Tips
- Common Mistakes to Avoid
- Maintenance Tips for Screened Porches
- FAQs
- Conclusion
Introduction
Screening a porch is a popular home improvement project that not only enhances your outdoor living space but also provides protection from insects and harsh weather. In this comprehensive guide, we will explore everything you need to know about screening a porch, from the benefits to the step-by-step installation process. Whether you're a seasoned DIY enthusiast or a first-time homeowner, this guide will equip you with the knowledge to create a comfortable and inviting screened porch.
Benefits of Screening a Porch
Screening your porch comes with a variety of benefits:
- Insect Protection: A screened porch keeps pesky bugs at bay, allowing you to enjoy your outdoor space without interruption.
- Enhanced Comfort: Screens provide ventilation while blocking out wind and rain, making your porch a comfortable retreat.
- Versatile Use: A screened porch can serve as a dining area, playroom, or simply a relaxing space to unwind.
- Increased Home Value: Adding a screened porch can enhance your home’s resale value by improving curb appeal and functionality.
Materials Needed for Screening
Before you start your project, gather the necessary materials:
- Screws: Choose rust-resistant screws for durability.
- Screening Material: Options include fiberglass, aluminum, and pet-resistant screens.
- Wood or Metal Frames: Depending on your porch style, you may need wood or metal to create the framing.
- Tools: Essential tools include a staple gun, utility knife, measuring tape, and level.
Step-by-Step Guide to Screening a Porch
Step 1: Measure Your Porch
Start by measuring the dimensions of your porch. Accurately measure the height and width of each section you plan to screen.
Step 2: Choose Your Screening Material
Based on your needs and budget, select the right screening material. Fiberglass is affordable and easy to work with, while aluminum is more durable.
Step 3: Build or Prepare Frames
If you’re building frames from scratch, cut your wood or metal to size according to your measurements. Ensure the frames are sturdy and fit snugly in place.
Step 4: Attach the Screening Material
Using a staple gun, attach the screening material to the frames. Make sure it’s taut to avoid sagging.
Step 5: Install the Frames
Securely mount the frames to your porch structure, ensuring they fit tightly to prevent bugs from entering.
Step 6: Finishing Touches
Add any necessary trim or caulking to seal gaps and enhance the appearance of your screened porch.
Case Studies and Real-Life Examples
Many homeowners have transformed their porches into vibrant living spaces through screening. For instance, the Johnsons in North Carolina screened their porch to create a bug-free zone for family gatherings, increasing their outdoor usage by 50%.
In another case, the Smith family in Florida utilized pet-resistant screening to protect their porch while allowing their pets to enjoy the outdoors without worry.
Expert Insights and Tips
According to home improvement experts, one of the critical aspects of screening a porch is ensuring proper ventilation. A well-ventilated porch can significantly enhance comfort during the summer months.
Additionally, consider the climate in your area. In regions with heavy rainfall, using waterproof screening material can prolong the life of your screened porch.
Common Mistakes to Avoid
- Neglecting Measurements: Always double-check your measurements to avoid costly mistakes.
- Using Inferior Materials: Opt for quality materials that withstand weather conditions and wear.
- Ignoring Ventilation: Ensure your design allows for adequate airflow to prevent humidity buildup.
Maintenance Tips for Screened Porches
To keep your screened porch in top condition:
- Regularly check for tears or damages in the screening material and repair them promptly.
- Clean the screens periodically with a mild soap solution to prevent dirt buildup.
- Inspect the frames for any signs of rot or rust, and make necessary repairs.
FAQs
1. How much does it cost to screen a porch?
Costs vary widely based on size and materials, but homeowners can expect to spend between $500 to $2,500.
2. Can I screen an existing porch?
Yes, existing porches can be screened with the right materials and framing techniques.
3. What type of screen is best for pets?
Pet-resistant screens made from heavier materials are ideal for families with pets.
4. How do I prevent moisture buildup in my screened porch?
Ensure proper ventilation and consider using dehumidifiers during humid months.
5. Can I install a screen door on my screened porch?
Yes, screen doors can be added to provide easy access while keeping insects out.
6. What is the best time of year to screen a porch?
Spring and early summer are ideal for screening porches to enjoy throughout the warmer months.
7. How often should I replace the screening material?
With proper care, screening material can last up to 10 years, but it should be inspected regularly for damage.
8. Can I paint the frames of my screened porch?
Yes, painting or staining the frames can enhance aesthetics and protect the wood from the elements.
9. Are there any building codes for screening a porch?
It's essential to check local building codes to ensure compliance before beginning your project.
10. How can I make my screened porch more private?
Consider adding curtains, decorative screens, or climbing plants for added privacy.
Conclusion
Screening a porch is a rewarding project that enhances your outdoor living space while providing protection and comfort. By following this comprehensive guide, you'll be well-equipped to screen your porch efficiently and effectively. Enjoy your new outdoor oasis!
Random Reads