Ultimate Guide on How to Test a Battery Charger for Optimal Performance

-
Quick Links:
- Introduction
- Why Test Your Battery Charger?
- Tools Needed for Testing
- Step 1: Visual Inspection
- Step 2: Testing Methods
- Case Study: Real-World Testing Scenarios
- Troubleshooting Common Issues
- Expert Insights on Charger Maintenance
- Battery Charger Statistics
- FAQs
Introduction
Testing a battery charger is essential for ensuring your batteries are charged efficiently and safely. Whether you use a charger for automotive batteries, power tools, or household gadgets, understanding how to test your charger can save money and prevent hazards. In this guide, we'll break down the process into simple steps, provide tools you need, and address common issues you might face.Why Test Your Battery Charger?
Testing your battery charger can reveal issues that might not be immediately obvious. Here are a few reasons why it's vital: 1. **Safety**: Faulty chargers can overcharge batteries, leading to leaks or even explosions. 2. **Performance**: A poorly functioning charger can lead to insufficient charging, reducing battery life and efficiency. 3. **Cost Savings**: Regular testing can help identify problems before they require expensive repairs or replacements.Tools Needed for Testing
Before you start testing your battery charger, gather the necessary tools: - **Multimeter**: Essential for measuring voltage and current. - **Battery Tester**: Specific for checking battery health. - **Load Tester**: Useful for testing the charger under load. - **Screwdriver Set**: For opening charger cases if needed. - **Safety Gear**: Gloves and goggles for protection.Step 1: Visual Inspection
Begin with a thorough visual inspection of the charger. Here’s what to look for: - **Cables and Connectors**: Check for frays, cuts, or corrosion. - **Physical Damage**: Look for dents, cracks, or loose parts. - **Indicator Lights**: Ensure that all lights work as intended when the charger is plugged in.Step 2: Testing Methods
Testing your battery charger involves several methods, each with specific steps.Method 1: Voltage Test
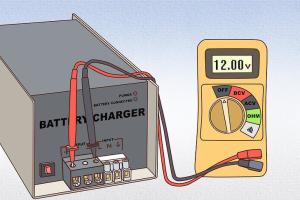
1. Set your multimeter to the DC voltage setting. 2. Plug in the charger and connect the multimeter probes to the charger's output terminals. 3. Check the reading—ensure it matches the charger's specifications.Method 2: Current Test
1. Set the multimeter to the current setting. 2. Connect the charger to a battery and place the multimeter in series with the battery. 3. Measure the current flowing into the battery; it should be within the designated range.Method 3: Load Test
1. Connect the charger to a battery and apply a load (using a load tester). 2. Monitor how the charger performs under the load; fluctuations indicate issues.Case Study: Real-World Testing Scenarios
Let’s explore a case study involving a popular automotive battery charger. **Scenario**: A user reported that their charger was not fully charging their car battery. **Testing Steps**: 1. Conducted a visual inspection—found exposed wires. 2. Performed voltage and current tests—readings were below the manufacturer's specifications. 3. Resolved the issue by replacing the charging cables, improving performance significantly.Troubleshooting Common Issues
If your tests reveal issues, here are common problems and solutions: - **Charger Not Turning On**: Check the power source and fuses. - **Overheating**: Ensure proper ventilation and avoid prolonged use. - **Insufficient Charge**: Inspect connections and replace faulty components.Expert Insights on Charger Maintenance
Experts recommend regular maintenance checks to prolong the life of your battery charger. Here are their top tips: 1. **Keep it Clean**: Dust and debris can cause overheating. 2. **Store Properly**: Avoid extreme temperatures. 3. **Follow Manufacturer Instructions**: Always adhere to guidelines specific to your charger type.Battery Charger Statistics
Recent studies show that nearly 20% of battery-related failures are due to faulty chargers. By implementing regular testing and maintenance, users can extend the lifespan of both chargers and batteries.FAQs
1. How do I know if my battery charger is working?
Use a multimeter to check the voltage and current output against the specifications.
2. Can I test my charger without a multimeter?
While possible, a multimeter provides the most accurate and reliable results.
3. What should I do if my charger is faulty?
Consider repairing it or replacing it, depending on the extent of the damage.
4. How often should I test my battery charger?
It's advisable to test your charger at least once every six months.
5. Are there different testing methods for different types of chargers?
Yes, methods may vary based on whether the charger is for NiMH, Li-ion, or lead-acid batteries.
6. Is it safe to use a damaged charger?
No, using a damaged charger can pose safety risks including fire hazards.
7. What indicators show that my charger needs repair?
Signs include inconsistent charging, overheating, or physical damage.
8. Can a battery charger be repaired?
Yes, many chargers can be repaired, especially if the problem is with cables or connectors.
9. What is the lifespan of a typical battery charger?
On average, a well-maintained battery charger can last 5-10 years.
10. Where can I find a professional to test my charger?
Look for local electronics repair shops or battery specialists.
Random Reads
- Play ps3 games on ps4
- Photoshop arrows
- How to remove hardwood floor
- How to remove paint from skin
- How to trim video samsung galaxy
- How to repair corrupted bios firmware
- Mastering dog taming breeding minecraft
- How to measure kitchen cabinets
- How to measure remaining propane
- How to hide youtube subscriber count