Mastering Fuse Testing: A Comprehensive Guide to Using Multimeters

-
Quick Links:
- Introduction
- Understanding Fuses
- What is a Multimeter?
- Preparation Before Testing
- Step-by-Step Guide to Testing a Fuse with a Multimeter
- Common Types of Fuses
- Safety Tips for Fuse Testing
- Case Studies and Real-World Examples
- Expert Insights
- FAQs
Introduction
Testing a fuse is a fundamental skill for anyone working with electrical systems. Fuses protect electrical circuits by interrupting the flow of current when it exceeds safe levels. Using a multimeter to test fuses can save you time and help you diagnose electrical issues effectively. In this comprehensive guide, we will walk you through the process of testing a fuse with a multimeter, exploring the tools involved, safety precautions, and common pitfalls to avoid.Understanding Fuses
Fuses are safety devices designed to protect electrical circuits from overloads and short circuits. They work by melting a metal strip inside the fuse when excessive current flows through it, thereby breaking the circuit. This section will delve into the different types of fuses, how they work, and when to replace them.Types of Fuses
- Glass Tube Fuses: Common in household appliances.
- Blade Fuses: Widely used in automotive applications.
- Ceramic Fuses: Suitable for high-voltage applications.
- Resettable Fuses: Can be reset after tripping.
What is a Multimeter?
A multimeter is an essential tool for anyone involved in electrical work. It measures voltage, current, and resistance, making it invaluable for troubleshooting electrical issues. This section will cover the different types of multimeters, their features, and how to use them.Types of Multimeters
- Analog Multimeters: Use a needle gauge to display readings.
- Digital Multimeters: Provide numerical readings and are easier to read.
- Smart Multimeters: Connect to smartphones for advanced features.
Preparation Before Testing
Before you begin testing a fuse, it’s crucial to prepare properly. This includes gathering your tools, ensuring safety precautions, and understanding the circuit you are working with.Tools Needed
- Digital or Analog Multimeter
- Safety Gloves
- Screwdriver (if needed for access)
Safety Precautions
- Always disconnect power before testing.
- Wear insulated gloves to protect against electric shock.
- Use properly rated tools for your specific application.
Step-by-Step Guide to Testing a Fuse with a Multimeter
Testing a fuse with a multimeter is a straightforward process. Follow these steps to ensure accurate results:Step 1: Disconnect Power
Ensure that the circuit is powered off. This is crucial to avoid electric shock.Step 2: Remove the Fuse
If necessary, use a screwdriver to access the fuse holder and carefully remove the fuse.Step 3: Set Up Your Multimeter
Set your multimeter to the continuity or resistance setting. A continuity setting is usually represented by a sound wave symbol or a diode icon.Step 4: Test the Fuse
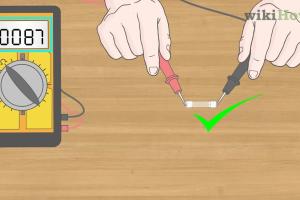
Touch the multimeter probes to each end of the fuse. If the multimeter beeps or shows a reading close to zero, the fuse is functional. If it shows infinite resistance or "OL," the fuse is blown.Step 5: Reinstall the Fuse
If the fuse is functional, reinstall it back into the holder. If it’s blown, replace it with a new fuse of the same rating.Common Types of Fuses
Understanding the different types of fuses can help you choose the correct one for your needs. Here’s a detailed look at some common fuse types:Glass Tube Fuses
These are often used in household appliances and are easily recognizable due to their transparent casing.Blade Fuses
Blade fuses are common in automobiles and come in various amperage ratings. They are easy to replace and can be quickly identified.Ceramic Fuses
These fuses are designed for high voltage and high current applications. They are more robust than glass fuses and offer better performance in extreme conditions.Safety Tips for Fuse Testing
Testing fuses involves handling electrical components, so safety is paramount. Here are some essential safety tips:- Always assume the circuit is live until proven otherwise.
- Use insulated tools and wear protective gear.
- Do not attempt to repair a blown fuse; replace it instead.
Case Studies and Real-World Examples
To illustrate the importance of testing fuses accurately, let’s look at a couple of case studies.Case Study 1: Household Circuit Issues
In a household, a blown fuse can lead to complete power loss in a specific area. By testing the fuse with a multimeter, homeowners can quickly identify the issue without calling in an electrician.Case Study 2: Automotive Troubleshooting
In cars, a blown blade fuse can prevent critical systems from functioning. A simple multimeter test can save drivers from unnecessary repairs and costs.Expert Insights
Experts in electrical engineering emphasize the importance of routine maintenance checks. Regularly testing fuses can help prevent equipment failure and increase safety.FAQs
1. How do I know if a fuse is blown?
If your multimeter shows infinite resistance or an "OL" reading, the fuse is blown.2. Can I test a fuse while it’s still connected?
It’s advisable to test a fuse only after disconnecting power to ensure safety.3. What should I do if the fuse is blown?
Replace the blown fuse with one of the same rating; never use a higher-rated fuse.4. Is it safe to use a multimeter?
Yes, as long as you follow safety precautions and ensure the circuit is powered off.5. Can I use an analog multimeter instead of a digital one?
Yes, both types can be used effectively to test fuses.6. What does it mean if my multimeter beeps?
A beep usually indicates continuity, meaning the fuse is functioning properly.7. How often should I test fuses?
Regular checks are recommended, especially in older installations or where equipment is frequently used.8. What are the signs of a faulty fuse?
Signs include flickering lights, appliances not working, or visible damage to the fuse.9. Can I repair a blown fuse?
No, it’s safer and more reliable to replace a blown fuse.10. Do fuses have a shelf life?
Fuses can degrade over time, so it’s best to replace them if they are old or show signs of wear.Random Reads