Complete Guide to Wiring a Doorbell: Step-by-Step Instructions

-
Quick Links:
- 1. Introduction
- 2. Tools Required
- 3. Types of Doorbells
- 4. Safety First
- 5. Step-by-Step Guide to Wiring a Doorbell
- 6. Troubleshooting Common Issues
- 7. Expert Insights and Tips
- 8. Real-World Case Studies
- 9. FAQs
1. Introduction
Wiring a doorbell may seem daunting, but with the right guidance, it can be a straightforward DIY project. Whether you are replacing an old doorbell or installing a new one, understanding the basic principles of electrical wiring is essential. This guide will walk you through everything you need to know about wiring a doorbell, ensuring you can do so safely and effectively.
2. Tools Required
Before you start, gather the necessary tools to make the process smooth:
- Wire stripper
- Screwdriver (flat and Phillips)
- Power drill (if needed)
- Voltage tester
- Electrical tape
- Wire connectors
- Level (optional)
3. Types of Doorbells
Understanding the types of doorbells available can help you choose the right one for your home. Here are the two main types:
- Wired Doorbells: These are connected directly to your home’s electrical system and typically require more installation work.
- Wireless Doorbells: These operate on batteries and use radio signals to communicate with a receiver. They are easier to install but may require battery replacements.
4. Safety First
Safety is paramount when working with electricity. Here are some safety tips to follow:
- Always turn off the power at the circuit breaker before starting any electrical work.
- Use insulated tools to avoid electrical shocks.
- Double-check that the power is off using a voltage tester before touching any wires.
5. Step-by-Step Guide to Wiring a Doorbell
Step 1: Turn Off the Power
Locate your circuit breaker and turn off the power to the doorbell circuit. This is crucial for your safety.
Step 2: Remove the Old Doorbell (if applicable)
If you are replacing an old doorbell, carefully remove it by unscrewing it from the wall and disconnecting the wires.
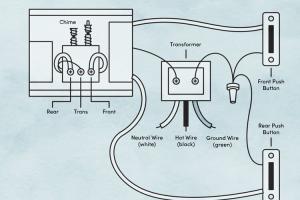
Step 3: Install the Transformer
Wired doorbells typically require a transformer to convert household voltage to a lower voltage suitable for the doorbell. Install the transformer near your main electrical panel:
- Connect the primary side of the transformer to your household wiring.
- Secure the transformer to the wall using screws.
Step 4: Run the Wires
Run the low-voltage wires from the transformer to the doorbell location:
- Use a drill to create holes if necessary.
- Be sure to avoid running wires near high-voltage lines.
Step 5: Connect the Doorbell
At the doorbell, connect the wires to the terminals, usually marked as "front" and "trans" or "back":
- Use wire connectors to secure the connections.
- Wrap the connections with electrical tape for safety.
Step 6: Mount the Doorbell
Secure the doorbell to the wall using screws and a level to ensure it is straight.
Step 7: Test the Doorbell
Restore power at the circuit breaker and test the doorbell by pressing the button. If it doesn’t work, double-check the connections.
6. Troubleshooting Common Issues
If your doorbell isn’t working, consider these troubleshooting tips:
- Check Power Supply: Ensure the transformer is receiving power.
- Inspect Connections: Make sure all wire connections are secure and insulated.
- Examine the Doorbell: If it’s a wired doorbell, the chime could be faulty.
7. Expert Insights and Tips
Experts recommend paying attention to the following for a successful installation:
- Choose a doorbell with a good warranty for peace of mind.
- Consider smart doorbells for added functionality like video and intercom features.
8. Real-World Case Studies
Here are a couple of case studies on doorbell wiring:
- Case Study 1: A homeowner replaced their old wired doorbell with a smart doorbell, discovering improved functionality and ease of installation.
- Case Study 2: An electrician detailed how using a transformer with a higher wattage improved the performance of the doorbell chime.
9. FAQs
1. What voltage does a doorbell need?
Most doorbells operate on 8-24 volts, which is why a transformer is necessary for wired systems.
2. Can I install a doorbell without a transformer?
No, wired doorbells require a transformer to step down the voltage. Wireless doorbells do not require one.
3. How do I know if my doorbell is bad?
If your doorbell doesn’t ring when pressed and you’ve checked the power supply, the doorbell unit may be faulty.
4. How long does it take to wire a doorbell?
Most installations can be completed within an hour for someone with basic electrical skills.
5. Can I use any doorbell transformer?
Ensure the transformer voltage matches the doorbell specifications; typically, a 16V transformer is safe for most doorbells.
6. What if I have multiple doorbells?
Multiple doorbells can be wired to the same transformer, but ensure the transformer can handle the load.
7. What is a chime?
A chime is the device that produces sound when the doorbell button is pressed.
8. Do I need a permit to install a doorbell?
Generally, no permits are needed for doorbell installations, but check local regulations for any specific requirements.
9. What should I do if my doorbell makes a buzzing sound?
A buzzing sound often indicates a loose connection or an issue with the transformer.
10. Are there battery-operated doorbells?
Yes, battery-operated doorbells are available and are often easier to install without any wiring.
Random Reads
- How to open zip rar 7z archives android
- How to jump in dark souls
- How to insulate a shed
- How to treat and preserve wood with oil
- How to treat carpet burns
- How to make an ico file on windows and mac
- How to wrap text in word
- How to remove paint from skin
- Update wifi alexa
- Update your phone number on amazon