Mastering Snapping in Inkscape: Easy Steps to Optimize Your Design Workflow

-
Quick Links:
- 1. Introduction
- 2. What is Snapping?
- 3. Why Use Snapping in Inkscape?
- 4. How to Turn On Snapping in Inkscape
- 5. Snapping Options Explained
- 6. Working with Snapping: Tips and Tricks
- 7. Real-World Examples of Snapping in Action
- 8. Troubleshooting Snapping Issues
- 9. Expert Insights on Snapping Techniques
- 10. FAQs
1. Introduction
Inkscape is a powerful vector graphics editor that is widely used by graphic designers, illustrators, and artists around the world. One of the most essential features of Inkscape that enhances the design workflow is the snapping feature. This article will guide you through the easy steps to turn on and effectively use snapping in Inkscape, allowing you to create precise and professional-quality designs with ease.
2. What is Snapping?
Snapping is a feature that allows objects in Inkscape to align or "snap" to specific points, such as grids, guidelines, and other objects. This feature is crucial for ensuring that elements are perfectly aligned and spaced, which is especially important in graphic design and illustration.
3. Why Use Snapping in Inkscape?
- Precision: Snapping ensures that your designs are accurate and aligned.
- Efficiency: Reduces the time spent adjusting elements manually.
- Professional Quality: Helps create polished and cohesive designs.
- Flexibility: Easily toggle snapping on and off based on your design needs.
4. How to Turn On Snapping in Inkscape
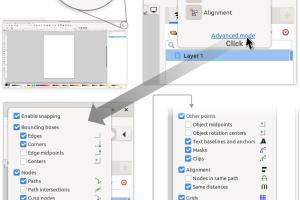
Turning on snapping in Inkscape is a straightforward process. Follow these simple steps:
- Open Inkscape and create a new document.
- Navigate to the top menu and click on View.
- From the dropdown, select Snap or press Shift + % on your keyboard.
- In the Snap Preferences dialog, check the boxes for the snapping options you want to enable, such as Snap to grid, Snap to guides, and Snap to objects.
Once you have enabled the desired snapping options, you will notice that objects will snap to the specified points as you move them around the canvas.
5. Snapping Options Explained
Inkscape offers several snapping options to enhance your design process. Here’s an overview:
- Snap to Grid: Align objects to a grid for uniform spacing.
- Snap to Guides: Use guides to position elements accurately.
- Snap to Nodes: Align objects to the nodes of other paths.
- Snap to Bounding Box: Objects snap to the edges of their bounding boxes.
- Snap to Center: Align objects to the center of other objects.
6. Working with Snapping: Tips and Tricks
To maximize the effectiveness of snapping in Inkscape, consider the following tips:
- Use Grid and Guides: Set up a grid and use guides to help with alignment.
- Toggle Snapping: Use the snapping toggle button to switch snapping on and off as needed.
- Zoom In: Zooming in can help you align objects more precisely.
- Combine Snapping Options: Use multiple snapping options for maximum accuracy.
7. Real-World Examples of Snapping in Action
Snapping is especially useful in various design scenarios. Here are some examples:
- Logo Design: Snapping ensures elements are aligned and equally spaced.
- Web Design: Aligning buttons and images for a clean layout.
- Illustrations: Creating detailed artwork with precise lines and shapes.
8. Troubleshooting Snapping Issues
If you encounter issues with snapping in Inkscape, consider these troubleshooting steps:
- Ensure snapping is enabled in the preferences.
- Check your grid and guide settings.
- Restart Inkscape to resolve any glitches.
9. Expert Insights on Snapping Techniques
Graphic design experts emphasize the importance of mastering snapping in Inkscape. Here are some insights:
- Utilizing snapping can significantly speed up your workflow.
- Understanding how to leverage different snapping options can enhance your design quality.
- Regular practice with snapping will improve your overall design precision.
10. FAQs
Q1: What is the purpose of snapping in Inkscape?
A1: Snapping helps align objects accurately and efficiently within the design workspace.
Q2: Can I customize snapping options?
A2: Yes, you can customize snapping settings to fit your specific design needs in the Snap Preferences dialog.
Q3: How do I turn off snapping temporarily?
A3: You can toggle snapping on and off using the snapping toggle button in the toolbar or by pressing Shift + %.
Q4: Why is snapping useful for beginners?
A4: Snapping helps beginners create clean and professional designs without having to manually align elements.
Q5: Does snapping affect the final output of my design?
A5: No, snapping is a design aid and does not affect the exported output of your design.
Q6: Can I use snapping with imported images?
A6: Yes, snapping can be used with imported images in Inkscape for alignment purposes.
Q7: Is there a way to snap to specific angles?
A7: Yes, you can use the rotation snapping options to align objects at specific angles.
Q8: How can I see the snapping guides in my workspace?
A8: Snapping guides will be visible when you enable the snapping feature and have guides set up in your document.
Q9: What should I do if snapping isn’t working?
A9: Check if snapping is enabled in the settings and ensure that your guides or grids are properly set up.
Q10: Are there any keyboard shortcuts for snapping?
A10: Yes, you can use Shift + % to toggle snapping on and off quickly.
Random Reads