2 Simple Ways to Print a Document From Your Computer: A Complete Guide

-
Quick Links:
- Introduction
- Method 1: Printing Using a USB Connection
- Method 2: Printing Wirelessly
- Troubleshooting Common Printing Issues
- Case Studies
- Expert Insights
- FAQs
Introduction
Printing documents from your computer has become an essential task in our daily lives, whether it’s for work, school, or personal projects. Understanding how to print efficiently can save you time and reduce stress. In this guide, we will explore two simple methods for printing documents from your computer, along with troubleshooting tips and expert insights.
Method 1: Printing Using a USB Connection
Step 1: Connect Your Printer
To start printing via a USB connection, follow these steps:
- Ensure your printer is powered on and properly set up.
- Locate the USB cable that came with your printer.
- Plug one end of the USB cable into the printer and the other end into an available USB port on your computer.
Step 2: Install Printer Drivers
Most modern operating systems will automatically detect your printer and install the necessary drivers. However, if this doesn’t happen, visit the manufacturer’s website to download the latest drivers for your specific model.
Step 3: Print Your Document
Once the printer is connected and drivers are installed, you can print your documents:
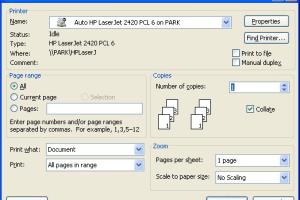
- Open the document you wish to print.
- Click on ‘File’ in the top menu, then select ‘Print’.
- Choose your printer from the list of available devices.
- Adjust the settings (like number of copies, page range, etc.) as needed.
- Click ‘Print’ to send your document to the printer.
Method 2: Printing Wirelessly
Step 1: Connect Your Printer to Wi-Fi
Ensure your wireless printer is connected to the same Wi-Fi network as your computer. This is typically done via the printer's control panel. Refer to the printer’s manual for specific instructions.
Step 2: Add the Printer to Your Computer
On Windows:
- Go to ‘Settings’ > ‘Devices’ > ‘Printers & Scanners’.
- Click ‘Add a printer or scanner’.
- Select your printer from the list and click ‘Add device’.
On Mac:
- Open ‘System Preferences’ > ‘Printers & Scanners’.
- Click the ‘+’ button to add a printer.
- Select your printer and click ‘Add’.
Step 3: Print Your Document
Follow the same steps as in Method 1 to print your document wirelessly.
Troubleshooting Common Printing Issues
Even with the right setup, printing problems can occur. Here are some common issues and their solutions:
- Printer Not Found: Ensure both the printer and computer are connected to the same Wi-Fi network. Restart both devices if necessary.
- Poor Print Quality: Check the ink levels and perform a printer cleaning if necessary.
- Document Stuck in Queue: Restart the print spooler service or clear the print queue from the printer settings.
Case Studies
To better understand the impact of efficient printing methods, we will explore a few case studies:
Case Study 1: Office Productivity
A local marketing firm implemented a wireless printing solution, reducing the time spent on printing tasks by 30%. Employees reported increased productivity and fewer interruptions.
Case Study 2: Educational Setting
A school district adopted USB printing stations to streamline print jobs. This led to a 40% decrease in printing errors and improved resource allocation.
Expert Insights
Experts recommend keeping your printer drivers updated and regularly checking ink levels to avoid common printing issues. Additionally, utilizing cloud printing services can enhance flexibility and efficiency.
FAQs
- Q: Can I print without a USB cable?
A: Yes, if your printer supports wireless printing. - Q: What should I do if my printer is offline?
A: Check your connections and restart the printer and computer. - Q: How can I improve print quality?
A: Regularly clean the printer and check ink levels. - Q: Can I print from my phone or tablet?
A: Yes, many printers support mobile printing via apps or Wi-Fi. - Q: Is it better to print in color or black and white?
A: It depends on the document type; use black and white for text-heavy documents. - Q: Why does my printer take so long to print?
A: This could be due to network issues or high-quality print settings. - Q: How can I set up a printer for multiple users?
A: Connect the printer to a network and add it to each user’s computer settings. - Q: What types of documents can I print?
A: You can print documents, images, and presentations. - Q: How do I cancel a print job?
A: Open the print queue from your computer and select ‘Cancel’ for the job. - Q: What if my printer is not responding?
A: Restart both the printer and computer, and check the connections.
Random Reads
- What xd really means in the digital world
- Unlock rosalina mario kart wii
- Link to specific time youtube video
- Routing network traffic tor
- Restore samsung notes
- How to show hidden files and folders on a mac
- Mastering the art of snaking a drain at home
- How to write html code
- How to hang pergola lights
- How to hang hook ceiling