Step-by-Step Guide to Building a Shed from Scratch: Expert Instructions

-
Quick Links:
- Introduction
- Planning Your Shed
- Materials You'll Need
- Building the Foundation
- Framing the Shed
- Installing the Roof
- Adding Siding
- Doors and Windows
- Finishing the Interior
- Case Studies
- FAQs
- Conclusion
Introduction
Building a shed from scratch is a rewarding project that can provide additional storage space and enhance your property’s value. Whether you need a place to store tools, gardening supplies, or outdoor equipment, constructing your own shed allows for customization to suit your needs. In this guide, we'll cover everything from planning to execution, ensuring you have the knowledge to build a shed that meets your specifications.
Planning Your Shed
Before diving into the construction, careful planning is essential. Here are the steps to consider:
- Determine Purpose: What will you use the shed for? Storage, workshop, or perhaps a garden retreat?
- Check Local Regulations: Ensure compliance with zoning laws and obtain necessary permits.
- Choose a Location: Select a level area with good drainage, away from trees and structures.
- Design Your Shed: Sketch a design that includes size, shape, and layout.
Materials You'll Need
Gather the following materials before starting construction:
- Pressure-treated lumber for the foundation
- Framing lumber (2x4s or 2x6s)
- Plywood for the floor and walls
- Roofing materials (shingles or metal sheets)
- Siding material (vinyl, wood, or metal)
- Doors and windows
- Paint or wood stain for finishing
Building the Foundation
The foundation is crucial for the longevity of your shed. Here’s how to build a solid foundation:
- Mark the Area: Use stakes and string to outline the shed's footprint.
- Excavate: Dig out the area to a depth of 4-6 inches.
- Add Gravel: Fill the area with gravel for drainage.
- Construct the Frame: Use pressure-treated lumber to frame the base, ensuring it is square.
Framing the Shed
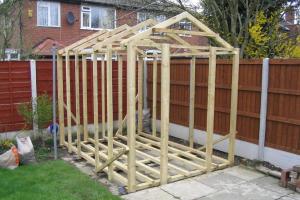
Framing is the skeleton of your shed. Follow these steps:
- Build Wall Frames: Create frames for the walls using 2x4s. Ensure to include spaces for windows and doors.
- Raise the Walls: Secure the wall frames onto the foundation using nails or screws.
- Install Temporary Bracing: Use braces to keep the walls upright until the roof is installed.
Installing the Roof
The roof protects your shed from the elements. Here’s how to install it:
- Build Roof Trusses: Create trusses from 2x4s based on your design.
- Attach Trusses: Secure the trusses at the top of the walls.
- Cover with Plywood: Lay plywood sheets on top for a solid base.
- Add Roofing Material: Install shingles or metal roofing to complete the roof.
Adding Siding
Siding adds durability and aesthetic appeal. Follow these steps:
- Choose Your Siding: Select siding that matches your home or suits your style.
- Cut to Size: Measure and cut the siding to fit the wall frames.
- Attach Siding: Use nails or screws to secure the siding to the frames.
Doors and Windows
Doors and windows enhance functionality and light. Here’s how to install them:
- Choose Door and Window Styles: Decide on the type and size of doors and windows.
- Cut Openings: Cut openings in the wall frames for installation.
- Install Doors and Windows: Follow manufacturer instructions for securing them in place.
Finishing the Interior
Once the exterior is complete, focus on the interior:
- Install Shelving: Use brackets and wood to create shelves for organization.
- Paint Walls: A fresh coat of paint can make the interior inviting.
- Electrical Work: If needed, hire an electrician for any wiring or lighting installations.
Case Studies
Real-world examples can inspire your project. Here are a few case studies of successful shed builds:
- The DIY Garden Shed: A couple built a 10x12 garden shed using reclaimed materials; they saved costs and reduced waste.
- The Tool Shed Transformation: A homeowner transformed an old storage shed into a functional workshop with insulation and electricity.
FAQs
1. How long does it take to build a shed from scratch?
It typically takes 1-2 weeks, depending on size and complexity.
2. Do I need a permit to build a shed?
Yes, permits are often required. Check your local regulations.
3. What is the best material for shed siding?
Vinyl, wood, and metal are popular options, each with pros and cons.
4. Can I build a shed without prior experience?
Yes, with careful planning and following instructions, even beginners can succeed.
5. How do I ensure my shed is waterproof?
Use quality roofing materials and seal joints properly.
6. What foundation is best for a shed?
A gravel or concrete foundation is recommended for stability and drainage.
7. How much does it cost to build a shed?
Costs vary widely, typically ranging from $500 to $5,000 based on size and materials.
8. Should I insulate my shed?
If you plan to use it year-round, insulation is beneficial.
9. What tools do I need to build a shed?
Basic tools include a hammer, saw, drill, measuring tape, and level.
10. How can I personalize my shed?
Consider custom paint colors, window boxes, and decorative hardware.
Conclusion
Building a shed from scratch can be a fulfilling project that adds value and functionality to your property. With careful planning, the right materials, and a commitment to following these steps, you can create a structure that meets your needs perfectly. Don’t forget to enjoy the process and take pride in your craftsmanship!
Random Reads
- Save youtube subtitles
- Scan documents to pdf
- Mastering life360
- Mastering light timers guide
- Quickly add page numbers adobe indesign
- 14 brilliant ways to get free gems in dragon city
- How to protect a cracked phone screen
- How to puncture the seal on caulk
- How to repair windows 7
- How to repair water damaged iphone