Ultimate Guide to Checking Ethernet Cables: With or Without a Tester

-
Quick Links:
- Introduction
- Understanding Ethernet Cables
- Common Issues with Ethernet Cables
- Checking Ethernet Cables With a Tester
- Checking Ethernet Cables Without a Tester
- Case Studies
- Expert Insights
- Conclusion
- FAQs
Introduction
In our increasingly digital world, a strong and reliable internet connection is essential. Ethernet cables are a critical component of this connectivity, yet they are often overlooked when troubleshooting network issues. Whether you're a tech novice or an experienced IT professional, knowing how to check an Ethernet cable can save you time and prevent headaches.
Understanding Ethernet Cables
Ethernet cables, also known as network cables, are used to connect devices to a local area network (LAN). The most common types include:
- Cat5e: Supports speeds up to 1 Gbps.
- Cat6: Supports speeds up to 10 Gbps over short distances.
- Cat6a: Enhanced version of Cat6, suitable for longer distances.
- Cat7: Supports speeds up to 10 Gbps with improved shielding.
Understanding these types is crucial, as different scenarios may require different cables.
Common Issues with Ethernet Cables
Before diving into how to check your cables, it's vital to understand some common issues:
- Physical Damage: Cuts or frays can disrupt connectivity.
- Loose Connectors: Poor connections may cause intermittent issues.
- Interference: Nearby power lines or devices can interfere with signal quality.
- Improper Installation: Incorrect wiring can lead to significant problems.
Checking Ethernet Cables With a Tester
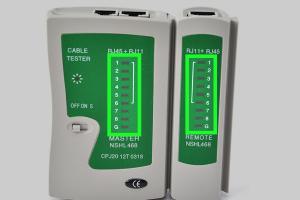
Using a cable tester is the most reliable way to check your Ethernet cables. Here’s a step-by-step guide:
Step 1: Gather Your Equipment
You’ll need:
- Cable Tester
- Ethernet Cables
- Power Source (if required by the tester)
Step 2: Connect Cables to the Tester
Plug one end of the Ethernet cable into the main unit of the tester and the other end into the remote unit.
Step 3: Power On the Tester
Turn on the tester. Most models will indicate whether the cable is functioning correctly through lights and sound.
Step 4: Interpret the Results
Refer to the tester’s manual to understand the results. Generally, a successful test will show a sequence of lights indicating the cable is intact.
Step 5: Troubleshoot as Necessary
If the test fails, check for physical damage or try using a different cable.
Checking Ethernet Cables Without a Tester
If you don’t have a cable tester, there are still ways to check your Ethernet cables:
Method 1: Visual Inspection
Inspect the cable for any visible signs of damage. Look for:
- Frayed ends
- Cracks in the casing
- Loose connectors
Method 2: Swap Test
Replace the suspected cable with a known working cable. If the problem resolves, the original cable may be faulty.
Method 3: Use a Multimeter
A multimeter can help check for continuity in the cables:
- Set the multimeter to the continuity setting.
- Touch the probes to the connectors on each end of the cable.
- If it beeps or shows continuity, the cable is likely intact.
Case Studies
Understanding practical scenarios can greatly enhance your troubleshooting skills. Here are a couple of case studies:
Case Study 1: Office Network Failure
In a small office, the internet suddenly dropped. After checking the router, it was determined that the issue lay with an Ethernet cable connecting the router to a switch. A quick visual inspection revealed a frayed end, prompting a replacement and restoring connectivity.
Case Study 2: Home Setup
A homeowner was experiencing slow internet speeds. They swapped out their Ethernet cable for a newer Cat6 cable, resulting in a noticeable speed increase. This illustrates the importance of using the right cable for your internet speed requirements.
Expert Insights
We spoke with networking expert Jane Doe, who shared valuable insights:
"Regularly checking your Ethernet cables can prevent network issues before they start. Always ensure your cables are rated for the speeds you need and store them properly to avoid damage."
Conclusion
Knowing how to check your Ethernet cables, whether with a tester or through alternative methods, is essential for maintaining a reliable internet connection. Regular checks can save you time and frustration in the long run.
FAQs
1. How often should I check my Ethernet cables?
It's advisable to check them regularly, especially if you experience connectivity issues.
2. Can a damaged Ethernet cable affect my internet speed?
Yes, a damaged cable can significantly slow down your connection or result in intermittent connectivity.
3. What should I do if my Ethernet cable fails the test?
Replace the cable with a new one, and check if the issue persists.
4. Is there a difference between Cat5e and Cat6 cables?
Yes, Cat6 cables support higher speeds and frequencies compared to Cat5e.
5. How can I prevent my Ethernet cables from getting damaged?
Store them properly, avoid sharp bends, and keep them away from heat sources.
6. Can I use a standard multimeter to check an Ethernet cable?
Yes, a multimeter can check for continuity, but it won't provide detailed diagnostics.
7. Are there any software tools to diagnose Ethernet issues?
Yes, network diagnostic tools can help identify issues in your setup beyond physical cable checks.
8. How can I tell if I need a new cable?
If you experience consistent connectivity problems and the cable shows signs of wear, it’s time for a replacement.
9. Can I use an Ethernet cable outdoors?
Only if it is rated for outdoor use, as regular cables may degrade when exposed to the elements.
10. What is the maximum length for Ethernet cables?
The maximum length for effective data transmission for most Ethernet cables is typically 100 meters (328 feet).